There is such a beautiful idea how to sew easter chicken made of flavors fabric.
We need, such a pattern pattern

now, you need to prepare a patchwork fabric (flashing with each other, disappear, stroke)

now, crumbish our canvas

some details, stitching among themselves

wings are sewn into manual, here is the look from the inside

for the body of the chicken and bottom, make a layer with Vatin

that's ready, more detailed description, you can see here.

I think there is nothing easier: enough to take old, unnecessary things or some pieces of fabric, flaps, prepare patterns to connect it all together. The chicken can be made multicolored by using different fabrics or give preference to a single color solution.
Easter chicken is a wonderful Easter symbol that can be sewn with your own hands.
I really liked the idea of \u200b\u200ban aromatic toy, for lovers attic dolls

In order to sew such a chicken, we need the following materials:
we fold the cloth in half and translate the drawing on it.

We spend on the typewriter along the contour, we leave a small hole at the bottom and turn:


tinging the coffee maker and dry

From lace make scallop and glit

Paint the chicken with acrylic paints, as it allows fantasy

Our Easter chicken is ready :)
How to make other Easter gifts, you can see here
Chicken with a pocket for eggs, or so-called Easter chicken.
the chicken is sewn from the fabric X / B, it will also need a rope or a laugh, a tape (for strings), yarn or threads Moulin for scallop and tail.
By template, cut the part, one large (we will lay it in half) and two wings. The wings are sewn to the body, the threads are on the place of the scallop and the tail, the bottom of the chicken bend and flash, insert the cords. The beak from the triangle of the fabric stitched in half.


P.S. I do not know what kind of chicken has a chicken for Easter, because the lamb was chained in the Old Testament, and the New Testament Easter has lost its strength (since the holiday symbolized the victim of Christ, which has already happened when he came to our world and He died for us) and the replacement of Christ in the evening.
In order to sew an Easter chicken, you must first prepare milets. His, by the way, can be done on your own sketch. Draw the contour of the chicken and then do two patterns on the fabric you prepare for this craft (it can be like a stente simple colorful fabric, and the loskutka is more expensive and elegant matter - pick up your desire).
Wings, or rather paper patterns, for the chicken it is necessary to draw separately. Pattern for them is as separate.
The wings and scallops of the chicken are better made from the tissue of another color than the whole chicken.
For a more visible pattern of patterns and sewing Easter chicken-baskets, you can see photos with step-by-step execution of this craft (see photo below):


In order to billaries; The basket chicken was more dense and kept the shape, it should be attached between two parts of each sides of the chicken more dense fabric.
Easter chicken with a pocket for eggs. Tissue color to take bright with a pattern of tones.


Shoots a chicken path. The fabric must be applied to the phlizelin. Read more, how to sew a chicken with patchwork cloth See here
The egg has long been a familiar Easter symbol, and Chickens on Easter- Natural continuation of this topic. Have you had to keep in your hands this small fluffy miracle of the sunny beam color? It is impossible to remain indifferent, so it is not surprising that we meet the chickens everywhere among the Easter decorations.
There are a lot of ways to manufacture them, and something new is added every year. Materials can be the most different - threads, fabric, paper, felt. You can choose what you are closer to you, and your children will be happy to take part in such creativity.
The easiest way make chicks for easterfrom paper. The material is simple, cheap and affordable, always in the house available, especially if there are children. It can be a figurine, a gift box, an application in the form of a panel or postcard. Finally, for kids, cute pictures can be printed on the printer - they will gladly paint them.
The same drawings can serve as stencils for appliqué, if you cut them into the components. And for the application you can use not only colored paper, no less beautiful will turn out. For a paper stencil, you can make a few printouts: Some cut on templates, and onto others paste details from colored paper. By the way, color printer paper is also quite suitable for this.
Small postcards will work well if you take a multi-colored block for notes. Something will serve as a background, and from those that yellow, cut out the appliqué details. Similarly, packaging for gifts is made. Just when printing the contour should be two, looking at different directions with a distance between them.

As always, skillful handles will be applied to empty tubes from toilet paper. If there are such tubes from the foil, they can simply be cut to the sharp knife into pieces of the desired length. We have a yellow paper tube, for the wings, we cut the square diagonally, we will make small details from red paper for scallop and beak.
It remains to glue everything in the right order. It is best to use a glue pencil for this. Even the thinnest paper does not spilt from it, and there is no danger to blame the glue if you are cracked together with the kids. Funny chickens on Easter do it yourselfit turns out of cardboard trays for eggs.
You need to carefully cut cells. For each box, we will need two of them, so that a company of five chicks will be obtained from the standard tray. Coloring the cells you have paint: acrylic, gouache or watercolor, trying to cardboard at the same time not splash. We give work to dry.
Connect the details of the box, placing a strip of paper on one side. Decorate the toy with the beak and paws of red. Inside, you can put a painted egg, candy or small cookies. In general, what will allow to put inside the size of the resulting product. Eye to our poultrys are drawing a felt-tip pen or stick made of black and white paper.

Chickens on Easter
Easy enough to manufacture and chicken from threads do it yourself for Easter. From the materials, we will need a cardboard for two circles, for which we will wrap the threads, the threads themselves (suitable acrylic, wool or semide of the middle thickness, naturally, yellow color), as well as red paper for keyboard. Circles make the size we need, differ in size.
The little pomponchik will be head, and the one is a bigger torso. Threads are better not to regret so that the pumps come out are not slightly, but quite dense. In detail the manufacturing process of this you will find in the appropriate master class. In principle, a cute chick is obtained from one pompon.
The main thing, then decorate it with a fantasy. Bows, hats corresponding to the shape box in the form of halves a broken shell or other entourage - and your bird will acquire uniqueness and individuality. You can spend your crafts on the chandelier or on branches and put such a bouquet on the table.

Make chicks for easter
Always enjoy popular chickens from Fetra to EasterAnd it is not surprising, because the work of such work is even for inexperienced craftsmen, just to be able to keep the scissors and needle in their hands.
Variations There are many. For example, a mum chicken with a baby in a basket looks great. The pattern is given, so you need to print and cut the partitions of parts or simply copy them by increasing the size to the desired, directly from the screen using tracing or loose paper. Then cut the details from the felt, we estimate them on the facial
side, slightly retreating from the edge. First we will produce small detail: scallop and paws, filling them with a synthet or hollofiber, and then stitched large, inserting small inwards insertion during stitching. With kids can be performed from the fabric.

And as a substitute for fetra, thin viscose napkins are suitable, which are sold in business stores and are quite inexpensive. Pieces also look good.
The body shape can be different: a circle, a triangle with rounded edges, an oval or egg. Before sewing half figures, enter the front side of the entire finish: aprons, wings, bows, grass, and so on that you decide to use, and also make eyes.
They can be made independently using beads, butchers, beads, although ready-made eyes are usually in needlework stores. Also make your eyes when knit chickens for Easter. Slowing halves, leave a small hole for packing. Felt or viscose napkins are not too elastic, so you should not make a tight pack, just to hint on the volume. Such a bird will serve as an decoration of the house, it will be a good gift to a child, can be used as a keychain on a school scale. The chick from the pumps or felt can be placed inside the native egg.

Knit chickens for Easter
And finally knitted chickens on Easter - This is the highest pilot. It is usually knitted from quite thin threads, so that the hook or needles need to be taken appropriate, so a person for whom it is at least the first can be taken for such a job, and it has some knitting skills.
In principle, if you had to knit the cap, then you will cope with a spherical torso and head, since you can imagine how to make and add, the complexity is only in a very small product size. But with legs and other small details to cope very difficult because of the small number of loops and the thickness of the tool and material. Exit - in mixed technique.
That is, if you are not sure that we can cope with the legs, connect the head and the torso in the form of balls with knitting or crochet, you can also perform wings, but make paws, for example, from a core (fluffy) wire or ordinary wire, which is wicked by threads , Gofrobumaga on glue or teip-ribbon of suitable color.
For beak and scallop felt fit, however, the crochet and they are not so difficult. Believe me, if you do everything carefully, the appearance of the toy does not suffer from it. It looks much worse. Roughly conjugated limbs look, if they lack their skills.

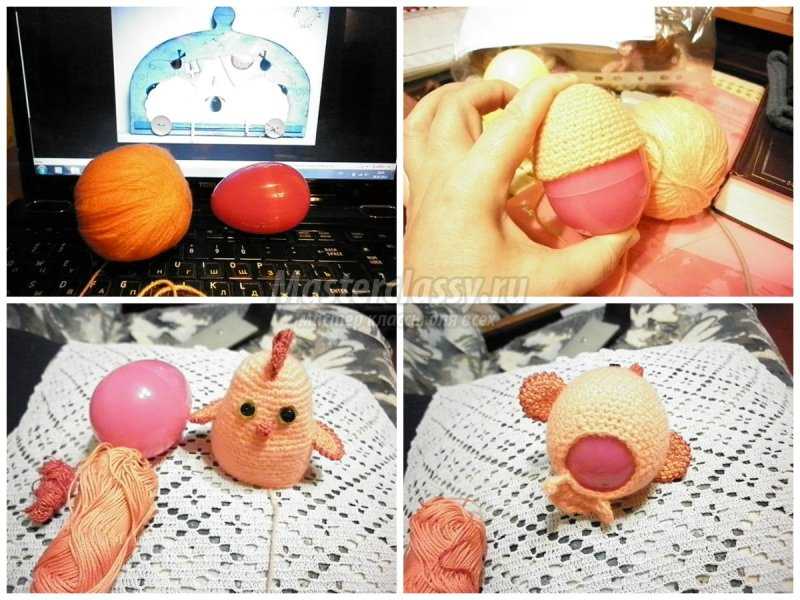
Amigurum Chickens for Easter: Scheme
Crochet Chickens on Easterit is best to start with a fairly simple model to, as they say, fill your hand. We will only make the hatching chick with the remnants of the shell proposed by Master Anastasia. It consists of a head and torso bound by one principle, but differ in size. We will also have to raise the upper and lower shells, wings and keyboards.
For the manufacture, we will need materials:
threads for knitting yellow, white and some red, preferably one thickness
factory eye or beads suitable size
sintepon, silicone or other filler
and tools:
needle for stitching
adhesive gun or instant glue
hook corresponding to the yarn by number (better so that it is thick no more than 2.5)

We begin to confuse from the head and body. First of all, with a ring with amigurums from six columns without Nakid. The sequence of its execution you can see in the photo. This method of starting knitting allows you to tightly pull the circle, so that the holes are practically not left. Knit chickens on Easter Crochet Stakes without Nakid. In the second row above each art. B / N.
insert two tbsp. B / N.
In the third row, the increase in each second Art. B / N.
In the fourth row, the purchase in each third Art. B / N.
Fifth row: in every fourth st .b / n, they see two
To the sixth row, our knitting width is 30 columns, the additions for four rows do not do (6-10 rows knit the column over the column)
Eleventh Row: Groove in every fifth column

Twelfth row: in each sixth column we spread two of one on one on the thirteenth to the twentieth row inclusively knit evenly without add-ons of 42 columns in each row, and with a twenty-first row, we make a slumber, tiered through one column: in 21 rows knit five columns, and then the seventh, leaving the sixth unlimited
Further, descending: four and rolling, three and so on, while in twenty-fourth row we will not have 18 loops. Through the resulting hole tightly fill the filler figurine, after which we continue to reduce the number of columns until six of them remain in the 26 row. Finally pulling the hole, the thread will be fixed, and the tip will be pushing it into the chick.

Others like others like others Chickens Amigurums for Easter, Scheme The additions will be the same. May differ in the design of the paws, details, but the principle is the same. The wings knit in the form of a mug from Colza amigurum with one increase in each column in the second row. Third and fourth rows: 12 tbsp. B / N without add-ons. The finished circle is folded in half and insert over the edge, connecting it into one. Do not cut a thread, but leave a sufficient tail to use it to sew the wing.

Top knit shell, making an increase from the second on the sixth row, similar to how we knitted. There should be 30 tbsp. b / n. The seventh rod knit, alternating the groups of columns with the capes and without Nakid. They can be three or six loops. The edge is thus obtained by gear, uneven.
Similarly, the lower shell fit, but it is more in height than the top, so we make an increase, until 42 columns are formed in the seventh row. The following four knit evenly, without add-ons, and end with a toothed edge. For a keyboard, we make a ring out of six art., In the second row, we evenly add two more and then they see again eight st. B / N, leaving the tip for sewing. The assembly remains: to sew beaks and wings, as well as glue the head and torso shells.

Maybe knitted chickens on Easterto be made on the needles. The difference is small. Since the cloth in this case turns out to be more elastic than the crochet, it does not require such a rigid diagram of the additions and lifting.
The height of the row is less here, so we reduce or add a loop through a row or even less often. If the threads are thin, then you can finally pull up not six loopes, but from six to ten. But the beginning of knitting is also conducted from the ring amigurum, only we recruit eight loops, and then distribute them to four knitting needles.
If the thread is quite thick, you can start with six, distributing them on three spokes. The gear can be obtained like this: knit in the face, tied two facial together and follows the Nakid. A hole is formed under the navigation, and if the canvas be reset, the edge will be toothed. Another beautiful Easter idea is to make
At Easter in the house should be smart and festive. Decorate the house to Easter will help bright colorful crafts made with children. Any spring theme is suitable: flowers, birds, chickens, but most of all, of course - Easter eggs, holiday symbol.
Easter wreath of packaging from eggs
Do not throw out cardboard packaging from eggs - it will come in handy to make a very beautiful floral wreath for Easter!

You need a ring cut from a flat sheet of cardboard - it will serve as the basis for a wreath. From packing from the eggs, cut a cell, form flowers from them and give petals a variety of form. Some flowers are well done double or even triple, putting flowers in each other in each other.

Now paint the resulting flowers in bright colors. They can be not only monophonic, but also with overflows and specks.

Coloring the basis in the color of greenery and after drying, we attach flowers to a wreath with a plow glue.

In the middle of the wreath you can hang egg cut from cardboard on a ribbon.
Paper floral garlands
A wonderful decoration of the house to the psak will serve garlands from paper colors.

For the manufacture of greenery it is the most convenient to print the proposed template directly on the colored paper.

Now the sheet needs to be collapsed in half and carefully cut the items to get symmetrical stems and leaves.

For cutting colors, the template is not needed - you can use the usual glass. Cut the circles from the paper of different colors, we turn together four times and make cuts to get petals. Do not forget to stick a contrasting middle.

Now we glue the flowers to the petals and get ready-made garlands chain links. We begin to dock them with each other, adding leaves in the connection places.

Ready garlands can be sprinkled around the room - the festive mood of the house is provided!

Simple flower garland
Another version of flower garland-lianas is even easier, kids will easily cope with it.

As the basis, simple green paper strips are taken. In one end, they are fixed to the painted cardboard roller (suitable roller from paper towels). At the same distance to the ribbons, simple five-point flowers are glued.


The finished garlands are suspended on the threads and become a beautiful spring design of the group in kindergarten.
Easter crafts from plastic spoons
Very original crafts for Easter can be done using conventional plastic spoons.

Using cotton disk, paper and plastic spoon, you can make this funny cock, which will decorate the flower pot.

Having wrapped in a spoon in colored paper, we get a cheerful yellow chicken.

So that the paper does not slip, the spoon must be deceived by glue.

Using only the upper part of the spoon, on the form resembling an egg, you can make a whole Easter wreath with bright colorful eggs. And you can place eggs in the convention of Izi in the nest.

Chickens in the nest
From the roller from toilet paper and a piece of cardboard will be cute and funny chicken. Step-by-step manual instructions are shown in the photo below.


Paper Drugs
From disposable paper plates with scissors and pairs of markers can be made of cute naive chickens.

The plate must be bent in half and make cuts, as shown in the photo. It turns out a stand for future crafts. Then the face of the product is given shape: the feathers on the tail are cut, the head is made round.


With the help of a stapler, we attach the beak and scallop, draw the wing and decorate the chicken-row ornament.
Multicolored birds
Birds can also be a symbol of Easter and Vince, because at this time they return from warm countries. To perform these colorful applications, children will be able to themselves, but with the preparation of parts it may need help.

Details for multicolored birds can be printed directly on the colored paper from this template:


The video content called "" was posted by the author of the "Adventures of David" for 4 years. Tomorrow, he looked at 44, 607 times. I liked the video 266 and did not like 39 users.
Description:
Mastery crafts for Easter. Cheerful paper chickens can be an excellent gift for Easter for your friends and loved ones. For the manufacture of Easter choke, we will need:
Materials: A4 sheet bright yellow, orange leaf A4, leaf A; Pale yellow, a piece of white paper 3x1.5, a slice of colored paper 5x5, a ruler, scissors, a simple pencil, a pencil glue, a black felt-tumbler or eyes for toys.
In our videos, it is shown in detail how to make a craft to Easter in the form of a chicken. By the way, the paper does not have to be yellow, if you take some kind of penny paper, the chicken will turn out even more cheerful. Do not be afraid to fantasize.
And it is not clear why only chickens and bunnies make to Easter. We recommend not to limit your fantasy and make, for example, beautiful rainbow giraffes from paper.
See here -
By the way, why not make the easter crafts in the form of heart snails. After all, handicrafts with your own hands as a gift close - it is primarily a small recognition in love. And on Easter day it will be more than appropriate.
Look -
Well, we helped you with ideas what hand to do in Easter?
If not, then subscribe to our channel so as not to miss new video.
Timlet for video crafts for Easter:
00:23 - from the yellow sheet A4 cut the square
00:25 - From the resulting square twist the cone
00:27 - We look at the place of gluing
00:29 - Bearing
00:34 - cut off excess paper
00:35 - The basis for crafts for Easter is ready
00:37 - Sut off the short side of the sheet three strips 2 cm width
00:39 - twist strips to rolls with a pencil
00:44 - glue strips among themselves. This is tail.
00:53 - Printe the tail of a piece of paper on Easter
00:59 - Cut a strip of 6 cm wide
01:01 - fold in half
01:02 - Cut the wings
01:08 - Printe the wings to the body
01: 16- Cut two strips with a width of 2.5 cm
01: 18- fold strips of harmonica. These are the paws.
01: 24- glue your paws to the body
01: 29- cut the rectangle 4x8 cm
01:31 - fold in half and cut out two mug
01:35 - Circles stick to the legs
01:39 - Cut another rectangle 4x8 cm
01:41 - fold in half and cut out two parts for scallop
01: 46- Bonding among themselves only the edges of the details
01: 54- Dress on the scallop
01: 56- cut off the strip of 1.5x13 cm
01:59 - We divide into two parts
02:01 - From a longer part, we make a beard
02:05 - Printe a beard
02:10 - from the second part we make the beak
02:15 - glit to the beard
02:20 - cut out the basis for the eyes
02:23 - glit to the head
02: 26- glue eyes or draw felt-tip
02:31 - Cut the decoration
02:34 - Printed on a chicken
02: 35 - Paper Crafts for Easter Ready Source Youtube.com/Watch?v\u003day35B9-z4ck
This video footage can watch online, and also download absolutely free and without registration in almost any video format: MP4, X-FLV, 3GPP and so on. You only need to click on the button "Download" at the top of the site and move the slider to the right. In addition, you can see other educational video about Lepk From plasticine, salt dough, clay and so on from the author of the adventure of David, which are also posted on our website, as well as other similar educational videos about modeling, crafts, materials, art and the like. If you need a mobile version of this video, then our site has a modern adaptive design and suitable for any mobile devices: tablets, smartphones, phones and so on.
Do not forget to add learning and developing videos for children and adults in bookmarks! To even go back to viewing.
A small chick will become the main decoration of the Easter table, an excellent key chain and a wonderful reminder of the pleasant moments of the holiday. And if you make a whole family of chickens, they will definitely eclipse at the school exhibition.
Today I will show you how to make two chickens: Newborn(and therefore very surprised), and older, on short thin legs.
To make a newborn Easter chicken, you will need:
- yellow threads (acrylic, cotton, wool),
- round artificial eyes (or two black beads),
- red cardboard (for scallop, paws and kelp),
- two Circle Circled Card.
We start doing chicken!
1. Take two circles with cut-out middle. The outer diameter is the size of your future chick, and the internal determines the density of the pompon. The more carved part - the more threads you can wind, and therefore the pompon will be densely.
So it's time to decide whether you have a tiny chicken or a rather impressive broiler \u003d)

2. Clear two circles together and wrap them with threads.


But if you have a big pompon, you will see the meters of 15 threads, spreading them to memero, and already be accepted for work. So it will be much faster.


3. Redraw thread, as shown in the photo. Scissors must come between two cardboard circles.

4. By cutting the threads to the end, take a new thread with a length of 20 cm, turning it between two cards and pinch it stronger so that the pompon kept the form well.

5. Now scissors cut and remove cardboard circles from the pump - they are no longer needed there.

6. Did you do Well done! It's time to visit the beauty salon and make your chicken chic hairstyle.
Align Pompon, straighten the threads, cutting in the right places, and you can go further.

7. Cut from red cardboard scallops and legs.

Chuck to chicken. Like this:


8. Now the eyes of eyes and a keyboard consisting of two red-droplets. Beauty!

We carry out the second chicken, which can already walk.
For work, additionally prepare:
- glue moment crystal
- wire,
- red threads
- two chevy bispers
- red bead-cone.
1. Make 2 Pompon (you already know how): one is small, and the other is more. Threads that will be tied up with pumps, do not cut off - they will be useful when binding the parts of the body of chicken.

2. And now the trinity of the thread. From thin wire, make a chicken leg: Three fingers will be ahead and one behind.


3. Slightly smeared with glue paws, wrap them with red threads.

4. Give a red bead-cone. This is a key chicken. Two black bispers are glued to the eye place.

And here are our two handsome. Sit them in and rather to a friend - congratulate on Easter and!