If you make a large garden figure from papier-mâché, it will turn out heavy. You can use a combined method: crumpled paper inside and papier-mâché on top. The figure is made without a frame. For internal filling, you can use foam plastic - the figure will be light.
Process of creation:
Crumple the paper and apply wad to wad, then secure with tape. In this way, create the outlines of the future sculpture. Then cover it with pieces of newspaper or toilet paper in several layers, and then finish small parts from toilet paper, moistening it with PVA glue. Toilet paper becomes like clay - mold it what you want. Then simply cover it with toilet paper again to create a uniform surface. Wait for the structure to dry, and then paint it with gouache. After complete drying, apply a layer of PVA glue to fix the paint color before applying varnish. Dry again and apply three layers of yacht varnish on top (as the previous layer dries).
Since all the sculptures are covered with yacht varnish, there is no need to remove them indoors when it rains. But if necessary, you can bring it in - the weight of the figure is on average 5-6 kg.
Since papier-mâché is paper, you have to work with PVA glue. You have to wait for it to dry, and the sizes of all the figures are from 80 cm to one and a half meters. It takes about 2 weeks to make one sculpture. But I want to see the result quickly!
http://urozhayniy.com 


2 MK/raven and cat/
The same white giraffe who participated :

The base was made of polyethylene and tape - using the same technology as the elephants: . Initially it was yellow with orange spots (yellow garbage bags as a base + colored tape):

The toy was frameless, I just “wrapped” the polyethylene with tape quite tightly. But over time, the giraffe began to play and he lost his former stamina. So I decided to make an upgrade - papier-mâché. Only it turned out not at all like classic papier-mâché - without paper at all. Instead of glue and paper I used plaster bandages(I liked the imported ones, they are more expensive, but softer and more pleasant to work with than domestic ones): I cut them into pieces, dipped them in water and applied them in the same way as if I were making papier-mâché from newspapers. And then I “glued” the white lace—wet the lace and put a piece of damp plaster bandage under it. Not reinforced concrete, but a very rigid structure...and openwork. A variety of laces were used - ribbons, crocheted ones and pieces of school white collars.


Here he is, a handsome guy, white on white:


Now I don’t even remember when the idea came to me to use plaster bandages as an alternative to papier-mâché... The bandages had already been lying around for two years and were waiting in the wings. And yet we waited!
By the way, 2-3 layers of plaster bandages are equal in rigidity to 8-10 layers of newspapers or gray paper using the classic papier-mâché technique. There is less hassle, it dries faster, the texture is interesting. I'm sharing!
Oksana Shapkarina
No matter how hard manufacturers of garden tools and decor try, they cannot achieve the charm that the independent crafts of creative summer residents evoke. Garden figures made from plastic bottles, car tires, papier-mâché, plywood, various pipes and other available materials cause real delight and bring a smile to anyone who meets them.
DIY garden figures
Sleight of hand and no fraud

How pleasant it is to find this miracle among monotonous and boring courtyards with professional and identical landscape design or lack thereof: a plot decorated with fairy-tale characters, flowers, cartoon characters or non-existent good monsters!

You involuntarily stop, admire, absorb positive vibrations and notice how bad thoughts have left your head, and with a barely noticeable smile you continue on your way...
Who are they, the creators of this wonderful fairy-tale world of the master? Maybe some artists live here or just rare talented people? In fact, these are simple summer residents who showed a little love for their garden and began to creatively transform it.

Anyone can create similar figures for the garden from plywood with their own hands, you just need to start. In the process, you will see for yourself that anything can be used, unless at the beginning you need a little instruction, guidance, and we will try to provide it to you.

Important!
The most difficult thing is to believe in yourself and overcome shyness.
Show the world your love and joy, and it will reciprocate, and the technical side of the issue rivals in complexity the crafts of the children's art club.
Plastic

Plastic is the favorite material of amateurs. It is easy to process, lends itself to various methods of fixation and installation, and its source is ordinary nylon bottles and plastic containers, of which a whole sea accumulates against your will.

Of course, you can only work with bottles and plastic, but more often combinations of materials are used, among which you can find:
- Papier mache . From childhood, we all remember the technique of gluing newspaper scraps, gradually building up the layer and forming the shape or detail we need. Any glue for wood or paper will do here; you can use a homemade paste made from flour or PVA;
- Metal wire. An excellent way to attach parts, fix and connect individual parts together. The material is pliable, easily cut with nippers or scissors, and is available in abundance in any country attic, basement or workshop;
- Concrete. This material is also available in the countryside and plays the role of gypsum, only durable and waterproof gypsum. Do-it-yourself garden figures from concrete are much easier to make than it might seem at first;
- Plywood. You can cut out any part from scraps or whole sheets (if you don’t mind, of course), because electric jigsaws allow you to do this without any special skills or experience;
- Various pieces of plastic pipes, hoses, corrugated channels, insulation- these are almost ready-made paws, fingers, necks and tails of fairy-tale or real animals, it all depends on your imagination and courage.

But let's get back to plastic. Empty eggplants are just Klondike: here you can see both the whole body and the finished pig, and by cutting it into the necessary pieces, you can collect plumage, petals, ears - whatever you want.
Important!
The material is easy to cut, glue, fasten with wire or fishing line, screws and other materials.
Thus, plastic can serve both as the basis of the product and as elements of its decor.
Giant mushroom from a bottle and papier mache

So, so that you understand what we’re talking about and believe our stories, let’s look at making a mushroom step by step:
- We take a plastic lid from paint or putty, cut a hole in its center and put it on the neck of a 1.5-liter eggplant;

- We dilute PVA glue in water, cut the newspaper into strips and paste it onto the bottle and cap in layers using the papier-mâché technique. Form a mushroom shape;

- Soak the egg trays in a bowl of water overnight, then grind this mass in a blender and add a little PVA and putty. Stir until smooth;

- We apply the resulting mass with our hands to our mushroom, giving it a more natural outline. The mass is applied by hand, it sticks well and sets quickly;

- We sculpt the elements of the face from the same egg-tray mass - nose, cheeks, beard, eyes. We add hands and other details of our hero if desired. Let it dry;

- After the mass has completely dried, we cover our giant with waterproof grout for tile joints. The grout is prepared according to the instructions on the package;

- When the grout has dried, we paint the hero with façade paint. It is better to use acrylic or silicone paint. Voila - our giant mushroom is already asking to go into the garden, where the most prominent place has been prepared for it.

Important!
Don't forget to apply a good coat of waterproof grout and two or three layers of exterior paint, otherwise the rains will quickly turn your masterpieces into a pitiful sight.
How many people - so many ideas

Now we want to say the main thing. You are not limited by anything except your imagination and creative thinking: garden figures made of metal, empty pots, old dishes, toys - and what not you will find.

Experiment and don’t be afraid of anything - this recipe has given many interesting and even important results during the history of human development, and work and creativity will make you truly happy people.
Start small, try your hand at different techniques, and over time you will understand that nothing is impossible, you will find your own material and technique, style, and, perhaps, people will start talking about you as a new self-taught sculptor, whose work will be used as an example others and post on design forums.

Most of those who make money today by making exclusive garden sculptures started out this way, without having the slightest idea about painting or sculpture, or what about sculpture – banal modeling.
What is important here is not academic knowledge (although it will not be superfluous), but the desire to create, the desire to feel like a child again, the desire to give people moments of joy from contemplating your work.

Important!
Even if you don’t find much talent in yourself, you can definitely make primitive, but beautiful and non-trivial things.
The main thing is to try, start, and then you will see, in any case, all you will lose is a few hours, empty bottles and old newspapers.
Conclusion
Decorate your garden yourself - what could be more natural and harmonious? And if it turns out that it is also as simple as shelling pears, then there will be no obstacles left at all. The video in this article will convince you of this completely.
How to make a giraffe from papier-mâché?
Today I would like to invite you to try making something out of papier-mâché. Papier-mâché means “chewed paper” in French. In other words, crafts made from papier-mâché are crafts made from paper. In this article we will look at creating a giraffe, which can be placed in an apartment, for example in a children's room, or taken to the country and placed near a flower bed. Garden sculptures are very fashionable today, and handmade garden sculptures are valued even more.
So where to start creating our papier-mâché craft?
First you need to stock up on a lot of old newspapers and cardboard, plastic bottles, and tape. Buy brushes, PVA glue, acrylic paints or gouache, clear varnish. PVA glue can be replaced with wallpaper glue, or you can make a paste from flour.
How to cook paste from flour and water?
It's very easy to do. Boil a glass of water, add half a glass of flour and stir over low heat. The paste should be without lumps. Remove from heat and cool. It is not recommended to work with warm paste, as it can ruin the materials for the craft. In addition, it is better to prepare the paste as much as necessary, because it is not worth storing. It quickly loses its adhesive properties.
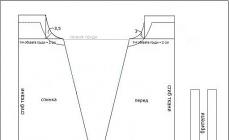
1. We create the frame of our future craft from plastic bottles. The body can be a three-liter water bottle. For the neck and legs we will need thinner bottles.
The legs of this giraffe are made simply. The bottom and neck of the bottle were cut off. Then the bottle was cut lengthwise and rolled into a roll. A neck was threaded onto one end, resulting in something similar to a hoof. All parts of our frame are held together with tape. 

2. Afterwards you need to paste over the base of our craft with pieces of torn newspaper. Using a brush, apply glue to a piece of newspaper and firmly glue it to the plastic bottles. It is enough to glue one layer of newspapers. After the paper has dried, take the papier-mâché mixture, which needs to be prepared from cardboard.
How to make papier-mâché?
The cardboard box must be torn into pieces and soaked in hot water. It is better to soak the cardboard in a large enough basin so that it can be easily crushed later. The soaked cardboard must be thoroughly kneaded to a homogeneous paste, squeeze out the water and add some wallpaper glue and PVA to it. The mixture should be sticky and soft. (Papier-mâché can be made not only from cardboard, for sculpting small toys or parts, you can soak napkins, toilet paper or paper towels)
With this mixture you need to sculpt our giraffe’s muzzle, horns, ears, legs, and round the body. In other words, give the giraffe a shape close to a real animal. Cover the papier-mâché layer again with pieces of newspaper. We need to make several layers, so our craft will be durable. For two or three days we forget about our giraffe. Let it dry thoroughly.


3. When all layers are dry, you can continue working. We need to color our giraffe. We applied the first layer with a yellowish water-based emulsion. Let it dry. To color this giraffe we used colored paint collers. They are quite thick and bright. They dry very quickly. Using a pencil, we drew spots on the giraffe’s body, eyes, and mouth. And they started coloring. Thin brushes will come in handy here. One layer was enough for the giraffe to become so colorful. When the coloring work is completed, again give the craft time to dry.

4. Concluding our work, it must be said that in All papier-mâché crafts need to be varnished so that they please your eyes longer. If you want to display such a giraffe in the garden in the summer, then it needs to be varnished at least three times. Thus, he will not be afraid of either rain or sun rays.
- Katya and Vikulya in the Chamomile Country
Leave feedback
Popular video
Popular posts
Buy books

Discussions
- Alexey on post
- LezoidusRA on post
- leopoldychka on post
- to entry
- Albina on record
Buy books


WHISPERING OF THE WIND
As time went. The girl continued to live high in the mountains. She forgot that she was an Angel in the past. I only remembered my dream to find out what love is. After all, it was precisely for this reason that she violated the laws of the Almighty, left heaven and descended to earth. Having become a human, the girl continued to dream about this great feeling. In her dreams, she often heard the words “I love you” from a stranger dear to her heart. When I woke up, every time I tried to remember his face, but I couldn’t.
AND THE HEART CONTINUES TO LIVE
Tasha moved the diary away from her, where she was once again writing a letter to her beloved. There were tears in my eyes. A few tears managed to fall onto the page with the letter and blurred, catching the ink of the black paste, causing some of the words to become cloudy and incomprehensible. The girl didn't even notice it. Her thoughts were far away. She relived her first love again and again. It ended so sadly.
CHRONICLES FROM THE WINDOWSILL
Exactly. I am a flower fairy from the country of Merry Drop! - the girl confirmed.
- What is your name? - asked Cyclamen.
- Mmmm, Daisy! - the fairy giggled, and then quickly added: - Oh, no. My name is Rio Ritka.
- How so? - Cyclamen looked askance incredulously. - Daisy or is it Rio Ritka?
- Call me Rio-Ri! - The fairy giggled even more.
-Are you fooling us? - Cyclamen was offended.
- No. What do you. I just come up with a new name for myself every day,” the fairy sat down on the edge of the Cactus flower pot.
VILLAGE ADVENTURES
I expected more. I was hoping to enter the fence and gasp, “What a beauty,” but it turned out differently.
- Wow. There are burdocks all around - I was upset when I saw thorns and thickets of carrots.
- Nobody lived here for a long time. “We will put things in order here, and it will become beautiful,” said my mother. She walked towards the house with her bags. We, of course, did not lag behind.
The dilapidated porch, as soon as we stepped on it, creaked terribly. I was even afraid that it might crumble under us. But I was afraid in vain, as the future showed, it is even more alive than all the living.
The house was cool and dark and smelled damp.
“That’s because the shutters are closed,” dad explained. - I'll open them now.
Walking around the house, he opened the shutters. Sunlight immediately flooded the rooms...
This is a general post on the garden figurines that I have already talked about. The summer season is approaching, and perhaps someone will want to make themselves a country animal (or something else) from whatever comes to hand, and I’ll show you how. I have been experimenting for several years now and can tell you about the results of “exploitation”.
Everyone except the cat (he is a domestic cat) has served faithfully for 2 seasons at the dacha, right on the street.
The fly agaric is the best, there are no complaints about it at all, even the color of the cap has not changed - perhaps due to the shade of the plants. The rooster - it is closer to the sun - is gradually undergoing a process of color change - some colors, interacting with UV rays, change color. But this is even interesting. We have a “pet” cat. And the meerkat’s “reputation was tarnished” - I experimented on the topic “what will happen if you don’t glue the bottom with waterproof material” - the bottom swelled from moisture (it rained). But it’s not scary - let’s dry it, varnish it, glue it - and the cheerful meerkat will again look out from the green thickets)))

Rooster. Garden figurine.