Every time before some holiday, we think about what original gift we could give to our loved ones, household members and friends. As practice shows, our entire flight of fancy ends with the purchase of a banal souvenir or something useful in everyday life. In fact, making a nice and incredibly creative gift is not difficult. You can realize your plans by making handmade postcards.
Making handmade cards does not require any talent or experience in this matter. You can limit yourself only to a great desire to surprise the person for whom your craft is intended. Handmade surprises are more important than store-bought souvenirs. Together with the craft, you give the person attention, a sea of positive emotions and aesthetic pleasure. In addition, such an addition to the main gift does not require large financial expenses. You'll only have to spend a little money on the materials you'll need to make the card.
Before you start working, you need to go in search of original ideas. Naturally, if you yourself are the bearer of interesting, creative ideas, it is not necessary to resort to the help of the Internet. However, it won’t hurt to familiarize yourself with various handmade techniques. Perhaps you can combine ideas by combining them and creating your own little masterpiece.


Once you have found a rough sample, go shopping for tools. In truth, the beauty of handmade is that you can make and design various crafts from available materials. But in order to skillfully implement the plan, the abilities of a person with design skills are needed. If you are not sure that you can turn scrap materials into art, it is better to provide yourself with materials from the office and accessories department. To make a postcard you will need: scissors, thick cardboard, glue, colored paper. Then you can continue this list yourself, because everything depends on the author’s imagination. It could be beads, fabric, glitter, designs, bows, stickers... anything! Agree, it’s great when there is such a wide range, and you yourself regulate the total amount of expenses.
Once you get the hang of making simple, but at the same time bright and extraordinary postcards, you can move to the next level and master some interesting technique, for example, the technique of creating voluminous postcards. Of course, voluminous cards look much more impressive and will certainly bring a lot of joy.
Do not under any circumstances think that making handmade postcards is beyond your capabilities. After looking at photos of handmade artists, such thoughts may come to your mind. However, the whole truth is that handmade is a very simple way to create a real masterpiece. Even if you have doubts about whether you will be able to do something worthwhile, don’t waste time on these thoughts - try! Only by trying to build something magical can you be convinced that it is not so difficult. In addition, you will probably enjoy the process itself.
Once you become a proponent of handmade, don’t forget to involve the younger generation in the process. They will surely appreciate your wonderful hobby and keep you company.
You should start working on a gift after watching several videos that describe all the details and nuances of the process. This way you will be more confident in your strengths and capabilities, and will also be able to learn from the experience of the masters. Hurry up and start working on your own postcards. Those people for whom this gift is intended will be delighted! We wish you creative success!
I’ve already seen collages for a certain color palette in several blogs of scrap artists, and I’ll join this game too. The essence of the game is to photograph 9 objects in your home using a given color; the objects can be absolutely anything. Accordingly, the result should be a collage of 9 photos. I got the lemon yellow color from Christina. I’m not sure that I was 100% accurate in this shade of yellow, but I think it turned out quite nice, and most importantly, it was quite interesting to wander around the apartment and look for a certain shade of yellow.
And now a little more about what I discovered :) Items from left to right and top to bottom:
- nylon tape;
- paper hydrangeas;
- apple variety "Gold";
- round brads;
- hand from a children's toy;
- musical carousel mechanism for the crib;
- baby overalls sleeve;
- candle;
- book "The Shopaholic and the Sister" by Sophie Kinsella.
For those who want to continue the chain of play, I can come up with a color.
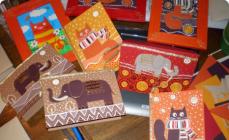
I haven’t shown anything for a long time, and I haven’t written anything on the blog for a long time, so I’ll slowly come out of the “underground” and show new and unpublished old works when I have a free minute.
These are the jacket cards I made as congratulations for my mother’s colleagues, all in the same style, only in different colors.
Tweet
Cool
Before the New Year's bustle takes up all your thoughts, why not prepare cards for your loved ones in advance. A handmade postcard will be a pleasant addition to a gift, and production will take a maximum of 30 minutes. On cold winter evenings you can pass the time with one of these postcards. “Pooring” over crafts will create a festive mood, calm and pacify you at the end of a busy day. As you can see, the benefits are not only for those to whom you give the gift, but also for you.
Let's choose and get started!
1. Postcard with ribbon
Very cute, and can be done in literally 10 minutes. Materials: ribbon, buttons, cardboard, scissors, glue.


2. Postcard with felt Christmas tree

You will need:
Scrap paper (or any colored paper with a suitable pattern)
Green craft felt (or fleece, or velvet paper)
Lace
Halves of beads (beads, buttons)
A piece of beautiful thread
Ruler
Scissors
Breadboard knife
Glue stick
PVA glue

We cut out the base with a size of 20x15 cm. The postcard itself will be 10x15 cm.

We measure the middle and use scissors along a ruler to draw a fold of the card.


Cut out the background, size 9x14 cm.

Draw the silhouette of a Christmas tree on felt and cut it out.


We embroider a “garland” with thread and fasten it on the back side.


We cut out another Christmas tree from cardboard, only a little smaller, and glue it onto felt. This will make the spruce more voluminous.

Take a rectangle of white paper and write the inscription. To this extent, it was applied with a stamp, but it can also be written by hand.

We measure out the lace.

Use a sewing machine to sew a stitch around the perimeter of the card.


Using double-sided tape, glue the tree.

Glue the inscription.

We glue this background onto the base.

Apply a drop of glue to the place where the bead will be.


3. Multilayer card
Materials:
Card base made of thick cardboard, format 11x16 cm, folded
Two sheets of scrap paper measuring 10x15 and 8x13cm
Paper cuttings in the form of an openwork oval frame and two snowflakes
A piece of striped tape 14 cm long
Transparent dial
Two golden fabric leaves
Three decorative berries with stems
Chip with the image of Santa Claus
Half a bead.

We sew sheets of scrap paper around the perimeter (but not necessary).

We cut the end of the tape in the form of a flag.

Glue the sheets on top of each other. We hide the end of one tape under one of the layers.

Glue the frame and clock.

We collect bouquets of leaves and berries. Roll them together and cover with a leaf.


4. Volumetric postcard made of scrap paper with different ornaments
For work:
Paper of different colors of ornaments for scrapbooking
White postcard without drawings
Decorative carnations or pins
Stationery glue
Double-sided tape
Simple pencil
Scissors
Ruler.
Cut out 12 rectangles. The length of each is 12 cm, the width of the first is 9 cm, the width of each next is 6 cm less.

Roll each rectangle into a tube. For convenience, you can use a pencil.

Glue the tubes to each other. Thus, you will get a Christmas tree.

Take a white card (or a rectangular piece of white cardboard that needs to be folded in half) and glue on the Christmas tree.
We decorate it with carnations, the “legs” of which we insert between the tubes. You can also use beads or rhinestones. This example also uses a bow that decorates the top.


5. Minimalist card
We need:
3 sheets of white laminated cardboard (12x20cm)
Wide satin ribbons
Narrow golden ribbon
Green or gold rhinestone
Scissors
Pencil
Ruler
Sewing machine

We put the ribbons on the cardboard and connect them together by stitching them.

On another sheet of cardboard, mark the width of the ribbons with a pencil and draw Christmas trees. Watch the proportions.


Cut out the workpiece.

We place the resulting stencil on a layer of tapes and place a third sheet of cardboard under them.

We put the tape around the perimeter and stitch it. On one side, through all three layers.

We form a bow on one side and glue a rhinestone into its middle.
I liked this card for its delicacy and lightness. A postcard with leaves, flowers, butterflies is suitable for any holiday. Using winter patterns, snowflakes, a drawing of Father Frost and the Snow Maiden, you can prepare cards for Christmas and New Year.
It's not difficult to make cards with your own hands. For this you will need: paper 30cm x 15cm, two sheets of designer paper 14.5cm x 14.5cm, additional paper for decorative elements in the form of leaves, flowers, branches and butterflies, a color image in the center of the postcard, ink for tinting the flowers.
Divide a sheet of paper 30cm x 15cm in half and bend it.

Draw a circle on one side of the paper

and carefully cut it out.

Using shaped hole punches, we cut out flowers, leaves, butterflies, and twigs. If you don't have hole punchers, use scissors to cut out the drawn elements.

We lay out the blanks to create a beautiful composition. Print this example and use it to draw all the necessary elements according to the intended size.

We tint flowers, leaves and butterflies. We prepare designer paper - we age the edges with a stiff brush or sandpaper, cut out a circle.

Glue the blanks to the base of the card. Glue it so that the main part of the cut out elements is above the cut out circle.