In this material you will learn how elegantly decorate wedding glasses with your own hands decorative elements. A wedding is always an amazing event that the newlyweds will remember for the rest of their lives. Therefore, both for the wedding ceremony and for the festive banquet, you need to select various wedding accessories that will create a unique atmosphere of celebration and emphasize the style of the event.
As a rule, two sets of wedding glasses are prepared for a wedding, each of which has its own purpose. If desired, they can be the same or significantly different. According to a long-standing tradition, the newlyweds break the first pair of wedding glasses. Once upon a time, brides broke a clay pot as a sign of their chastity.
Over time, the pot was replaced by wedding glasses, the fragments of which symbolize a strong family and happy well-being. Since the glasses from the first set will still have to be broken, an inexpensive glass option will do the job. If family happiness is more valuable to the newlyweds, then expensive glasses can be broken, but in no case are they personalized - a symbol of the future marital hearth.
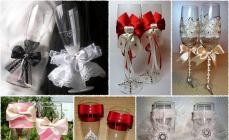
Time for the second pair of wedding glasses - banquet. It is from them that young spouses drink at the wedding, and after it they keep it as a family heirloom. Some newlyweds even start a tradition of celebrating their wedding anniversary only with wedding glasses. Therefore, this pair of wine glasses is chosen very carefully and is even made to order. The color scheme of wedding glasses and the overall design style are often selected to match the style of the wedding ceremony. Ribbons, beads, rhinestones and a wide variety of accessories are used to decorate them. Often the names of the newlyweds are written on the glasses or their monograms are added - the initials of the newlyweds connected and intertwined. Now let’s move on to the master class on decorating wedding glasses and look at a photo gallery of glasses beautifully decorated for a wedding:
Photo gallery with ideas for decorating wedding glasses with different decorative elements.
Master class with photos and detailed description of the stages of work. How to elegantly decorate wedding glasses.
Glass or crystal glasses were purchased, but it seems that the dishes are missing something, perhaps original decor.
An excellent solution is to decorate glasses with your own hands; this is how you can turn ordinary dishes into a real work of art, and in a unique design.
A wedding is undoubtedly one of the most important events in the life of any person. On this amazing day, I want the lovers to have a fairy tale around them that will be remembered for a lifetime. Traditionally, special glasses are prepared for the bride and groom on their wedding day from which they will drink champagne. Decorated glasses will remain as a keepsake in the new family, delighting the spouses on every anniversary.
For the bride and groom, decorating wedding glasses with their own hands can be one of the best moments of joint preparation of a wedding event or a pleasant surprise.

Unity of style
Usually the entire wedding ceremony is prepared in the chosen specific style and color; this is adhered to by an invited designer or by the bride and her close friends who have decided to do everything themselves. That is why the design of glasses for the ceremony should also be in harmony with the overall style. The glasses and bottle of champagne for the newlyweds’ table, decorated in the same color scheme, look beautiful.
Traditionally, wine glasses are chosen that are the same in shape, although a pair of different glasses looks no less interesting, for example, for the groom - narrow and thin, for the bride - lower and round.
Modern stylish decoration of glasses with your own hands involves the use of various materials: lace, paints, flowers, beads, pearls, ribbons, feathers, etc. There are endless options to make your glassware unique.
Lace luxury
Decoration with lace looks elegant. Even beginners in needlework can decorate glasses with their own hands. Such glasses will look great in the hands of the newlyweds.

Advice! Lace of any color is suitable for decoration - white, cream, scarlet or turquoise, preferably to match the bride's dress, the decoration of the hall or in contrast with them.
To glue the selected lace braid, you must:
- Degrease the glass. To do this, you need to wash the glasses, dry them, and wipe them with alcohol.
- Try on the lace braid on the glass, cutting off the required length and adding 2 cm to it.
- For gluing, both special glue for glass (sold in handicraft stores) and traditional silicone or waterproof super glue are suitable.
- It is necessary to retreat at least 1 cm from the edge of the glass so that toxic glue does not get on your lips even after drying.
- Glue is applied around the circumference of the glass, and a braid is immediately applied, which is not pulled tight. The glue is applied carefully so that it does not get on your fingers or smear on the lace.
This decoration of glasses looks interesting; the dishes are decorated with your own hands not with braid, but with a cut out separate piece of lace, for example, a large flower or bouquet. Beautiful convex woven lace gives aristocratic nobility even to simple glass wine glasses.

The lace is complemented with rhinestones, beads, pearls, satin ribbon bows or flowers. They are usually either sewn or glued.
If there is not much lace, it would be useful to decorate the stem of the glass with a bow made of satin ribbon to match the lace, securing it with an elegant knot or sparkling rhinestones.
The lace skirt on the base of the dishes looks original. To make it, you need to take a small piece of lace, the same as on the wine glass itself, and baste it along one side. Then the basting is pulled together, the resulting skirt is applied to the leg and stitched. For additional fixation, the skirt is placed on glue, then it can be decorated similarly to the decor of the glass itself.
On a precious day - precious dishes
Decorating glasses with rhinestones with your own hands will not only bring an original result, but will also give a charge of positive mood during needlework.

- Rhinestones can be placed over the entire surface of the glasses randomly or in a certain order, leaving only the glass border at the edge (otherwise it will be uncomfortable to drink). Then at the holiday all the sparkle and radiance will go to the pair of lovers!
- By combining rhinestones of different shapes and diameters, various patterns are laid out on the glass surface, for example, hearts or rings.
- The wine glasses will be unique, with the initials of the bride and groom written in rhinestones.
Like lace, rhinestones are glued with glue, but you need to work especially carefully so as not to leave glue smudges and stains.
The shine of the stones looks beautiful in photographs both under artificial lighting in a restaurant and in daylight outdoors.
Ephemeral beauty
DIY floral decoration of glasses has become extremely fashionable lately.
Delicate fresh flowers on the dishes harmoniously echo the bridal bouquet, pleasing the eye and imparting aroma. To decorate the glasses with fresh flowers, you will have to make a lot of effort; this must be done literally a few hours before the ceremony.
- The selected flower, which is planned to be placed on the wine glasses, is placed in water. The flower should absorb as much moisture as possible.
- Then the flower is trimmed, leaving the shortest possible stem. A piece of cotton wool soaked in water is attached to the cut using floral tape.
- The flowers are attached to the dishes with tape.
- Flowers look beautiful, shaded with greenery and small artificial flowers or beads, rhinestones, pearls, which are secured with glue.
A video of decorating glasses for a wedding with fresh flowers will help you do everything right. Such decor, of course, is short-lived, but extremely effective and original.
Important! It is better to choose flowers that are durable and that are easy to mount, for example, orchids, medium-sized roses and chrysanthemums, and irises.

If there are concerns that fresh flowers on wine glasses will not survive the ceremony, you can use artificial ones. They cover the entire glass, the stem, or lay out a pattern of small flowers. Rhinestones glued to the petals look like drops of dew.
The glasses look interesting, looking like magical bouquets - they are decorated using artificial flower petals. How to decorate glasses with your own hands this way?
- Select a flower of the desired shade. Those with many petals - roses, peonies - look beautiful.
- The flower is disassembled into individual petals.
- Petals are glued one at a time. You need to start from the top, gradually going down to the leg. At the junction of the glass with the stem, the flower is decorated with ribbons, feathers, and rhinestones. The stem of the wine glass can be painted to match the color of the flower.
The delicacy of painted glass
Painting with acrylic or stained glass paints gives the dishes an extraordinary charm, because traditional champagne in it will sparkle with all the colors of the rainbow!

When decorating glasses like this with your own hands, you can study photos of master classes in advance, or you can follow step-by-step instructions directly during the creative process. However, you need to stock up on materials ahead of time; they are easy to find in stores for artists. The following things will come in handy:
- alcohol for degreasing;
- thin round brushes;
- stained glass or acrylic paints;
- stencils for those who do not know how to draw, or a prepared sketch;
- varnish for fixing;
- spray paint in cans;
- stained glass contours.
A few nuances:
- It should be remembered that the first stage of any type of painting on glass is always degreasing thoroughly washed dishes with alcohol.
- During the process, you should try to move the dishes in your hands as little as possible so that fingerprints do not remain.
- It is better to leave a couple of centimeters unpainted in the upper part of the glass, which touches the lips. No one needs allergies or poisoning on a holiday.
- Stained glass paints are more fluid, liquid and transparent, acrylic paints are thicker and opaque.
- For stained glass paints, a contour is required; the paints are then poured into the resulting cells. You can paint with acrylic without an outline.

You can depict whatever your heart desires on a wine glass! Here are just a few design options for wedding wine glasses.
Simple and elegant
- The glass is completely covered with spray paint, then the dishes are decorated with patterns of rhinestones, beads, and flowers.
- When applying paint, the can must be held at the same distance, carefully turning the glass by the stem.
- When the top part is dry, the glass leg is sprayed in the same way. All gold and silver glasses look beautiful.
Painted Happiness
- The selected stencil or prepared design is glued to the inside of the glass with tape. Most often these are rings, initials of lovers with crowns or names, wedding date, roses, just beautiful fantasy patterns. However, the drawing can be anything, even portraits of the heroes of the occasion, it all depends on the artistic skill of the performer.
- On the outside, the pattern is repeated with a stained glass outline. After the outline has dried (this is at least 2 hours), they begin to paint with a brush and paint. You need to work carefully; in case of mistakes, remove excess paint with a cotton swab.
- Drying is speeded up with a hairdryer, but in any case, the products must stand for at least a day for the paint to set.
- Then you can complement the drawing with a variety of decor; decorating glasses with beads with your own hands, glued as individual accents, is perfect.
The decoupage technique will come to the aid of those who do not know how to draw. Required minimum materials:
- decoupage glue for glass;
- tassels;
- clear nail polish.
When performing the decoupage technique, drawings are taken ready-made and in the required scale. You can choose from special napkin motifs, rice paper, or by printing what you want on a laser printer.
- The design is not cut out, but neatly torn off, since uneven edges are better glued.
- The glue is applied to the drawing or glass in the place where it will be placed.
- The design is applied, then smoothed from the top with gentle movements from the center to the edges.
- After drying, the glass is varnished and additionally decorated with contour painting, shiny stones, pearls, and ribbons.

Glitter and chic
It’s easy to do, but the use of glitter when decorating wedding tableware looks incredibly bright.
Glitter is applied to the wine glasses using stencils. The finished design is applied to the inside of the glasses, secured with tape. The image is repeated on the outside with a brush dipped in glue. While the glue is still wet, sprinkle the glass with glitter. After drying, shake off excess glitter.
Two - or several?
The bride and groom need 2 glasses for their wedding. However, a wedding, like any special event, implies turmoil; no one guarantees that the necessary dishes will not break or get lost at a crucial moment. Therefore, when decorating glasses for a wedding yourself, it is worth preparing a spare set or making a second option specifically for a wedding photo shoot.
The rings have been purchased, the wedding dress and suit have been selected, the cortege and restaurant have been ordered. It seems that everything is ready, we are waiting for the main day. What about the details? Have you forgotten that the entire holiday atmosphere should be thought out to the smallest detail? Greetings, happy lovers! In the midst of your pleasant wedding chores, I would like to remind you that real masterpieces are assembled from small details. Today I decided to tell you how you can make an original design for wedding glasses and bottles with your own hands.
Such seemingly simple, but at the same time important accessories for newlyweds deserve your attention. And believe me, the decorating process is very exciting, and there are so many options that even if you are not familiar with hand-made, you will still find yours. I promise!
Concept
I am sure that if we have reached the glasses and bottles, then everything is clear and definite about the theme of the celebration. This is why we will dance. Yes, yes, both before and after the wedding are pleasant and healthy.
Rule #1
The wedding decoration of the celebration will be harmonious and complete if all accessories are decorated in the same style.
Here is the proof of my words - photos of the decoration of the hall.
Rule #2
In solving such global issues as decorating a banquet room and making floral arrangements, I recommend trusting the professionals.
If we talk in detail about the details, then of course, you can buy ready-made kits for decorating a wedding in an online store. But if you have time and desire, then why not resort to rule No. 3?
Rule #3
Rule #3 - There are no rules for implementing creative ideas.
Come on, decide on the birth! First a mini-masterpiece - and then great things - the birth of babies.
What if you get so into it that you start by decorating wedding glasses and bottles with your own hands, and then make some for the family hearth, and eventually become parents of many children. Where is the connection, you ask. And the connection is direct, but more on that a little later!
The choice is yours
Guys, why do you think I decided to pay so much attention to this topic? It's simple! I can’t ignore all the advantages of wedding hand-made decoration of bottles and champagne glasses with my own hands. Here they are:
- You know exactly what champagne you will drink on your first wedding anniversary.
- Choose wedding glasses that are pleasing to the eye, hands and lips.
- In creative stores, a selection of decorative elements will quench any thirst for ideas for a wedding not only in 2017, but in the coming 2018.
- Existing techniques for decorating - from simple to the most complex designs - can be mastered by both a beginner and a guru.
Step by step
The task ahead is interesting and responsible, so let’s take the process of decorating champagne glasses and bottles seriously. Ready? Then let's go!
Preparation
Where to begin? With preparation, of course.
- We choose and purchase at least two bottles of our favorite champagne.
- We buy a couple of champagne glasses. If you can't find a pair, look for a set of six. Everything will come in handy on the farm!
- Remove labels from bottles by first soaking them in warm water for 30 minutes.
- We go to the accessories store and buy in accordance with the wedding theme you have chosen: artificial flowers, bows and satin ribbons, lace and feathers, rhinestones, beads and beads.
- The materials you will need are: glue gun, PVA or glue for working with glass, special acrylic paints for applying an inscription or design.
Before starting work, take the most ordinary glass and try working with glue and paints. This way you'll get your hands on the ball before you start finishing work.
A matter of technology
Well, here's the interesting part. I offer you the basic techniques for decorating wedding glasses and champagne.
- Decoupage. Rice paper or thin napkins, PVA glue, varnish and brushes will help you create any composition on glass. Even if you don't know how to draw, this technique will hide this small flaw. Try it, and you are guaranteed an artistic miracle of your own making! This design is suitable for a wedding in the style of love is, and for French Provence.
- Ribbons are a mandatory material for the kanzashi technique. You can decorate bottles and glasses in the form of a groom in black and a bride with a snow-white veil. You can also beautifully tie bright bows to match the holiday to decorate the wedding champagne and wine glasses.
- Paints. You can apply any stencils from adhesive tape to the glass, or paint the shape in any color from an aerosol can. Then remove them and end up with original glasses. You can completely paint the glass white and apply monograms with initials on top with contrasting colors, and then glue on rhinestones and beads.
- Polymer clay will appeal to those who know how to sculpt well. Special compositions of different shades allow you to create absolutely any decor for your wedding accessories. If you can’t sculpt, buy ready-made ones and create!
And here is the video with the master class. Click Play.
When decorating, pay attention to how convenient it is to later use the glasses for their intended purpose, and check that the parts are well glued. We don't need embarrassing situations with a feather in our mouth.
Pleasant connections
One of the two bottles is traditionally drunk on the birth of the first child.
This is about connections and rule No. 3, as promised. If you're planning on having a little more than one child, why not make it a family tradition and wash each little one's heels with champagne from your wedding day.
Then prepare more bottles! And let the guests wonder why you don’t have two bottles on the table, like all newlyweds, but five. What do you think about this idea? Share your opinion.
Whatever decoration technique you choose - white, blue or gold - don’t be afraid to experiment. Creativity inspires, so try it and you will succeed!
I really hope that after reading the article your hands itched and your feet ran to the store for champagne. Don’t be afraid of mistakes, because nothing is irreparable and everything can always be corrected. I would appreciate your feedback and comments. Subscribe to my blog news and share ideas with friends. Well, I wish you a sparkling mood and bubbly ideas, fresh and gushing. See you soon in new topics. Bye bye!
New Year's Eve requires good organization, which to a certain extent depends on setting the festive table. Serve the men vodka in frosty damasks, and the ladies champagne in glasses decorated with your own hands. I don’t want to make mistakes for the New Year. After 12, seconds count.
We offer several ideas on how to quickly and easily decorate thin-walled vessels for drinking alcoholic beverages.
On New Year's Eve champagne is drunk from tall, narrow bottles. In such dishes, the aroma of the wine does not disappear, but is concentrated, and the champagne retains its “sparkling” longer.
According to etiquette, it is customary to drink sparkling wine and champagne from transparent glasses. Without drawings, gold notches and other decor that interferes with admiring the orderly rows of bubbles rising from the very bottom of the wine glass. New Year is a pleasant exception. To make your New Year's table memorable for you and your guests for a long time, come up with festive decor for a bottle of champagne and glasses.
In the meantime, while you are looking for the “fantasy” button, we offer six simple ideas that everyone can interpret in their own way.
Step-by-step instructions and a master class will allow you to decorate glasses for wine or champagne quickly and creatively.
Idea 1 – Decorating the stem of a champagne glass
 You will need: a tall champagne glass, a napkin with a New Year themed design, rhinestones, decorative thread with “rain”, scissors, a pencil, a brush, PVA glue.
How to decorate glasses - master class
 Place the napkin on a flat surface and place the wine glass on it. Outline the contours with a simple pencil, “throwing” 5-7mm around the circumference.
 Cut out two pieces of the same size. Patterns on circles may vary. Based on the New Year's design specifically for your napkin.
 Using a brush, cover the surface of the base of the glass stem with an adhesive solution (PVA school glue, diluted in warm water in a ratio of 2:1). Place the glass in the center of the circle and press down.
 Treat the protruding edges of the napkin with glue, bend them and gently press them against the glass.
On the second circle, make a cut - from the center to one of the edges. Coat the upper part of the leg with glue solution and “put” the second circle on it.  Coat the edges of the paper with glue and bend it to the underside of the leg.
Having secured both parts in place, apply a layer of adhesive solution to the napkin for secure fastening.
Glue the rhinestones according to the design using glue not diluted in water. It is more convenient to pick up rhinestones with tweezers.
 Decorate the leg column with decorative thread or ribbon.
Advice. In order for the rhinestones to stick well and not fall off during toasts during the chiming clock, it is safer to use glue with a stronger adhesion rather than PVA.
Idea 2 – Decorate glasses for the New Year with sparkles
 You will need: a jar of micro-glitter in bulk (glitter), a sponge and decoupage glue.
How to decorate a glass?
Wipe the wine glass thoroughly with a cotton ball soaked in medical alcohol. There should be no stains from water or fingerprints on the glass walls.
To prevent possible glitter from falling off, apply a thin layer of glue to the base of the glass and the stem. Let it dry. Glitter will stick to this primer better than to smooth glass.
 Cover the stem of the glass with another even layer. Apply the glue thickly, but so that it does not flow or drip. (When painting the base of a wine glass, do not apply glue to the back side that is in contact with the table. The glass will lose its stability.)
  Don’t wait for the second layer of glue to dry - immediately generously roll (sprinkle) the leg with glitter.
Do not shake or blow on freshly applied glitter. Let them dry. Once completely dry, apply another thin layer of glue on top.
Advice. The quality of work will not suffer if the glue for the blend is replaced with a less expensive and more common material - PVA.
Idea 3 – Decoupage glasses for the New Year with glass shavings
 You will need:
Champagne glasses, a sketch with a thoughtful pattern, a tube of stained glass contour in metallic color, a voluminous gel paste with glass shavings, a small brush with a fine tip.
How to decoupage a wine glass?
Wash the glass and then degrease the surface with acetone.
Draw the outlines of the petals using a stained glass outline. It is not difficult. Everything will work out even if you have no drawing skills.
The main thing is not to rush. But if you make a mistake, erase a fresh fragment of the pattern with a cotton swab or, after drying, carefully scrape off the outline with a knife.
When the outline is completely dry (after about 6 hours), begin applying clear gel to the petals.
There is no need to fill in the inside of the pattern. The flower inside should remain transparent.
We work out small details with an outline for stained glass windows.
Draw small drops on the base of the glass.
And we put a few more drops next to each crystal flower.
Advice. Instead of flowers on a glass, you can use glass droplets to create more traditional patterns for the New Year - snowflakes or frosty frost.
Idea 4 – Master class: Decorating glasses with beads with your own hands
 You will need: Christmas tree decorations (small round beads on a fishing line), a heat gun.
How to decorate a glass with beads?
Start gluing the beads with a hot glue gun from the base of the glass, working your way up the bowl.
The glue gun is very viscous and hot. Try to squeeze out as little glue as possible onto the glass. The mass hardens quickly. Beads are glued according to the principle: one pull on the trigger - press three beads onto the glue. Etc.
Advice. Do not paste Christmas tree beads over the convex rim at the top of the glass - drinking New Year's champagne will not be convenient.
Idea 5 – Decorating glasses with rhinestones (drawing “Snowflake”)
 You will need:
Sketch of a drawing, toothpicks, textile glue for rhinestones, tweezers or a cotton swab.
How to do?
The glass (in the photo of the master class there is a glass for red wine, but the idea itself is also applicable for decorating flute-shaped wine glasses) wash and degrease.
Then we take the sketch drawn with a simple pencil and put it inside the glass. It will serve as a stencil outline. It is not advisable to fix the drawing with tape - marks will remain.
The snowflake is clearly visible through the transparent glass. Lubricate one of the edges with glue and begin laying out the rhinestones with a wet cotton swab (this is better for adhesion).
Lubricate and glue. If the rhinestones move off the glue before drying, fix them with a toothpick.
Advice. To make your glass shine on New Year's Eve, sprinkle the snowflake with small silver sparkles before the glue dries.
Idea 6 – Snowman glass made of artificial snow and polymer clay
 You will need:
Tulip-shaped champagne glasses (wine glasses in the photo), a jar of artificial snow, glue (not PVA), black and orange polymer clay, pieces of fabric for a scarf, a thick brush.
How to decorate glasses with your own hands?
Clean the glass from stains and, for good adhesion, degrease with alcohol. On dry, clean glass, apply a thin layer of a mixture that imitates white snow. Try to create irregularities with a brush that are characteristic of natural snow cover.
Don't wait for the artificial snow to dry - sprinkle the mixture with sparkles of white snow. Shake off the excess, and after the snow has completely dried, brush off the remaining glitter with a brush and start sculpting carrots, eyes and coals from polymer clay for a radiant smile.
After the details of the snowman's face have been in the oven (the drying time is indicated by the manufacturer on the packaging) and have cooled, you can begin to decorate: gluing them onto the glass. When the glue is completely dry, decorate the leg with a stylish scarf.
 Advice.
To prevent the decorative scarf from sliding down the leg during the New Year's feast, secure it to the glass with a drop of glue.
As for serving New Year's champagne on the festive table, you will need a freezer, a mold and a rowan tree for the bucket.
In this article we will look at how to make an original design for wedding glasses with your own hands, what material to choose, what ideas to quickly and easily bring to life.
Preparing for a wedding is a hectic business. The main thing is not to forget anything, the newlyweds say in their thoughts. To do this, you need to make a to-do list and adjust it as plans are completed and changed.
How many sets of glasses will be needed for newlyweds?
What do newlyweds beat and what do they drink from at a wedding? Of course, from glasses that become family heirlooms after the celebration. The established tradition of breaking them for luck leads us to the fact that you need to buy a spare set, or better yet two. In order not to rush around with glasses and not accidentally break them in the chaos: we prepare the first pair for the registry office, the second pair for a photo shoot in nature, and the third for the festive table.
All these little things need to be taken into account so as not to get upset over trifles during the celebration.

But ordinary glasses are no longer interesting, faded and unfashionable; they definitely need to be decorated and given sophistication. Decorating glasses for a wedding with your own hands brings not only pleasure, but also an unforgettable experience from the resulting result. The soul is put into the work done, adding zest to the masterpiece.
A lot of imagination, free time and available materials allow you to make the design of glasses bright and unique.
So, how to decorate wine glasses? You will need the following materials for work: openwork lace, glue, satin ribbons, flowers, rhinestones, beads, glass paints.
DIY decoration of glasses for a wedding with rhinestones
Shimmering in the rays of the sun, such a glass will sparkle with bright reflections. The size and color of rhinestones can be any desired. It all depends on the pattern of the design. There is room for your imagination to run wild here. To broaden your horizons, you can look at photos of exclusive works in specialized wedding magazines in advance.

Decoration with ribbons
The color of the ribbons depends on the style in which the room will be decorated. Let's look at the step-by-step transformation of a glass.
We put several ribbons together in different colors. Wedding colors - yellow, white, soft pink, cornflower blue, light green, blue. We glue the glass with glue so that the ribbons do not come off, and wrap the glass very tightly in a circle, along the path coated with glue. You can only wrap the leg. We glue a bow in the middle and place a bead inside it.
You don’t need to use glue in this work if you make a bow from the remaining ends. Before working with satin ribbons, their ends must be treated with fire so that the product does not fray.
Roses made from ribbons that are made of narrow material look very beautiful.
If for some reason you can’t do it yourself, you can purchase ready-made products in the store.

Next, we offer a master class on the simplest and easiest rose to make. We take the ribbon and begin to twist it into a thin tube to form the middle of the rose. Using a needle, we record the result. Next, we bend the ribbon a little and continue twisting, but not tightening it so much and periodically fixing the product with a thread and a needle.
It turns out to be a half-opened bud. We prepare several of these flowers and glue them from the base of the wine glass down to the stem. You can also decorate the bottles on the table for the company.

Decorating glasses for a wedding with your own hands using lace
Using special glue, we place thin, elegant, openwork lace on the glass, wrapping it in a circle, going down to the stem. For expressiveness, we decorate it with rhinestones. The champagne on the newlyweds' table should be decorated, just like the glasses. Such decoration will highlight their creative abilities and refined taste.

Decoration with mastic or polymer clay
This is a more labor-intensive process since the clay must be baked. At the end of the work, the product is varnished and fixed on the glass.

Extravagant feather decoration. Bright, and at the same time gentle. Feathers can be purchased at the store in different colors.
Decor of glasses with rose petals
We disassemble the flower into individual petals, degrease the surface of the wine glass, turn it over (for ease of use), glue the smallest petals and let the first tier dry.
Covering the gaps, we move on to the second circle, glue not joint to joint, but a little lower. This process continues until we reach the stem of the glass. The largest petals are glued at its base. The result at the end of the work is a glass in the core of a rose.

Painting on glasses
Special golden and white paints are used. Dotted patterns, bows, rings, curls, smooth lines between which rhinestones, beads, roses are placed - it looks great. In the video, the bride and groom with such beautiful glasses in their hands will look sophisticated and elegant.
Fantasize and create your masterpieces; years later they will remind you of this great and solemn day.
Video on the topic of the article