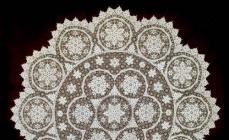
Openwork poncho
Execution technology:
1/4 PONCHO
The poncho consists of four identical parts.
Knit the remaining parts in the same way or make two paired parts, i.e. in one detail we make a decrease on the left, in another on the right.
ASSEMBLY
We sweep the parts together two at a time, lightly steam and sew all the seams.
COLLAR
Knit a collar with a false elastic band 1x1 with density changes: 10 r.-pl.5, 10 r.-pl.4, 10 r.-pl.3. The second half of the collar is also knitted with a change in density, but in the reverse order.
After the 70th row, we put the loops of the last row of the half of the plank knitted at the beginning onto the needles with a decker, putting the previously inserted needles into work. Knit the second half of the bar - 10 rubles, finish with an auxiliary thread.
ASSEMBLY
Lightly steam the collar, sew the side sections and kettle the open loops of the placket to the neck of the poncho along the front side. Sew the inner part of the strip with a seam over the edge using broaches of the kettel seam.
Lightly steam the product again and crochet the bottom edge "bushes" of lush columns.
"Knitting is practical, fashionable." Album. N.G. Lavrova, M., 1975
Addition from TS
This model can become the basic one, on the basis of which we carry out different options:
1. If we take yarn with the addition of lurex and knit such a product with an openwork pattern, such as “guipure,” we will get a beautiful cape for a festive outfit. In this case, it is best not to knit the collar, but to crochet everything, choosing a beautiful pattern. The lower edge can be decorated with fringe from tassels.
2. On one font, such a product can be knitted in any weave. For example, if you take a beautiful boucle yarn, you can simply knit it with a stockinette stitch. You can choose a press pattern, and the possibilities of “weaving” for such a product are endless.
3. In addition, this technology can also be used for double knitting. In this case, you can knit with any single-color weave or jacquard.
4. The collar can be knitted not only with a “false elastic” (single-fold machine), but with a regular 1x1 elastic. You can knit a cowl collar or a turn-down collar and make a placket fastener in the front seam.
Wear it for your health!
Size: 52-56
Yarn: Alpina Klement (80% alpaca, 20% merino wool; 300m/50g) – 500g.
Weaves: full fung (or English elastic band), half-fang openings (with pearl elastic band)
Density: fang PL4*/5, dissolutions on half-fang PL3/4
Loop test: fang Pg-1.48 r/cm, Pv-7.54 r/cm; openings on the half-fang Pg-1.66 r/cm, Pv-6.66 r/cm
BACK
Shifting the needle beds to H (needle versus two needles). Align the needles on both needle beds in the working zone 24-0-24 under a full eraser. Cast on loops. Make the first row of the zigzag on the working density; instead of the securing circular rows, knit 1 row of the eraser also on the working density. Continue knitting with English rib on PL4*/5. To expand the fabric, add 1 loop on each side of the fabric 14 times in every 5th row, then another 8 times in every 9th row. From a height of 150 rows, begin making shaped decreases on both sides of the fabric, so that along the edges of the fabric you get strips of 5 inclined loops. Decrease 1 stitch on both sides of the fabric 32 times in every 7th row. At a height of 376 rows, close the loops of the last row in one step without tightening.
BEFORE
Before starting the shaped decreases, knit in the same way as the back. Starting from row 150, decrease one loop on both sides 31 times in every 6th row. At a height of 338 rows, close the loops of the last row in one step without tightening.
SLEEVE (2 parts)
Shift the needle bar to N. Align the needles on both needle bars in the working area 37-0-37 under the full eraser. Cast on loops. Make the first row of the zigzag on the working density; instead of the securing circular rows, knit 1 row of the eraser also on the working density. Continue knitting with English rib on PL4*/5, making shaped decreases along the edges of the fabric. On the left side of the fabric, decrease 1 loop 26 times in every 8 row. After row 211, instead of shaped decreases, start performing simple decreases. Decrease 1 stitch in every 2nd row 22 times. On the right side of the fabric, decrease 1 loop 26 times in every 10 row. Knit the second sleeve mirror the first.
LOWER BACK AND FRONT DETAIL
Shifting the needle beds to H (needle versus two needles). Set the needles on both needle beds to work in the working area 78-0-78 under a full eraser. Cast on loops. Make the first zigzag row and securing circular rows on PL7/8. Transfer the loops from the ZI needles to the PI needles according to diagram 1. Leave the empty needles along the ZI in work. Knit 1 row of eraser. Next, knit with a half-fang (pearl elastic) directly on PL3/4. Adjust the carriages so that the yarn overs are aligned. At the height of the 136th row, slip the loops from those needles along the SI from which the transfer to the PI was made at the beginning of knitting. Transfer all stitches from PI to SI and knit 2 rows in stockinette stitch on PL4. Cast off all stitches of the last row in one step. Knit the second part in the same way as the first.
LOWER SLEEVE DETAIL (2 parts)
Knit similarly to the front and back pieces on needles in a working zone of 50-0-50.
COLLAR
Up to a height of 120 rows, knit similarly to the front and back pieces on needles in the working area 64-0-64. After dropping the loops from the ZI needles on the 120th row, leave the empty ZI needles in work and then knit with an eraser on PL3/4 for 10 rows. Then knit 12 rows using circular knitting at the same density. Kettle the collar into the “pocket” on the machine. To do this, leave the canvas hanging on the needles of the machine until the quilting begins.
ASSEMBLY
- On the bottom parts of the product, loosen the dropped loops along the entire width and length of the fabric.
- Allow the product parts to rest. Steam the fabric on one side and tuck all ends.
- Along the bottom of the front, back and sleeves, sew on the hem pieces made by unraveling.
- Sew the parts of the front, back and sleeves together, leaving one seam on the back unsewn.
Size 46-48
The model is made on the back needle bed double font knitting machine using the weaving pattern "Weating"
Yarn consumption: 600 g of wool yarn (160 ohm/100 g) white, 5 ply.
For finishing: 100 g each of wool yarn (160 ohm/100 g) in turquoise, pink, blue, coral, burgundy colors.
Fold 2 threads of each finishing color together and make a weaving pattern according to patterns 1,2,3.
Density 9.
Knitting density: 23 p. x 40 r. = 10 x 10 cm.
Main pattern: alternating the reverse side of the stockinette stitch with “Weaving” stripes.
weaving pattern do it manually, laying finishing thread on the needles, under the needles and twisting the specified number of needles the required number of times according to the diagrams.
The poncho consists of a main fabric and a yoke.
The main fabric consists of 8 wedges, which are made one after another by partial knitting in one fabric. Start working from the middle of the straight section of one of the wedges.
Cast on 160 open loops with an auxiliary thread and knit 8 - 10 r. Change the thread to the main one, knit 1 row with the main thread and start making the weaving pattern. Knit: * pattern according to pattern No. 2, 4 rows of stockinette stitch, pattern according to pattern No. 3, 4 rows of stockinette stitch, pattern according to pattern No. 1. Then change the shoulder carriages on the shoulder for 2 fontours, lift the front needle bed, connect the carriages. Set the shift of the needle beds to K - 5. Place 160 needles in the RP on the front needle bed and tie 1 p. eraser. Drop the stitches from the front needle bar, lower the front needle bar, change the carriage arm to a single-piece one. (Pull the fabric strongly. You will get elongated loops on the back needle bed. Knit 1 row on the back needle bed. Then knit: pattern according to pattern 1. 4 rows of stockinette stitch, pattern according to pattern 2, 4 rows of stockinette stitch, pattern according to pattern 1.
The straight part of the wedge is finished.
Then, to form a wedge (Diagram 5), start moving into the PNP from the side of the upper part of the poncho 6 times with 12 needles, 8 times with 11 needles. Return all the needles to the RP at once, knit 1 smoothing row, pattern row 2, 1 smoothing row and bring all the needles to the RP. Now insert into the RP from the bottom of the product 8 times with 11 needles, 6 times with 12 needles. When all the needles are in the RP. knit the smoothing row pattern according to pattern 1. 4 rows of stockinette stitch, pattern according to pattern 2.4 rows of stockinette stitch pattern according to pattern 1.
After this, make a row of elongated loops, as you did earlier. Next, knit the pattern according to pattern 1, 4 p. stockinette stitch*.
One full wedge is knitted. Now repeat from* to* 7 more times.
When tying the last wedge of the poncho, it should be taken into account that after partially knitting the last wedge, it is necessary to knit the beginning of the straight part of the 1st wedge. To do this, after a smoothing row and partial knitting, you need to knit 4 rows. stockinette stitch, pattern according to pattern 2. 4 rows of stockinette stitch, pattern according to pattern 1, 1 row of elongated loops, pattern according to pattern 1, 2 rows of stockinette stitch. Change the thread to an auxiliary thread and knit 10-12 r. Remove the fabric from the machine needles, steam it and sew open loops of the beginning and end
horizontal knitted seam "loop to loop".
YOKE
The yoke is made of two parts: back and front. Back of the yoke Cast on 140 stitches with an auxiliary thread and knit 8 - 10 rows. auxiliary drink. Change the thread to the main thread and knit 4 rows. stockinette stitch. Then knit the pattern according to pattern 1, 4 rows of stockinette stitch, pattern according to pattern 1, 3 rows of stockinette stitch, on the 4th row, to give the yoke a rounded shape, decrease every 8 stitches in the middle of the fabric. To do this, remove the fabric onto an auxiliary thread and then hang 2 stitches on one needle every 7 stitches. Then knit the pattern according to pattern 1, 3 rows of stockinette stitch, pattern according to pattern 3. Now decrease every 7 stitches, as described above. Next, knit 10 r. stitch, decrease each stitch.
Knit the pattern according to pattern 1, 9 r. stockinette stitch, decrease every 5th loop. Knit the pattern according to pattern 3, 3 rows of stockinette stitch, pattern according to pattern 1, decrease every 4th loop. There will be 38 stitches left on the machine needles. Divide these loops into 5 parts: 7 sts, 7 sts, 10 sts... 7 sts, 7 sts. Leave the central 10 needles in the RP, and bring out 14 needles on each side into the PNP. Insert needles into the RP from the left and right sides 2 times. When all the needles are in the RP, knit 1 smoothing row, pattern according to pattern 1, 2 more rows. iron.
Slip all stitches onto auxiliary thread.
Yoke front
The front part of the yoke is made similarly to the back part up to the neckline. For the neckline, close 7 stitches in the middle of the fabric and tie both parts separately
To form a stand, knit a binding 32 rows high, and tie the middle of the binding (rows 15 and 16) more tightly than the main fabric for a tighter fit of the stand to the neck. Steam the binding and kettle it on the front and back sides. Tie the bottom of the poncho with one row of single crochets and “crawfish step”.
Sew on a button and tie a loop in the form of a VP chain.
Finish the poncho with tassels.


A poncho is a universal wardrobe item. It goes well with most things, can be worn at any time of the year and hides features that you don't want to show off. Knit a poncho with your own hands. This is not difficult to do, and it takes very little time. Knitting a poncho- a fascinating activity that can be mastered by both an experienced craftswoman and a beginner.
How to choose a knitted poncho model
First, decide on the size and model of the product. There should be no problems with the size, since most capes are standard and fit any figure. The exact length can be determined during the knitting process by trying it on yourself. Many patterns are knitted from top to bottom, so if you think that the product is a little short, you can lengthen it by knitting the required number of rows.
The choice of models is huge. This could be a traditional Mexican cape, a half-jacket, a short coat, something similar to a bolero, a model with a hood, with buttons, zippers, or with appliqués. It all depends on your desires.
Choosing yarn for knitting a poncho
Depends on what time of year it is outside. An openwork poncho intended to be worn on the beach is best knitted from thin cotton thread. For summer evenings, you can buy thicker threads and make the knitting tighter.
A poncho made of sheep or camel wool will become a faithful companion in the cooler months, and if you try, you can turn an ordinary cape into a full-fledged outerwear for autumn or winter. To do this, just line it with fur.
Consider also what poncho knitting pattern. Different yarns look different depending on the patterns.
There are many ways to create exactly “your” poncho, make it the way you like.
How to choose knitting needles for knitting a poncho
The size of the spokes is their diameter in mm. If you can't figure out what size knitting needles you need, look at the gauge of the yarn. It is optimal if the knitting needles are 1.5-2 times thicker. Each craftswoman has her own knitting density, so for a correct calculation it is better to create a sample and count the loops and rows.
Sometimes knitting needles of different sizes are required to knit one product. The main fabric is knitted with one knitting needle, and the decorative elements with another.
When buying knitting needles, make sure they are well polished, otherwise the yarn will catch.
The model has been chosen, the knitting needles and yarn have been purchased, all that remains is to look at the patterns and start knitting. Good luck!
Knitting a poncho, selection from our website
Poncho – Shayta pullover for girls. Work by Oksana Usmanova

Poncho - jacket Wings knitted. Tatyana's work

Openwork poncho - jacket. Work by Marina Efimenko


Pullover - poncho knitted. Work by Marina Efimenko

Knitted poncho. Vilena's work

Knitted poncho – Lyudmila’s work

Poncho with jacquard patterns - the work of Maria Casanova

Poncho, scarf and leg warmers for girls

Poncho with fringe

Knitted melange poncho

Pullover - poncho

Children's poncho with tassels

Elegant cape (poncho) for girls

Melange yarn poncho

Knitted melange yarn poncho

Knitted striped poncho

Yellow set: poncho and handbag, knitted with knitting needles

White poncho with braids

Knitting: poncho and handbag

Poncho for girls

Knitting – striped poncho

Poncho in patchwork technique

Knitted poncho

Yellow poncho

Knitting a poncho, models from the Internet
Knitting a poncho with a “shell” border
Complete harmony! This shoulder-length poncho is knitted from an all-season blend yarn in an unusually pure mint color. Improves complexion and lifts your mood!
Poncho size: one size.
You will need: yarn (55% wool, 45% cotton; 130 m/50 g) - 450 g mint color; circular knitting needles No. 4.5; hook number 4.

Knitted poncho in the round
The openwork poncho is knitted in circular rows with a single fabric, and a hat elastic is passed along the top edge to reduce the width.
Size: one size.
You will need: yarn (100% linen; 110 m/50 g) - 550 g beige; short and long circular knitting needles No. 4.5; hat elastic.

Knitting a poncho for a girl
Yarn in skeins (300 g). 2 skeins.
Calculation of loops when knitting products in a circle from the neckline and advice Cast on 80 loops with waste thread using knitting needles 3 and knit three rows with any pattern (this part will later be removed). Next, knit one row with slippery thread. Next, switch to 3.5 knitting needles and knit with the main thread.

Knitting an openwork poncho
A thin openwork poncho is suitable for cool summer evenings. Description of knitting a poncho from designer Martin Storey translated from Knitting Magazine.
Sizes: 8-10 (12-14, 16-18, 20-22, 24-26).
Chest circumference – 81-86 (91-97, 102-107, 112-117, 122-127) cm,
The chest circumference of the finished product is 142 (146, 150, 154, 158) cm.
Necessary materials:
Rowan Summerlite yarn (100% cotton; 175 m / 50 grams per skein) – 8 (9, 9, 10, 10) skeins.
Required tools:
Circular needles No. 2.25 no more than 40 cm long, No. 3 120 cm long, stitch holders.

Pullover – poncho knitted with a braid pattern
Size: single.
You will need: 650 g of beige (col. 00010) Schachenmayr SOFT MIX yarn (25% merino wool, 30% alpaca, 45% polyamide, 113 m/25 g); knitting needles No. 5.5-6; circular knitting needles No. 5.5-6, 40 cm long; knitting needle for braids or auxiliary spoke.

Knitting a poncho with braids
At work and at the movies, at a school meeting and on a date, you will feel at home in this model.
Charming poncho knitted with a pattern of “cones”
The poncho, with a perfect fit on the shoulders, takes on a beautiful trapezoid shape due to the even decreases in the loops.
One size.
You will need: yarn (41% natural wool, 32% polyester, 13% polyacrylic, 10% alpaca, 4% nylon; 105 m/50 g) - 750 g burgundy; long circular needles No. 6.

A very beautiful poncho from a Japanese magazine! There is no description - there are only two diagrams. Experienced needlewomen will be able to knit this model.

Knitting a delicate blue poncho with knitting needles
- Size(s): S/M – L/XL – XXL/XXXL
- Yarn: DROPS PARIS from Garnstudio (100% cotton; 50 gr. ~ 75 m.)
- Number of balls: 400-450-550 gr.
- Tool(s): circular knitting needles (80 cm) 6 mm.
- Knitting density: 14 p. x 23 r. pattern A.1 = 10 x 10 cm.
- This romantic, elegant, soft poncho is a must have in your wardrobe.

Knitting a poncho
The poncho is knitted on knitting needles with a patent elastic band with an offset. The knitting is carried out vertically in the round, the pattern consists of flared wedges due to partial knitting. Yarn: Yarn JAZZ MAGIC 100% microfiber, 225 m, 100 g.
Black circle = 1 p. knit. along with the yarn over. Circle with a cross inside = 1 p. knit purl together with yarn over. But in this pattern it is important which stitches you knit with – classic or grandma’s.

Knitted gray poncho
To knit a poncho you will need:
- yarn Garnstudio Drops Nepal (65% wool, 35% alpaca, 75m/50g) 14 skeins
- circular knitting needles No. 5
- 4 markers

Knitted poncho with knitting needles with branches
Instructions for women's size Small. Changes to sizes Medium, Large are in parentheses.
Final dimensions of the poncho:
Bust - 102(112-122) cm. Length - 67(69-70) cm.
Materials:
13 (14-15) skeins of BERROCO SMART MOHAIR (50 rp.) color No. 8803 Dolphin (41% mohair, 54% acrylic, 5% polyester, 50 g – 100 m)
Straight knitting needles No. 5.5 and 6.5 or knitting needles matching the pattern, circular knitting needles No. 5.5 40 cm long, loop holder for braid loops (sp), 2 stitch markers, knitting needle.
Knitted poncho with royal braid
The video should load here, please wait or refresh the page.