Easter is a wonderful holiday that not only adults, but also children enjoy. This Christian holiday has its own traditions. But it is worth saying that it is customary to make all kinds of crafts for such a holiday. Today we will offer you interesting crafts for Easter 2017 that you can make with your own hands from cotton pads. Don't be surprised by this. After all, you can make many interesting crafts from cotton pads. Of course, to create such crafts you will need handy materials. So remember this point.
Easter crafts from cotton pads
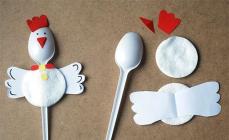
Cockerel made from a plastic spoon.
A fun craft - the Cockerel is very easy to make. Prepare for this occasion a couple of disks, a plastic spoon, white paper, glue and parts for decorating the face.
Progress:
- You should cut out wings from a sheet of white paper.
- Then you should attach a spoon to the wings.
- Next, glue a second cotton pad to the spoon.
- Now let's design the cockerel. We attach to it the parts that were previously cut out of colored paper.

Owl made of cotton pads.
This craft is simple to make. Adults and children can participate in its creation. To create a craft, take:

- cotton pads and PVA glue,
- colored cardboard of any color and colored paper,
- buttons and scissors.
Progress:
- To make an owl craft, all the details should be cut out symmetrically. It's worth starting with the head. You need to cut off a third from the first cotton pad. In this case, most of the disk will be the head. And the smaller part of the disk will imitate the eyebrows of an owl. Therefore, the smaller part should be folded in half and cut. In this case, it is worth making even cuts along the rounded side.
- To make the body, you need to take the second disk and fold it in half. You also need to make cuts on this disk that will imitate the feathers of an owl.
- To create wings, you need to fold another disk in half and cut both parts along the rounded side.
- Glue the blanks that you cut out to the cardboard. First the wings are glued, and the body needs to be glued on top of them.
- After that, you should glue the head and place the eyebrows on it.
- Now it’s time to glue the button eyes and a paper triangle, which will be the nose of the craft.
- Next, you should complement your composition with a tree branch and stars.
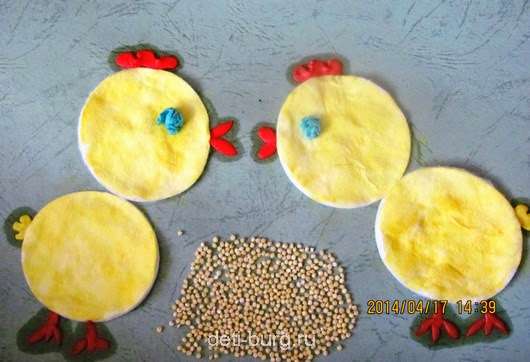
Easter composition made from cotton pads.
Easter crafts made from cotton pads can be a wonderful gift for anyone. In addition, such products can freely participate in the Easter exhibition. So, in order to make this craft you need to prepare:

- gouache paints and a sheet of cardboard,
- brush and foam swabs,
- cotton pads and glue,
- brown wool threads,
- sequins and plasticine,
- braid, seeds and scissors,
- cocktail tubes.
Progress:
- On a sheet of paper you need to draw a green background. Use a tampon for this.
- We paint cotton pads yellow.
- You need to make a tree from brown threads.
- You need to make willow buds from cotton wool.
- Next, you need to make chickens from cotton pads.
- We make the letters XB from the braid and glue them to the composition.
- It’s worth making a frame for the Easter picture. Use cocktail straws for this.
Cockerels made from cotton pads. Various options.
The first version of the chicken is created from cotton pads. Take 3 cotton pads. And be sure to color them. Cut out individual elements from paper and glue to the chicken. Also, don’t forget to sprinkle cereal on your chick.
To create the next chicken, you should take yellow yarn. Lubricate the disk with glue. Cover it with yarn. The remaining parts are cut out of colored paper and also glued on.

Another cotton pad chicken.

And the creation of this composition will involve a chicken, which can be made from simple cotton wool.

Application - sheep.
The sheep applique is very easy to make. In your work you should use cotton swabs and disks. You will also need colored paper to create flowers. To create such a picture, be sure to choose a bright colored cardboard on which the remaining parts will be attached.

Postcard using cotton pads.
You can make a wonderful card if you use individual elements of cotton pads. For work you will need:
- cotton pads and colored paper,
- finger paints and PVA glue,
- eyes.
Progress:
- First of all, you need to cut out two chickens from paper.
- We use cotton pads to cut out egg shells.
- You must cut out grass from green paper and stick it on.
- Now glue the eyes and beak to the chickens. You can also add a bow for decoration.
- After that, use finger paints to paint the grass and clouds.

Easter bouquet.
If you take blue cardboard and draw a twig on it with black paint, and make leaves from cotton pads, you can get a beautiful willow twig.

Finally
In this article we have listed for you interesting crafts made from cotton pads for Easter. Of course, you can supplement these crafts with your imagination or additional details. As a result, you should end up with something stunningly beautiful.
Beautiful New Year's crafts are great for decorating your home, school classrooms and kindergarten rooms. Such products can be easily made by both children and primary and secondary school students. Do-it-yourself bright rooster made from paper, cotton pads, plastic bottles does not require any special skills - they can be easily made from inexpensive and simple materials. And to make the symbol of the 2017 New Year a bright fiery one, you can use different combinations of materials with colorful colors. The considered toy master classes with photos and videos are great for quick execution. They can be used for entertaining handicraft activities in schools and kindergartens. The article also presents an original craft for parents - a rooster costume for a matinee.
How to make a beautiful Rooster symbol of 2017 with your own hands - an idea for kindergarten

A very bright and beautiful craft for the New Year of the Rooster can be made from such simple materials as plastic bottles and plates, glasses. The unusual symbol of the year, the rooster, is made with your own hands quite quickly. It can be made to decorate a corridor or office or bedroom. The colorful craft will fit perfectly into the overall interior and will be a wonderful addition to the New Year tree.
Master class materials: bright DIY rooster craft
- plastic bottles (brown) - 3 pcs.;
- plastic plates (red and yellow) - 2 pcs.;
- plastic glasses (red and yellow) - 5 and 6 of different colors;
- disposable spoon - 2 pcs.;
- yellow ball (for the pool);
- stapler, marker, tape.
Master class on making a rooster with your own hands - an interesting decor for school and kindergarten
- The top parts of the bottles are cut off and firmly fastened with ordinary tape, as shown in the photo.

- The upper parts of disposable glasses are cut into fringes and placed on the bottle one by one. 2 top glasses and cut into fringe on the other side.

- The sides of disposable plates must be carefully cut off. Finely cut the inner sides with scissors to create a bright fringe. Connect the parts together with a stapler.

- We make a small cut on the bottle and insert the prepared tail into it.

- We decorate the tail with gift or wrapping paper. Wings are cut out from the remaining parts of the plastic plates and attached to the body using double-sided tape. The ball head is also attached to the craft with double-sided tape.

- A comb, beak and “earrings” are cut out of plastic plates. The parts are glued to the rooster's head with double-sided tape. Eyes are made from disposable spoons and glued to the head. The pupils are marked with a marker.

- Additionally, you can make a small stand. For example, from a flower pot.

Original do-it-yourself paper rooster for school and kindergarten - crafts with photos and videos

It is very beautiful to make a rooster - the symbol of 2017 - with your own hands using plain paper. This craft can be supplemented with a magnet, photo, to get an original decoration for the refrigerator. Both kindergarten kids and school students can make a simple rooster out of paper with their own hands. An entertaining New Year's craft that even little ones 3-4 years old can do.
DIY materials for the “Rooster Magnet” master class for kindergarten and school
- multi-colored paper;
- glue gun;
- PVA glue;
- magnet, photographs.
A simple and clear DIY master class - New Year's rooster 2017 for school and kindergarten

Do-it-yourself soft New Year's toy Rooster for the senior group of kindergarten and school

Not only paper or plastic crafts can be prepared in the form of a symbol of the New Year 2017. To solve this problem, you can also use felt. A beautiful DIY Christmas rooster toy can be a wonderful gift for your mother or good friend. The idea is suitable for middle and high schools: children from elementary school and kindergarten will have a hard time making such a New Year's toy.
Materials for the master class DIY Rooster toy for the New Year 2017 for school
- felt;
- beads;
- needles, threads;
- padding polyester (can be replaced with regular cotton wool).
Step-by-step instructions for the master class: DIY New Year's rooster as a gift

Unusual DIY crafts for the Year of the Rooster 2017 - for school and garden with photos and videos

Every child and adult knows how pleasant it is to give and receive New Year's gifts. For such an occasion, children can make a simple craft, which can become an excellent decor for the kitchen, room, or hall. It’s not at all difficult to make gifts for the Year of the Rooster with your own hands: you just need to follow the instructions given and ensure that they are executed correctly.
Materials for the master class: DIY paper rooster
- paper plate;
- newspapers;
- paper tape;
- dye;
- PVA glue.
An interesting master class for kids - simple DIY crafts for the Year of the Rooster

Do-it-yourself small New Year's rooster made from cotton pads - crafts for school and kindergarten

A funny little rooster can be made from scrap materials. Regular cotton pads are great for this task. Even elementary and preparatory group students can make a small rooster with their own hands in kindergarten. This fun craft is a simple children's applique.
I would like to introduce you to the cockerel Petrunya.
Not a single yard in a village or village can do without this magnificent bird. So I made myself a friend, a bright and majestic owner of the yard!
I will be happy to share with you the stages of its production (based on the idea of making birds from plastic bottles by Alena Zinovieva).

To make the mold we need:
1) 5l. canister (I use liquid soap),
2) 5l plastic bottle,
3) metal-plastic pipe (leg height approximately 30-35 cm),
4) two 1.5 l. plastic bottles for thighs,
5) screws, scissors, stationery knife, screwdriver.

For fastenings, I use these self-tapping screws (I buy them by weight at hardware stores).
Small (about 1.5-1.6 cm) - for attaching feathers and component parts to each other.
Large ones (about 5-6 cm) - for attaching the head to the neck.

1) Move the top of the canister about 3cm.
2) We bend the metal-plastic pipe (shape the legs), in my case, the rooster is walking (the right leg is pushed forward), and attach it to the canister with self-tapping screws.
3) For the neck, from 5l. bottles, fold the envelope, attach it to the canister with self-tapping screws.
4) From 1.5 liter bottles we cut out two “thighs”, which we attach to the canister with self-tapping screws.

For the feathers, I used bottles of this shape. We cut off the long neck, cut the bottle into 5 feathers (we are guided by the protrusions on the bottom of the bottle), and use the upper part of the feathers.

We begin to cover the body from the “thighs”. Disconnect them from the canister for convenience.
1) attach the corrugated tube to the neck of the bottle,
2) attach the feathers using wire.

We attach the finished legs back to the canister.

Starting from the back, we cover the entire body, except the back, with feathers (we attach it to the canister with self-tapping screws). We leave the back of the neck open because there will be other feathers there.

The next step is to start making the paws. From 2.5mm copper wire (or any other wire, preferably rigid, but not steel, which bends), we bend the shape of the legs (you can see more details in MK Filin). We create the effect of paws from a corrugated tube. We insert the remaining tail between the metal-plastic pipe and the corrugated tube. You can also fill the bottom with glue for strength.

We cut out claws from the bottom of the bottle (photo). They should be narrow and long. We fasten them with glue (I use “Moment of installation - liquid nails”).

We paint the body and legs using spray paint (I use universal enamel from KUDO).

We cut out the head from construction foam using a stationery knife, it is very sharp and the cuts are smooth and not torn. If the cutting process seems complicated to you, cut out all the parts separately! Then they can be glued together with glue.


Using sandpaper (medium), we bring it to the shape we need.

We treat the surface with acrylic putty, wait for it to dry completely and sand it again until smooth. After that, we treat it with ordinary PVA glue, so the paint adheres very well.

We begin to paint the head (you can use acrylic paints, it’s more convenient). Glue on the eyes (I bought them at a fabric store).

After fitting the head to the body, the husband said that the comb turned out not like a rooster’s, but more suitable for a chicken. I decided to redo it. I made a pattern out of paper (I tried it on for a long time to make it larger). I transferred it to foam plastic, cut it out and glued it in place of the previous one.


Using wire, we begin to attach the long wing feathers. The back remains open.

I cover the top of the wings with these feathers from 1.5 liter corrugated feathers. bottles The last row goes to the bend, into the inside of the wing.

We paint it with paint, let it dry well and attach it to the body using perforated tape (sold at any hardware store) and self-tapping screws. We bend the mesh for attaching the tail (you can increase its length and the tail will turn out richer).

Let's start making the tail.
We cut feathers from 2l or 2.5l. bottles into 5 parts. We paint separately on both sides (first we applied black, after drying a little blue)

We attach it to the mesh using wire. After coloring, I cut the feathers in half again, so the tail turned out to be more magnificent.

For the feathers on the back, I cut feathers of different lengths, from transparent bottles (this makes it easier to paint with yellow), approximately 2-2.5 cm wide. I attached it to the back using self-tapping screws, 3-4 pieces at a time.


Ksenia Deryabina
Continuing to make decorations for the site, we made something like this cockerel.
For work we needed:
Three brown plastic bottles;
- disposable plates(yellow and red);
- disposable glasses(yellow and red);
Dry pool ball (yellow);
Double sided tape;
Simple tape;
Stapler;
Black marker.
From three bottles cut off the top parts and fasten them together with tape.

Disposable We cut the cups along the edge and, alternating colors, attach them with tape to the neck cockerel.

From disposable Cut off the edge of the plates and cut from the inside. The result was feathers. We collect the feathers into a tail with a stapler.

Insert the tail into the cut.

Cover the connection point with wrapping paper.
From disposable cut out the plates and attach the wings.
Attach the head with double-sided tape.

From the Reds disposable plates, cut out the comb, beard, beak and insert into the cuts on the head. From using disposable spoons to make eyes.

The cockerel is ready.

Publications on the topic:
A great idea for decorating at home, decorating a flower bed, and even in a kindergarten group or at home are flowers made from plastic bottles.
We won’t meet him in the spring, He won’t come in the summer, But in winter He comes to our children every year. He has a bright complexion, his beard looks white.
What can be made from plastic bottles? A lot of things. I bring to your attention a master class “Pots of flowers for table decoration”.
To make this craft you will need two empty plastic bottles, a glue gun and a little imagination. Let's make Santa Claus out of a 5 liter bottle.
Often educators are faced with the problem of storing didactic games. Of course, there are a large number of different containers on sale, but...
1. We will need one strip 1x20cm, two rectangles 6x4cm, two squares 10x10cm, two squares 8x8cm from a dark plastic bottle.
Strawberries from kinder surprises and plastic bottles. A very cute craft can be made from plastic bottles and kinder surprises. This.
You can create beautiful and original products from almost any material. The main thing for this is the desire to create beauty with your own hands.
Ordinary plastic spoons are perfect for home crafts. You can make bright, interesting, creative compositions from standard and unremarkable items of disposable tableware.

This exciting activity will appeal to both adults and children.
What can be made from spoons
We invite everyone who wants to please themselves and their loved ones with the results of their creativity to the “Crafts from Spoons” master class.

You will see step by step the entire process of forming crafts from plastic spoons.

Tulips
In order to make a charming bouquet of tulips, we will need:
- spoons (5 pieces for each flower);
- colored corrugated paper;
- glue with a brush;
- scissors;
- green electrical tape.

Cut red paper squares. We wrap spoons in each square and seal it.

Then we collect the tulip. To do this, we fasten 2 spoons, add 3 more to them and fix the resulting flower with electrical tape. We cut out the leaves from green paper, attach them to the stem and tie them with ribbon.

We make a bouquet and put it in a beautiful vase.

Water lily
To create a plastic water lily you need to prepare:
- spoons of different sizes,
- glue gun;
- regular glue;
- paints;
- scissors;
- green plastic bottle.
After cutting off the handles of the spoons, attach the future petals with a glue gun. You should now have an inner layer of petals.

Make the outer layer of the flower in the same way. Cut a strip measuring 12x3 cm from the bottle and make a fringe along one of its edges. Roll the strip and secure it with glue.

Paint the fringe yellow and let it dry.
Make leaves from the bottle as shown in the photo.

Attach the dried strip to the inside of the petals - this will be the center of the flower. The magnificent snow-white water lily is ready!

Garland of flowers
A bright flower garland will look very impressive, for the manufacture of which you will need:
- 18 multi-colored spoons;
- scissors;
- glue;
- thick thread;
- dye;
- pom-poms;
- thick cardboard.

Cut out 3 triangles of the same size from cardboard and color them.
Note!


Cut off the handles of the spoons. Mark the middle in the triangles and stick petals around it (6 pieces per flower). Place a pompom in the center of each flower.

Make 2 holes in each triangle and thread a thread through them, thus connecting the flowers into a garland.

Flower vase
Making a cute flower vase will require you to have:
- spoon;
- tin cans;
- scissors;
- glue;
- paints.
Paint the jar your favorite color. Cut off the handles from the spoons. Paint the rounded parts of the spoons in the desired colors.

Glue the spoons to the jar, placing them in even rows.

Note!

ladybugs
You can make a cute ladybug from spoons using:
- spoon;
- glue;
- large voluminous button;
- paints;
- scissors

After cutting off the handles of the spoons, paint the oval part of each of them. Glue the wings together. Attach a button head on top.

Candlestick
To create a sterile original candlestick, you only need the spoons themselves and glue.

By gluing the spoons together as shown in the photo and attaching a candle to the top of the structure, you will get a stylish decorative element that will brighten up any holiday.

Decorative frame
You can also use disposable spoons to create original frames that decorate various interior items.

Note!

For this you will need:
- spoons in large quantities;
- scissors;
- glue;
- polystyrene foam or thick cardboard;
- a watch, a small round mirror, a photograph or another item that is valuable to you.

After measuring the diameter of the desired object, cut out a circle of the appropriate size in cardboard or foam plastic.

Place a watch, photo or mirror in the resulting frame and secure it. Cut off the handles of the spoons. Glue the rounded parts of the spoons to the frame in rows in a circle, from the edge to the center.

Color the finished product of your creativity the way you want.
Christmas tree
Among crafts made from disposable spoons, picturesque Christmas trees are very popular, for the manufacture of which you will need:
- paper cone;
- glue;
- scissors;
- dye.

As usual, cut the spoons into 2 parts;
Glue the oval part of the spoons to the cone in a checkerboard pattern.

We paint the resulting Christmas tree any color or leave it white and admire our creation.

Maracas (musical instrument)
Creating this unusual instrument will take you very little time, but is guaranteed to delight your children.

Prepare the following materials for this:
- 2 spoons;
- plastic egg;
- scotch;

Place a small amount of rice into the egg and close.
Press the sides of the egg with spoons.

Cover the resulting model with tape.

Pumpkin
To make a large bright pumpkin from spoons, you need to prepare:
- yellow or orange spoons in large quantities;
- foam ball.

Cut the handles off the spoons.
Attach the rounded part of the spoons to the ball in a checkerboard pattern from bottom to top.

The top of the resulting pumpkin can be decorated with a small branch.

The process of creating all the described compositions is reflected in the photo of crafts made from spoons. We talked about the most popular and beautiful products made from this material and shared secrets on how to make crafts from spoons with your own hands.

We hope that our master class was useful to you and gave you aesthetic pleasure.

Photos of crafts made from spoons