A chocolate box is a box for chocolate that can be decorated for any occasion. The chocolate turns into a real gift, and on the inside of the box you can make a paper loop-holder for money, then the chocolate box replaces the postcard with an envelope.
We will need:
- chocolate;
- bright A4 cardboard;
- a piece of beautiful paper;
- ribbon;
- double sided tape;
- beads, flowers, any other decor;
- ruler, scissors.

Step 1.
We cut out the cardboard according to the diagram, taking into account the size of the chocolate bar in length and width. The figure shows the fold lines. In this case, the dimensions of the chocolate bar are 17x8 cm and height 1.5 cm.

Step 2.
We bend the cardboard along all the drawn lines. We glue double-sided tape to the edge of the “wings”.

Step 3.
Glue the wings to the back wall of the chocolate bowl, thus creating a pocket for the chocolate.
Step 4.
Close the box and tape it around the middle with double-sided tape. Glue the ribbon onto the tape.

Step 5.
We cut out a rectangle from the prepared beautiful paper, the size of which is slightly smaller than the chocolate bowl. Indentation 0.5-1 cm on each side. Glue the paper in the center of the box.

Step 6.
The inside of the cardboard can be decorated with something flat - flowers, flat beads, ribbons, pictures. If necessary, you can glue a money holder loop to the inside of the “door”. Place a chocolate bar and tie a bow. On the outside you can glue beads, flowers, pictures depending on the occasion, you can also write a beautiful wish.


Ekaterina Fesenko specially for Podarki.ru
Photo by 7darov
What is the idea of the gift?: We give an ordinary (at first glance) box of chocolates. That is, it seems like nothing special. Such a service gift. But the inside of the box is not at all as simple as it seems from the outside, which is unexpected and VERY pleasant!
Let's look at the gift not from the donor's point of view (that is, not in the sequence of production), but let's look at it through the eyes of the one to whom it is intended.
This is what it looked like: On my colleague Nina’s desk one fine Monday, this box of chocolates materialized

The note to the box (not in the photo) said that I wished Nina a happy birthday, and the box itself would tell me about my wishes. So, this is the picture you get if you remove the transparent film and open the box:
and a closer view:

We open the folded piece of paper with the Esfero logo, which plays the role of a small postcard, and there is a note:

The note reads as follows:

Ta-ta-ta-dam! The curtain rises and the box opens! And this is what Nina sees there (and this, frankly speaking, is not exactly what is usually found inside a standard box of chocolates):

Let's take a close-up look at the bonuses from left to right:
Below right is a mini-card with wishes of love. Since love is as important as air in a family, and in life in general, the entire box is strewn with colored hearts. May there be a lot of love!

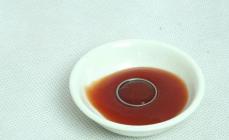
in the left corner there is essential oil of mint and coffee beans:


Inside the folded bonus leaflets are pictures and inspiring phrases on the topic. What kind of phrases are these and where to get such pictures?
What is the result? I liked the gift! It was nice to give it (because Nina is a very good person), and it was no less nice to collect bonuses from different items.
True creativity))
And a little about technical issues, which will be useful to everyone who decides to bring this gift idea to life:
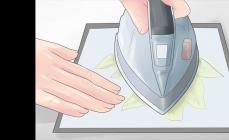
All items were glued with double-sided tape (which is so thick - on a foam base)
The box was packed in transparent film (which is also used in making bouquets)
What a gift! Both a box of chocolates and a postcard in 3D format
The idea of such a design did not belong to me, but to a talented person unknown to me, who posted a photo of his creation on the Internet. Here I will show and tell you how I made a chocolate bowl with such pockets.

For work we will need cardboard, scrap paper, glue, cutting and creasing tools. I do not mention decorations here, because the decor of the outer part of the chocolate bowl will not be included in the master class. But what else will not hurt you when working with its “insides” is a real chocolate bar and tea bags :) I will tell you here all the parameters of my pockets, but keep in mind that they are tested only on a certain type of chocolate and tea :)
So, let's start preparing the parts for our chocolate maker.
For its base, cut out a 17x22 cm rectangle from cardboard and crease it in the middle (at a distance of 10 and 12 cm from the edge).

The second detail is the future pocket for chocolate. It starts with a 10x12 cm cardboard rectangle. We make folds on the rectangle, as shown in the photo. The distance between adjacent lines is 1 cm. We crease the long side on both sides, and the short side on one side.

And one more type of parts for which we need creasing. These are future pockets for tea bags. We take rectangles measuring 8.8x14 cm. We bend along the long sides on both edges at a distance of 1 cm from the edge. We also make a fold line across, dividing the 14 cm side into 6 and 8 cm.

The creasing tool can be put aside. Now we have to make several cuts. Let's transform the chocolate pocket like this (I think you can easily do this by comparing two photos)

We cut the remaining punched squares on one side and turn them into “ears”:

Then we simply bend our part along all the fold lines -

... and it will fold itself into a pocket like this. We glue the “ears” to the “bottom” of the pocket, and we also glue the transverse strip along the edges.
What you see in the photo below is the back view of the pocket. We will then glue it to the base using these folded edges.

Now let's take care of the tea pockets. From our blanks we cut out such a part (we cut off the edges of the shorter half)

We bend it and we get this nice pocket. I rounded the corners of the valves with a special hole punch.

Glue the front side to the valves. We repeat the whole procedure with two other pockets :)

That, in fact, is all the difficulty:) all that remains is to glue the pockets to the base (previously covered with scrap paper). Don't forget to try on the chocolate and bags :)
I made a few souvenirs here for the upcoming Teacher's Day.
Instead of buying standard gift bags, I made chocolate makers. It seems to me that this is a great option for congratulations.


Strictly speaking, this technology is suitable for making packaging for any flat object - soap, books, boxes of chocolates, even cream in a flat bottle. Also, such chocolate boxes can be perfectly used as a gift envelope for money for a birthday or wedding - put chocolate and banknotes and give them in such a beautiful package.

Issue price:
sheet of cardboard from the children's set "Colored cardboard"
sheet of single-sided paper for scrapbooking 15*15 cm - 10 rub.
ribbons - 4-6 rubles per 1 m (0.5 m is enough for one package)
additional decorations - upon request and opportunity
double-sided tape (one will last a long time and not only for chocolate makers)
and plus 15-20 minutes of time
With the first chocolate maker, it may take more time, but 2.3 and subsequent ones will be done much faster and with better quality.
The idea for such chocolate makers is not mine, but after studying many master classes, I made the most convenient and fastest option for myself.
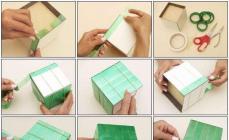
1. Take a sheet of colored or white cardboard in A4 format. If you are making it not for a standard chocolate bar, but for something else, then the dimensions will have to be changed and the cardboard will also need to be larger/smaller. On the long side we set aside 26 cm

2. and cut off the excess

3. on the front side we put it from right to left: 8.5 cm, 1 cm, 8.5 cm, 1 cm

4. put aside 2 times 1 cm from the bottom and top and draw lines

5. cut off the excess with scissors according to the diagram

6. Now we need to push all the lines, so that it is easier to make bends on them. You can push it with a non-writing pen, or the corner of a ruler; I pushed it with round scissors. After pressing with an eraser, erase all lines. Fold the cardboard along the folds.

the outlines of the future box are already visible


8. glue

It’s important to glue it evenly, otherwise the box will end up crooked

We repeat the same on the other side. And the actual base of the box is ready. Now all that remains is to decorate it.
9. Glue small pieces of double-sided tape on both sides to secure the tape. For the ties we will need about 0.5 m of tape (more or less, if desired, and of any width). Wide ribbon bows look very nice.

10. Cut scrapbooking paper 15*15 in half
Today, you won’t surprise anyone with sweets from the store. Can you make a sweet gift with your own hands?
You can make a gift from ready-made sweets, or you can bake it yourself.
The most important thing is to use your ingenuity and imagination, and everything will definitely work out! We offer you several sweet gift ideas for any occasion.
You can give your child a magical sweet sleigh with your own hands! The child will undoubtedly love such a tasty and unusual gift. 
To make a sweet sleigh we will need 2 cane-shaped candies, chocolates and candy bars, a piece of satin ribbon, glue or tape.
We take lollipops that will serve as runners in the sleigh, and place a wide KitKat-type chocolate bar or a large chocolate bar on them.
A sweet gift for your little sweet tooth is ready!
You can make a sweet gift for a boy from marmalade in the form of a kebab. Such a sweet gift can be given not only to a child, but also to a boyfriend.
For such a gift, you need to prepare skewers, marmalade figures, bags for packaging, and glue.
We put marmalades on a skewer, alternating colors; we do not pierce the outermost marmalade all the way, so as not to pierce the packaging. 
We wrap the resulting kebab in a transparent bag and tie it with a beautiful ribbon.
Chocolate card
As a gift to your loved one, you can prepare a creative sweet gift in the form of a chocolate card.
To do this, you just need to provide the masters with a photo of the gift recipient, indicate his name, and write a few warm words. Your personalized sweet gift is ready! You can attach a beautiful congratulation to the gift. 
Car as a gift
A man can make a sweet gift with his own hands in the form of a chocolate car! For such a gift you need to prepare chocolates, polystyrene foam, double-sided tape, paper and felt-tip pens.
We make the frame of our car from polystyrene foam. We cut out wheels from cardboard and cover them with white paper, and attach sweets on top. We attach the wheels to the car, then cover the entire body with candies. 
We decorate places for glass with foil. We glue eyes on the windshield of the car. To ensure the safety of the gift, you need to pack it in transparent mica and secure it with a beautiful ribbon.
You can give such a sweet gift to your husband on his birthday if he dreams of a new car and make his dream come true!
Delicious camera
You can give your beloved guy an original sweet gift in the form of a camera for his birthday. To do this, you will need a can of instant coffee, small rectangular chocolates, a satin ribbon or strap, scissors, thick cardboard, and glue. 
We cut out a base for the camera from cardboard, paste it on both sides with chocolates and form a camera. On the front part we glue a coffee can, which will replace the photo lens. And the final touch is to secure the strap or ribbon with candy bars on top. The sweet gift is ready!
Sweet flowerbed as a gift
You can give a sweet gift in the form of a flower bed to a friend or mother who loves to grow flowers.
For such an original gift, you need to prepare a beautiful flower pot, a set of sweets, a piece of foam plastic, glue, tape and skewers.
We glue different candies to the skewers using tape or glue. Along with the sweets, you can stick small notes with wishes. 
Cut the foam into the required shape and place it in a pot. Next, we plant sweet flowers in our flowerbed in random order.
Cover the top of the pot with artificial grass or green velvet.
For sweets, you can make original sweet baskets with your own hands. To do this we need the required number of balloons, chocolate, a tray or baking sheet, and a needle.
Melt the chocolate in a water bath. At this time, we inflate balloons of the same size as our planned baskets. Lubricate part of the ball with vegetable oil. 
Pour one spoonful of melted chocolate mass onto a baking sheet, this will serve as a stand for our basket, then dip part of the ball, greased with butter, into chocolate and place it on the stand.
We give the chocolate mass time to harden, and pierce the ball with a needle or pin. We made great baskets or cups for sweets. You can fill such a stand with any delicious dessert or small sweets.
Raffaello
With your own hands you can prepare a delicious and beautiful sweet gift called “Raffaello”. Everything is very simple and easy! To make them, we do not require any kitchen appliances or complex manipulations. 
To prepare Raffaello we will need:
- butter – 1 pack;
- condensed milk 1 can;
- nuts;
- coconut flakes;
- nuts.
Using a mixer or by hand, mix the butter and condensed milk. Add coconut flakes to the resulting mass until the sweet mass thickens. 
For a complete sensation, we need beautiful packaging made by ourselves.
Christmas balls as gifts for friends and family
To do this, you need cocoa powder, transparent Christmas tree balls, preferably plastic, confectionery sprinkles, chocolate chips, preferably white, marshmallows. First of all, let's prepare the Christmas balls. To do this, remove the top part with the Christmas tree fasteners from the balls, wash and dry. 
Such a beautiful sweet gift can be given to friends or family for the New Year, so that such an unusual ball can become a decoration for their New Year tree.
And then such a gift can become a delicious addition to dinner or breakfast. To do this, you just need to open the lid of the toy and pour the contents into a cup of hot milk or water.
Ice cream set
Children can be given an ice cream set as a sweet gift. To do this you will need packaging for sweet gifts, chocolate syrup,  confectionery toppings of various types, wafer cones, wrapping paper, a small glass jar, ribbon and a piece of fabric.
Place the confectionery topping into several plastic bags. Pour the chocolate syrup into a jar, close the lid and tie a piece of fabric on top, which we secure with a ribbon. Next, place all the ingredients carefully in a gift box. Decorate with a bow or ribbon.
Delicious rainbow - a sweet gift in a jar with your own hands.
For this we need a glass jar, multi-colored dragees, chocolate medals, marshmallows, and ribbon.
We sort the dragees by color. We place chocolate medals in a golden wrapper at the bottom of the jar, then pour the dragees according to the colors of the rainbow - red, orange, yellow, green, blue, indigo, violet. 
The final piece will be a layer of marshmallow, which needs to be slightly pressed before closing the jar to compact the dragee to prevent mixing.
We decorate the jar with fabric and tie it with a ribbon, to which we attach a greeting card.
Kinder Surprise
You can give your beloved girl a sweet gift in the form of a Kinder surprise, and place a beautiful pendant, earrings or bracelet inside.
Delicious bouquet
For a girl's birthday, you can give an unusual gift in the form of a bouquet of sweets. You can make such a sweet gift for a girl with your own hands. 
To do this you will need candy, a small soft toy, wrapping paper, ribbon, wooden sticks or plastic tubes. A master class on making sweet bouquets can be found on the Internet.
Sweet first aid kit to lift your spirits
You can give a sweet first aid kit to a person who is in a bad mood. It's very easy to do. We take a beautiful box, maybe a tin one. 
And fill it to the top with various candies. We glue the inscription “cure for depression” or something like that, tie it with a beautiful ribbon and give it to the “patient”.
This gift will be a great way to cure a bad mood!
Views: 2,451