Crochet skill a few decades ago for a woman was considered as needed as the ability to read or write. And this is not by chance, because the knowledge of the rules of the weft of the loop allows not only to create beautiful products, but also add special charm and elegance or decorations. Therefore, in our days, information how to bind the edge of the product, will help bring originality to many things.
Nuances of knitting process
One of the last stages of creating products from yarn is the edge strapping. It would seem that this is such a slight point compared to knitting the whole canvas! However, the neakkurat edge is able to spoil all the impression even from the most beautiful pattern. In addition, if you neglected the binding of the finished product, it may simply dismiss during operation. Also a few rows cliched with crochet may:
- help avoid twisting the edges of knitwear;
- refresh frenzy outfits;
- hide disadvantages, for example, ugly seam or stains;
- make the edge tough so that the product holds the form.
All these problems are easily solved with the help of a properly selected yarn and hook - a real chopstone stick.
One of the most simple patterns for the strapping is "Radi Step". To perform it, you need to enter the head of the hook in the first right loop, but for the direction of knitting - on the left side to the right. The hook is entered into all edge loops. They have a single column, in the corner - triple. Especially beautiful such pattern looks at the threads of a contrasting shade. This type of strapping is convenient for functional things (mittens, for example), which are actively operating.

Knitting schemes Arch with air loops
For products that are tied in decorative purposes, an aircraft arc is suitable.
Instruction:
- In the edge loop, we make 1 column without Nakid.
- Optionally, they check from 4 to 12 air loops.
- We introduce the hook for the basis of 3-4 loops from the first.
- We repeat steps 1-3.
Such a drawing must be made free, otherwise the product will twist and reunite.
Another type of decorative strapping - pico pattern.

Instruction:
- We carry out the hook in the loop of the base, make 2 columns without a Nakid.
- Pick out 5-7 kettles (air).
- We start the hook in the first loop and close it together with the working.
To give the figure of originality, you can climb beads or butchers. You can also vary the frequency of openwork chains.
More complex option - district "Shell"giving edge rounded shape. In order to eliminate it, you need to plunge several cape columns in one loop. It is important to take into account one point: before and after each shell, you need to skip so many loopes as they are in each column. Then the pattern will be smooth.

Lovers of intricate drawings will like pattern "Lush columns". Only for him need thick threads.

Instruction:
- We enter the hook in the loop of the base and check from 6 to 10 looping with one nakid.
- We return to the base loop and pull the loop equal to the length of the column.
- Next follows a nakid and a long loop.
- Having done 1 of the nakid, we take all the long loops in 1 loop.
All the diagrams can be made multi-tiered, repeating the same patterns or combining them.
To the strapping was aesthetic and functional, it is necessary to take into account some recommendations:
- before starting the edge processing, you should connect a small sample to estimate the appropriate size of the border and correctly calculate the drawing around the perimeter of the product;
- to tie the edges, the threads are used slightly thinner than in the product - then the edge will not look like a dying;
- to add elegacity things, beads, sequins or buttons on the leg are used;
- if knitwear is tied up, the fabric is touched 1 time, and only then the hook is running, a row is lying without a nakid and the pattern itself - so the loop of the product will not "run."
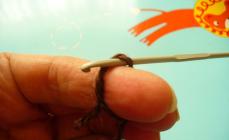
Each of us has a favorite thing that seems to be out of fashion, but it doesn't want to get rid of it. Fortunately, there is a good way to update it - to tie the neck with a crochet. In this article, we will present a few good tips for experienced craftsmen who know how to work with knitting tools, and also tell me for beginners, how to tie the neck with a crochet.
To the one who previously never crocheted, first should be accepted, and only then start creating strapping:
- Type a chain, consisting of about twenty loops (although it is enough for workout 10).
- Tie a few rows of six b / n columns (without Nakida). It is advisable to adhere to the direction - right to left.
- Subsequent ranks need to start not as in the first. Knit from air columns.
- Turn the hook for a third loop (you need to capture the thread, and then pull it out).
- The resulting loops (there must be two), you need to tie together.
As a result, you should get this even canvas:

Now we'll figure it out like till crocheted square necksweatshirts:
- Grind the hook to the place where the area of \u200b\u200bthe shoulder seam begins
- Hook a crochet thread and pull it out (so you need to create air hinges around the edge of the product)
This is the easiest square-shaped crochet neck pattern:

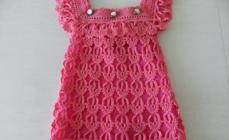
Example, how to bind the neck of the dress with a hook?
Favorite dress can be decorated with original strapping. There are two common methods that crafts are accustomed:
- "Watching a step"

- Lace

Tell first, how to tie the neck with a hook by the way "Radi Step":
- Take a long thread (it should be several times longer than 10 times longer than the edge of the neck)
- One end of the thread should be fixed at the edge of the shoulder seam
- Next we make a conventional loop (air)
- Under this loop, you need to turn the hook to catch the thread and pull it out
- The resulting loops bind to one whole
- As a result, there should be only one loop (it is necessary to start the knitting process from the very beginning)
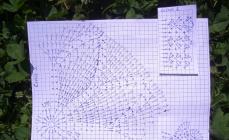
Here are a pair of orientative schemes for beginners Which will help learn how to toss the neck with a knitting hook in the way "Radiy Step":


A beautiful way to straighten the neck with a hook according to the "Lace" scheme:
- 1 - stuck with simple loops (there must be a "air" chain from ordinary loops)
- 2 - knit a chain consisting of three b / n columns and terh air loop (they should alternate in turn)
- 3 - Knit a chain consisting of two columns with C / H (with Nakid) and two air loop (they should alternate in turn)
- 4 - knit the usual chain, as in the first row
- 5 - knit a chain of 4 ordinary columns that need to complete 1 column with / n
- 6 - Knit a chain consisting of 1 column with two Caides and 1 column of C / N (these loops should be alternate with each other along the length of the entire row)
- 7 - Knit a chain consisting of one column with two navigations and 1 air loop (alternation repeats)
- 8 - knit chain 1 with a column with two navigations and 3 air loop (loops again alternate in turn)

Example, how to tie the neck of a sweater with a hook?
Recently, pullovers have become very fashionable - knitted jumpers who wear predominantly women. Therefore, for many may be an urgent topic, how beautiful to tie the neck of the semi-crochet. We offer you several options:
- The neck of the neck for the type "Boat" with the help of a hook
- 1 - knit chain from one b / n column and from an air loop (loops alternate)
- 2 - completely confusing from columns with / n
- Subsequent ranks should be repeated one by one


- V-neck strapping with a hook according to the "nodule" scheme
- 1-3 - knit b / n columns
- 4-6 - knit only by conventional loops (air)
- 7-9 - knit as the first three rows of b / n columns
- 10-12- Knit from 4 columns of b / n and 3 air loop (they should alternate each other)


Example, how to bind the neck of the vest with the hook?
Very beautifully looks at vests, the cutouts of which are made by crocheted openwork pattern.
- 1- Knit for crochet Pillar Tips without Nakid
- 2 - fit out of 3 air loop, one loop with / n, 2 air loop, one loop with / n and 7 air loop
- 3 - for crochet neck edge strappingfit like this: 1 b / n column, 4 air loops - so until the end of the row
- 4 - Looks according to the second row scheme
- 5 - ties according to the third row scheme
- 6 - ties according to the fourth scheme
- 7 - fit according to the fifth row scheme
- 8 - fit out of 3 air loop, 1 loops of C / N, 2 air loop, one loop with / n;
- 9 - knits from 4 columns of b / n, pico, 4 b / n columns, pico, 3 b / n columns, pico, 3 b / n columns


You can also raise the cutout vest of the border. For this you need:
- In the first row it is necessary to make 6 columns without Nakid
- The second row fit so - 1 column without Nakida, 2 air loops, 4 columns with Nakud, 2 air loops

It turns out a very beautiful border, which externally resembles elegant lace.
Schemes of the strapping of different types of Gorlovin with a hook


Do not rush to say goodbye to the thing that was worn out. Show a creative approach, fantasy and make your own hands a beautiful neckline for your old sweater or dress. Sometimes needlework can give things a new life. We hope that the schemes presented in this article and the crochet options will be useful to you in creativity, because they should be mastering them even those who have never kept knitting tools in their hands.
Video: "How to tie the neck with a crochet?"
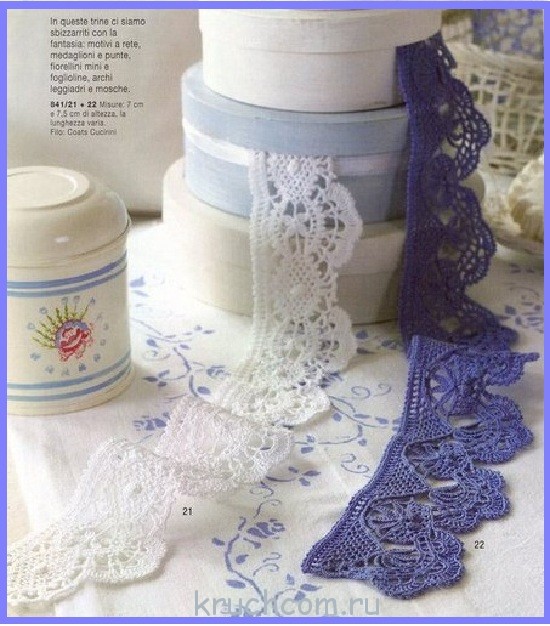
Kaima time impact is considered to be the element of knitting, which gives any product true tenderness and refinement. With it, it decorate any crochet-crocheted things - from the items of clothing to kitchen accessories (napkins, tablecloths, towels, curtains and more). Moreover, not only ready knitted products are tied with decorative border. Openwork lace, pregnated in the free edge of the fabric, can inhale a new life in the old, long forgotten the thing from the female or children's wardrobe.
Kaima knitting methods are quite a lot. They knit it along and in across, in one layer and with a layering, with the help of a fuel, openwork, ribbon technician, as well as in the form of a border or fringe. Each version of the mating of Kaima has its subtleties, therefore, if the craftswoman began to master the rims of crochet, we recommend choosing the simplest strapping schemes, subsequently gradually complicating knitting tasks. 
Today we will talk about how to knit a bunch of crochet. We offer handicrafts with a large collection of circuits and step-by-step instructions for crocheting the edges of knitted products - from simple "pico" to ultra-sized knitted "butterflies". 
Reduced text:
- VP - air the loop;
- Runway - air lifting loop;
- art. s / n - column with nakid;
- art. b / n - column without Nakid;
- art. C / 2N - a column with two nakidami;
- pet. - the loop;
- chalk. - chain;
- PH - working thread;
- Pr - previous row;
- CC - connecting column.
The simplest kaym for beginners based on "Pico"
With the help of such a border, you can assign that only wants: knitted napkins or conventional tissue handkerchiefs. The binding is absolutely simple in execution, consists of four rows, so even a new knitter can be mastered. 

Knitting:
Webly weiss the circular method near the b / n columns. Ss.
In the next. Rowing 6 VP (1 runway + 5 VP), 1 tbsp. b / n in the 5th century. b / n, then knit rapports to the end of the row: "5 VP, 1 tbsp. b / n in the 5th century. B / N PR. Ss.
The third row knit in the same way, only the b / n column should have to the Central Loop Arch out of the 5-WP PR.
The fourth row we bind the trail. Repeating knitted combination: "1 tbsp. B / N in the central. Pet. Arches from PR + 3 VP + 2 tbsp. S / N to the center. Pet. track. The arches out of the 5rd PR, over them between them - on Pico (3 VP + 1 ss in the first VP), between Pico - 3 VP, we complete the Rapport three VP and Art. B / N in the center. Pet. track. Arches from 5 VP PR. " Ss. Kima is ready!
Narrow openwork Kaima


Beautiful air kimea can be decorated with female blouses and children's topics, in its framed, it looks equally well as a wide variety of clothing items and all kinds of knitted accessories.
Steps of work:
Kimima knits in a transverse way, openwork motives.
We recruit. from 11 VP (7 VP + 3 runway + 1 VP).
Series number 1: 1 tbsp. S / N in the 7th VP MOG. From the hook, 2 VP, 2 tbsp. C / N in the 4th VP base from the hook, between the columns - the circuit. from 3 VP.
Series number 2: 5 runways, 3 tbsp. S / N to the center. Pet. Arches from the 3rd PR, 1 VP, 3 tbsp. s / n in the same pet. Arches, 2 VP, 1 tbsp. s / n next. Art. C / N, 1 VP., 1 tbsp. s / n in the 3rd runway pr.
Further, work continue according to the knitting scheme until the border of the desired length is achieved. Semicircular motifs during knitting are tied by Art. B / N with pico.
The finished kaima is treated with a starch solution and move to give the perfect shape.
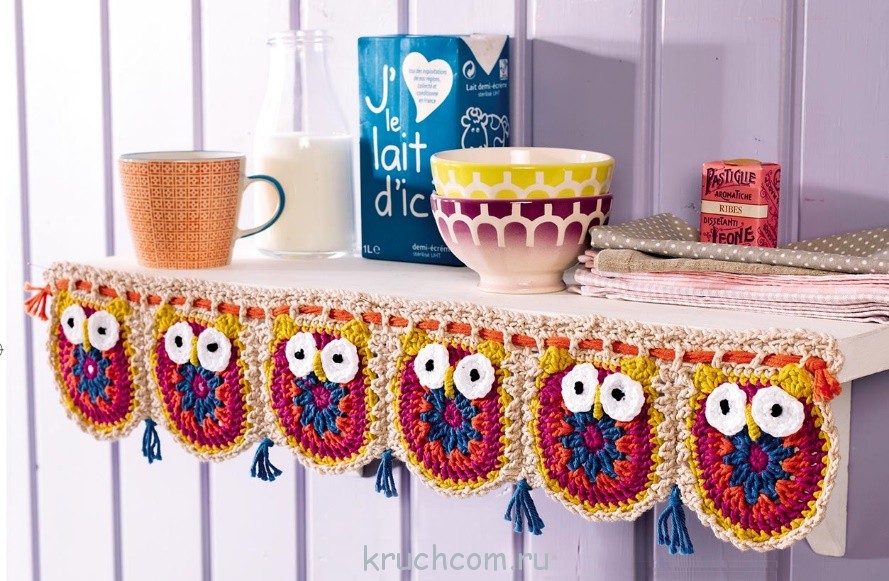
Kima "Hearts" in a fuel technique of knitting

Kaima, made in the fillet technique - one of the most popular types of crochet strapping. Filey curios decorate the towers, napkins and tablecloths, in addition, with its help, you can originally decorate the kitchen curtains and other elements of the home interior.
Kime "Hearts" with gear edges can become a bright emphasis of many knitted and tissue things, take, for example, kitchen curtains in which I want to bring a bit of diversity.
File pattern scheme:

The process of knitting the fillet Kaima is incredibly simple and similar to embroidery technology. It must be remembered that each pattern of the pattern consists of three kettops, the empty knits "1 tbsp. C / H + 2 VP ", filled -" 3 tbsp. s / n. "
For the Kayma "Hearts" We recruit the circuit. On 55 VP + 3 runways, and knit empty and filled with filleic cells according to the above scheme.
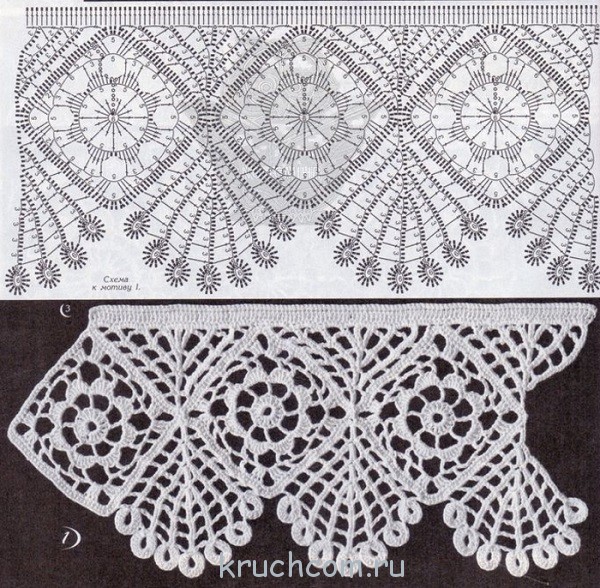
Sophisticated openwork Kaima
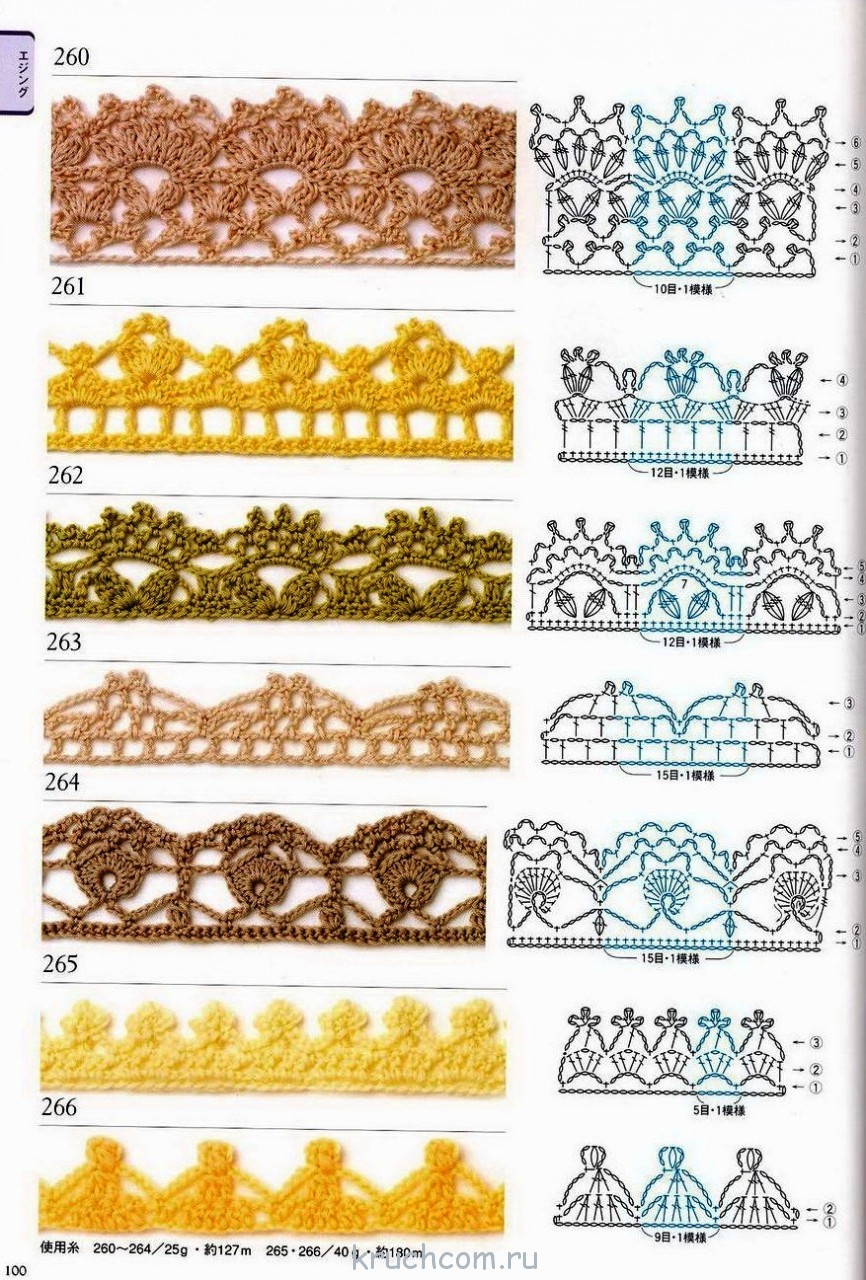
Openwork Kaima is the leader among the ways to cook free edges of the product. Schemes of openwork strapping are in high demand among craftsmen, therefore, their options are abuse: Festos, "pineapples", shells, floral motifs, etc.
Openwork border is narrow and wide. The latter is perfect for framing the towers and tablecloths. We offer needlewomen to make attention to a beautiful pattern of wide openwork kayma, perfectly suitable for giving the order of the tablecloth.
The crochet process of such a kayma does not relate to the easy, but also the results of the Labor will be appreciated, make sure of themselves! 
Knitting scheme:

Knitting order:
The beginning and end of the kayma knit according to the diagram of the first motive, then alternately according to the schemes of the second and the first motives until the border of the desired length is achieved.
The first motive: begins with a closed in the ring of the circuit. on 5 VP.
Series number 1: 4 runways, 6 tbsp. from 2 / n trail. 2 VP rings.
Series number 2: 4 runways, 1 tbsp. from 2 / n trail. Art. C 2 / N, 2 tbsp. from 2 / n trail. Art. C 2 / N, 3 VP, 2 unfinished. Art. with 2 / n with one vertex, in the first VP circuit. Of the 3rd VP, 3 unfinished. Art. With 2 / N with one vertex, in the next. Art. C 2 / N, 3 VP, 2 unfinished. Art. With 2 / N with one vertex, in the 1st VP. Of the 3 VP, 2 tbsp. from 2 / n trail. Art. C 2 / N, 2 tbsp. from 2 / n trail. Art. with 2 / n.
Rows №№3-4: knit according to the first motive scheme.
Second motive: We recruit the circuit. on 13 VP (7 VP, 4 runways, 2 VP).
Series No. 1: 4 runways, 1 SS between the fourth and third near the first motive, 2 VP, 8 tbsp. With 2 / n in the nine VP Nap., 3 VP, 1 SS between the fourth and third near the first motive on the opposite side of the chain.
Rows number number 2-4: knit according to the scheme.
The basis: knit directly and back under the scheme of knitting the foundation (ranks No. 1-8).
Binding: We bind the kaima with a circular way according to the strapping scheme. Ready!
Tight kime "Merry hearts"
A bright decoration of contrasting threads will have to do not only adults, but also for children. With the help of such a kayma, you can decorate the shelves for toys in the children's bedroom, as well as decorate clothing and accessories. 
Knitting scheme:
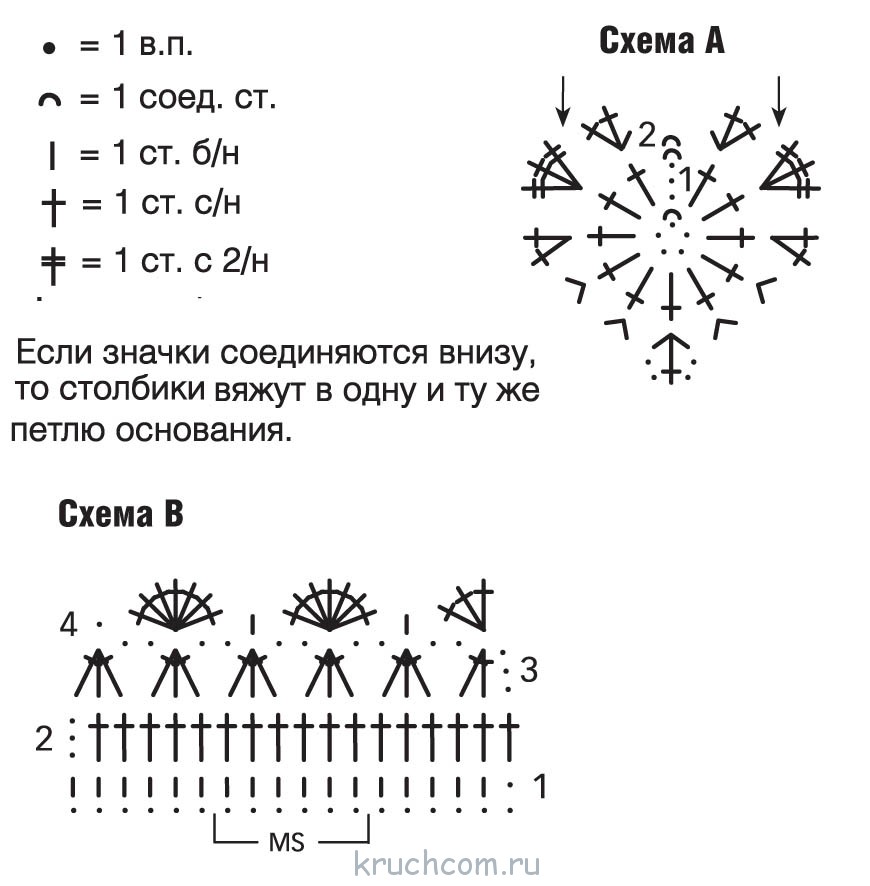
Knitting steps:
Knit pink yarn seven hearts out of 5 VP, closing them into a circle of one SS. Knit according to the scheme and two circular rows.
Then lettuce with salad yarn. By 120 VP + 1 runway and knit the trail. way:
Rows number number 1-2: Art. b / n;
Series number 3: 6 tbsp. b / n, 6 rapports: "In the next. Pet. The basics are binding to 1 tbsp. b / n, 2 VP, 1 tbsp. C / 2N, 2 VP and 1 tbsp. B / N, in parallel with the C / 2n, we grab the first half of the heart (in the scheme marked with arrows), in the next. 4 Pet. Basics knit on the 1st Art. B / N, in the next. Loop base - 1 tbsp. b / n, 2 VP, 1 tbsp. C / 2N, 2 VP and 1 tbsp. B / N, at the same time grabbing the second half of the heart, 11 tbsp. B / N. " After the last The heart is providing 6 ordinary art. b / n. Kima is ready!
Original kayma with pomponchiki

Step-by-step knitting performance:
- We recruit. on 6 VP.
- We recruit 3 tbsp. C / n 3 VE from the hook. Total - 4 Pet. on hook.
- We make a cider pH, stretch it through all the hinge on hook.
- We recruit 3 VP.
- In the post Pet. previous group of 3 tbsp. C / H again knit 3 tbsp. C / N and repeat all actions. We get another "cluster".
- Sing the SS in Pet. With which the first "cluster" began. We do it so that 1 tbsp. S / N remained behind, and two are front. Such an order refers to the first cluster.
- We recruit 3 VP. Attach their CC to the place of attachment to the main canvase.
- We repeat steps 1-7 The required number of times until everything can be linked with a border of miniature pomponchikov.

Exclusive border with butterflies
The amazing beauty of the border with the butterflies fluttering on it is captivated by many needlewomen. By the way, her knitting does not apply to the extra heavyweight, therefore, it can be practiced in the confusion of such an openwork border, not only profickers, but also beginners in hook needlework.
Knitted border knives with a transverse knitting. Openwork butterflies are torn along the edge of the fillet grid. After the bulk of the Kaima is ready, it is necessary to check the laughter from the VP, which subsequently tied up the chains of air hostels inside butterflies, thereby forming a clearly pronounced cavity and butterfly mustache.
To knit such a kayma, it is best to use the finest cotton threads, then the work will look highly gently and air.


Knitting scheme:
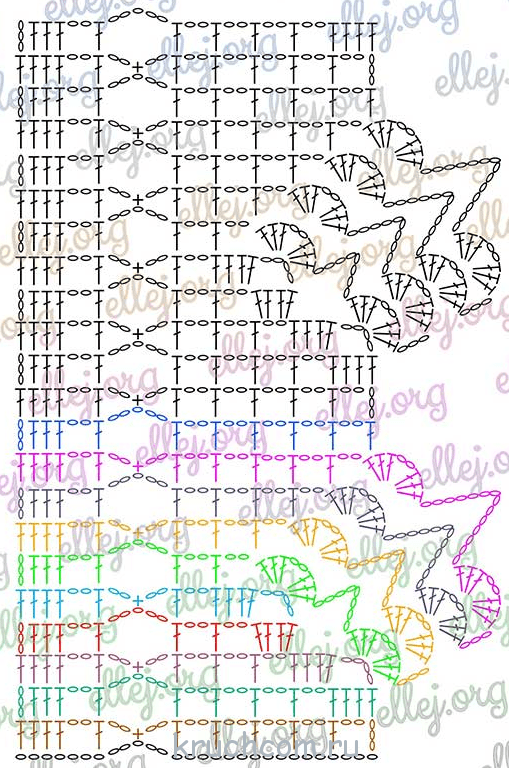
Knitting:
- We recruit. on 33 VP. From the 9th VE from the hook, we begin to knit the fillet grid (art. C / H + 2 VP), we skip 2 pets between the columns. You need to associate such 5 tbsp. s / n.
- After the fifth art. C / h We score 2 VP, we skip two pets. on the circuit. and knit art. b / n.
- We recruit another 2 VP, we skip two pets. on the circuit., Knit Art. s / n.
- We recruit 2 VP, we skip 2 Pet. To the end of a row knitting under Art. s / n in each pet.
- Knit under Art. s / n next. 3 tbsp. s / n.
- We recruit 2 VP, knitting Art. s / n next. Art. s / n.
- We recruit 5 VP, knitting Art. s / n next. Art. C / N further than 4 more cells with a fillet knitting.
- In the post Filey cell pr - binding 3 tbsp. s / n.
- We recruit 4 VP, the knitting unfold.
- In an empty fillet cell (after a cell with PD columns), bind 3 st. s / n.
- Next, knit the filleic cells to the army out of five VP (i.e. 3 filleic cells).
- We recruit 2 VP, knitting Art. b / n Three Pet. On the arc of five VP.
- We recruit another 2 VP, finish a number: 1 tbsp. C / H + 2 VP + 4 tbsp. s / n.
- All rows from this side are starting the same knitted combination: 3 tbsp. C / N, 2 VP, Art. s / n. Then - Arch out of 5 VP.
- Knit 2 Fileeons: Art. C / H + 2 VP + Art. C / H + 2 VP + Art. s / n.
- Above the trail. Filee Cell Prick 3 Art. s / n. We recruit 4 VP, the knitting unfold.
- Knit 3 tbsp. C / H in the first empty Filee cell PR + 1 tbsp. s / n next. Art. s / n.
- We recruit 2 VP, knitting Art. s / n next. Art. All rows from this side of knitting end the trail. knitted combination: 2 VP, st. b / n in the arch, 2 VP, st. s / n in the column, 2 VP, 4 tbsp. s / n.
- We recruit 3 VPs, knitting unfold.
- Knit according to the scheme (art. C / H, the fillet cell, the arch of 5 VP, Art. S / N in Art. PR), then score 2 VP, knitting Art. s / n next. Art. ETC.
- We recruit another 2 VP, in the angular arch of knitting - 3 tbsp. C / N, 2 VP, 3 tbsp. s / n.
- We recruit 8 VP, knit 3 tbsp. C / N, 2 VP, 3 tbsp. The s / n below is one more arch from the VP. We recruit 3 VPs, knitting unfold.
- Knit 3 tbsp. C / N, 2 VP, 3 tbsp. C / n central loop Arches of two hinges of the previous step.
- We recruit 10 VP, knit 3 tbsp. C / N, 2 VP, 3 tbsp. F / N in the arch of the 2nd VP Step No. 23.
- We recruit 2 VP, knitting Art. s / n after. Art. filled cell. The row is tying according to the scheme (fillet cells, an arch of 5 VP, 4th century. S / n).
- We recruit 3 VP, unfold knitting, knit a row on a familiar scheme.
- After 3-coupled filleic cells, we gain 2 VP, knit 3 tbsp. C / H + 2 VP + 3 tbsp. S / H to the nearby angular arch of the 2nd VP (it will be the right butterfly wing).
- We recruit 12 VP, knit 3 tbsp. C / H + 2 VP + 3 tbsp. C / H into the underlying arch of 2 VP (left butterfly left wing).
- We recruit 3 VP, reversal of knitting.
- Knit the last. A row of butterflies: shells - in the seashells, between them - the circuit. on 14 VP.
- Further, we will be touched by a well-known scheme. We recruit 3 VPs, turn the knitting again.
- Knit 3 tbsp. C / N, 2 VP, Art. C / H, Arch for 5 VP, 5 filleic cells. Lifting 3 VP, knit as the very first row. We repeat the pattern before reaching the border required length.
- We proceed to the butterfly tool. We recruit. For 25-30 VP, the tails of the threads carefully hide inside. All 4rd arches from the VP bandaging the chain (can be ordinary node). We get a well-pronounced butterfly. To decorate the butterfly, more of its wing can be tied with pico. Ready!
A selection of knitting schemes for your creative inspiration


Video master classes on the topic "Kimaim Crochet"
For those who are more convenient to work on video lessons, provide detailed master classes to knit all kinds of types of Kaima:
(Schemes are presented below) The edges of the finished product. Which pattern is it better to choose? Yes, so that it gives a blouse finished look or made a simple fillet napkin elegant.
What is it needed for?
There are several reasons why you may need a crochet (mandatory schemes). First, it gives the finished type of product. So the neck or cuff, the boards of jackets or the bottom of the product look more beautiful and more careful.
Secondly, the canvas associated with the knitting or crochet is twisted below. This spoils the type of product. Dense strapping slightly pulls it down, which does not give it to twist.
Thirdly, it can play auxiliary role when connecting parts of the product. For example, skirts and ruffles or flouses with a coquette.
Fourth, it simply performs a decorative function. It is relevant for napkins and curtains.

It is used not only for knitted products, but also for those who are sewn from the fabric.
Thin pattern
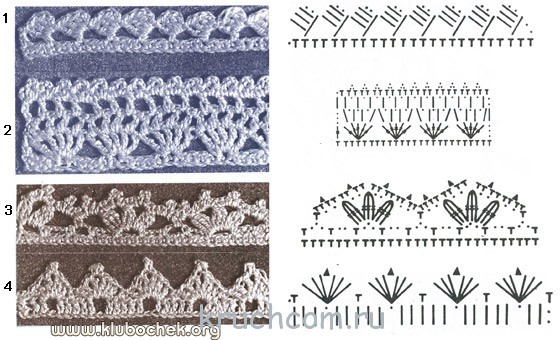
It is required in the case when the product is self-sufficient. No need to draw attention to the edge. Figure below shows such patterns (hook). Schemes of strapping are simple and understandable.

For beginners, a description of the second pattern is presented here. Its first two rows are formed by the columns without a nakid with one loop for lifting. They serve as the basis for a modest pattern, which consists of only one row - the third.
The rise is again one loop. A column without a nakid in the first loop. Here begins a repeating pattern: three air, in the first stayed column. Three air and columns without Nakid in the fourth previous row. Repeat to the end of the product.

Dent a "rachy step"
It is used when it is necessary for a very thin and neat outline. Before starting crocheted the edge of the edge strapping in this way, it will be necessary to estimate its appearance. If it is uneven, then the first thing ties a row from the columns without Nakid.
"Radi Step" is also a column without Nakid, only it is performed in the opposite direction. Typically, the direction of knitting goes to the right left. In the "Wachy Step", moving goes left to right.

The strapping shawls with a long fringe
It, of course, can be done, just cutting the threads on the part and attaching around the edge. But such a fringe will not look carefully, it will be leaving. Better, if it is still a high-quality blockage of the scheme, it is so simple that even a beginner needlewoman can cope with them.
Start processing the edge is recommended from a number of columns with an attachment. They will be the basis for a long fringe. The second row is the actual fringe itself. Depending on the thickness of the chosen thread and the desired length of the fringe, you need to type a chain of air loops. It is definitely that they should not be less than 25. Otherwise the fringe will be very short.
Then closures a small ring on the edge of the fringe, making a column without a nakid to the fifth from the hook of the loop. Then to tie another chain of such a number of loops so that it was on 5 shorter than the previous one. Attach the chain to the canvas, skipping one column of the previous row. One round of fringe is ready. Continue their knitting around the edge shawl.
It is interesting to look like this fringe if you make it from chains of different lengths. You can even tie it by waves. First, gradually increasing the length of the fringe, and then reducing. It will be beautiful.

Wide pattern
Such an openwork crochet (schemes simple) will be required to process the edge of the tablecloth or napkin. It can be used on the bottom of a simple skirt, and it will immediately become elegant. Especially effectively it will look if you take a thread of the sectional dyeing.
The first row of strapping is the basis. It consists of columns with nakid, which alternate with two air loops. The grid pattern is obtained. It will be attached to the main openwork drawing of the strapping.
The second row: the lifting loop, the three air loops of the pattern, 4 columns with an attachment to the second cell mesh of the previous row, three air, make a connecting column by skipping one cell. That is, each second cell of the grid is unsupened. Continue to the end of the row from the place where the "three air patterns" are indicated.
Crochet's binding continues (the schemes will help you) the third near: three lifting loops, three air loops of the pattern, connecting column in the first of the group of previous row columns, 4 air, connecting to the last group of group, six air patterns and repeat the arch over the columns. Continue to knit the pattern as described since the "Six Air Patterns".
The fourth row: three lifting loops, three columns with an attachment, three air patterns and in the arc of four air, three air loops and 4 columns with an attachment in the army of six hinges. Continue to knit the pattern from the words "three air patterns".
Repeat the third and fourth rows two more times so that they were only 8. The ninth is again to repeat the third. The last one is the tenth row - consists of a wider border. Connecting column, 4 air patterns, three columns with an attachment in an arc of six hinges, pico of 6 loops, again three columns with an attachment, 4 air, connecting column in a small arch. Continue to knit drawing as described from the words "4 air patterns".
"Frostwork"
This is another openwork available) edges of the product. The drawing will be repeated every seven loops. The first one next to, it is necessary to create a uniform bid from the columns without a Nakid, so that it is easier to count the patterns of the edge strapping.
In the second row, it is necessary to make a rise from one loop, to check the column without a Nakid to the first vertex of the previous row, 2 air and another column already in the 4th, 5 columns with an attachment to one base - seventh, skip two vertices and repeat the described pattern.

The third row begins with a lift formed by one loop. Then there is a connecting column in the first loop of the second row, 2 air, perform a column with an attachment to each vertex of the same column, separating them to one air loop, the connecting column - in the arch of two air. Continue knitting such "fans" to the end of the row.
The fourth row requires three lifting loops. Then the "Files" from the columns with Nakada immediately knit, between these columns it is now supposed to do two air loops.
The fifth nearby will be the columns without a nakid in each space formed by air loops. They should be three. Above the tops of the columns with the embeddings knit chains from seven air loops.
Details, as you know, can be ruined or save any thing. The product associated in the most different technique will have a complete appearance in the event that it is supplemented with a strapping suitable. The hook is an indispensable tool when placing the original edge of knitted blouse, dresses, napkins or tablecloths. Crochet's strapping schemes are so diverse, which allows you to decorate not only the finished thing, but also hide the flaws that often happen when the edge of the plank, the bottom and other parts of the knitted product are performed. In addition to interesting, the end of the edge, hooking patterns are used for an elegant ending of knitting cuffs, collar, norlowin strapping and confusion of combat for interior items.
Beginner craftsmen Useful Cheat sheet:
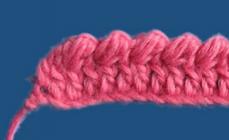
Finishing the edge of crochet "Radi Step"
The most common type of edge finish that does not require increased attention when it is fulfilled. Finishing the "rachy step" compact, prevents the stretching of the edge of the product and is very suitable for warm things.
1. First, take one straight line or a row in a circle by conventional columns without an inlet, entering a hook around each loop or below the air loop.
2. Without turning the work, knit "Watching a step": Enter the hook in the 2nd loop and pull the thread, make the nakid and close both hinges.
3. Continue the same until the end of the row, cut the thread and secure it. To achieve a good result, you need to maintain a uniform tension of the thread.

There are several options for knitting a chart, two of them look at the video:
Crochet edge - "Pico"
Usually performed in a circle. It is also possible to perform direct and reverse rows, but at the same time the thread is cut at the end of the first row, and the second row starts from the first loop of the first row.
1. Check a row in the circle with the columns without a Nakid. 2nd row: * 3 columns without Nakida, 1 Pico (\u003d 4 air loops and a semi-solitary without a nakida, closed in the 1st loop of the chain of 4 air loops) *, repeat from * to * until the end of the row and finish the column without a nakid.

2. It looks like a border after performing the 2nd row.

Pico - A little more complex way to process the edge of the crochet. Interesting for strapping the edge of sleeves, cuffs, caps, beret. There are several ways to inspect the pico, based on the thickness of the thread, the number of air loops connected to the pico is selected. The diagram is different options for this mating.


Master class: crochet products "Pico"
Finishing the edge of crochet - "Blinds"
1. This finish is performed in a circle or two straight rows only on the front side of the work. Check the 1st straight row or 1st row in a circle of columns without an inlet, 2nd row or 2nd Circle: 2 Air loops, * skip the loop of the previous row, a semi-sololbik with an attachment in the next loop (capture the thread and enter the hook under The loove has just performed, capture the thread and pull out the loop) 2 times. Check the 5 loops obtained *. Repeat from * to * to the end of the row and finish with a semi-solitary without an in-chain in the 2nd loop of the initial chain if you knit in a circle; And a semi-solitary wheel with a nakid, if you knit straight rows.

2. Dense and soft finish well suited for classic and elegant products.
Crochet Arch Arms Decision
1. This finish is performed in a circle or on two straight rows only on the front side of the work. Check the first straight line or 1st row in a circle by columns without Nakid, 2nd row or 2nd Circle: * In the loop of the previous row, perform a column without Nakid (1st Stage without an inlets is always replaced by air loop), 3 air loops And 2 more unfinished columns with Nakud and tie together 3 loops on the hook, skip 3 base loops *. Repeat from * to * to the end of the row and finish with a semi-solitary without a nakid in the 1st initial loop, if you knit in a circle, and the column without an inlet in the last loop, if you knit straight rows.

2. Easy and soft finishes suitable for the edges of children's clothing, light summer jumpers, coal and tops.

Decorating the edge of the product with crochet PLAYED arches
1. This two-bedding finish is performed in a circle or on two straight rows only on the front side of the work. Check the 1st straight line or the 1st row in a circle of columns without an inlet (number of loops, multiple 3 + 1 loop). 2nd row or 2nd Circle: * From the loops of the previous row, perform a column without an inlet, 3 air loops, skip 2 base loops *. Repeat from * to * to the end and finish with a semi-solol without a nakid in the 1st initial loop, if you knit in a circle, and the column without a nakid in the last loop, if you knit straight rows. Cut the thread and the yarn of a contrasting color. Perform a column without a nakid in the 1st loop of the previous row, 3 air loops, pull the hook and enter it under the arc from the 3-air hinges of the previous row, capture the left air loop and the thread and perform the air loop *. Repeat from * to * until the end of the row and finish the column without Nakid.

2. This finish is suitable for the edge of children's clothing.

Some more schemes of beautiful crochet product