Knitted overalls for newborn babies
Any clothing for newborns should not only be beautiful, but also comfortable so that the baby feels comfortable in it. Therefore, overalls for newborns are popular among most mothers. They not only protect babies from the cold, but also do not hinder the movements of young explorers.
When we knit for children, we try to use only high-quality natural materials, because the skin of babies is incredibly sensitive and close acquaintance with synthetics will definitely not please it. 


Overalls for baby
To create this wonderful knitted item for girls, we recommend that you buy yarn marked “100% cotton”. To create a warm overall for a newborn girl (size 56/62) you will need:
- 50/100 g of bright pink and the same amount of white yarn;
- 200/250 g light pink yarn;
- a pair of regular knitting needles No. 2.5 and 3;
- circular knitting needles number 3;
- stretchy two-centimeter braid - 80 cm;
- button;
- lightning;
- needle;
- thread;
- scissors;
- patterns;
- A small diagram with symbols.

While describing the knitting pattern for a baby girl's overalls, we will use some common abbreviations:
- loops - p;
- rows - p;
- purl - purl;
- facial - faces;
- facial stitch – LG;
- “*” - repeat the pattern from * to the next *;
Marking of threads by color:
- pink – 1;
- hot pink – 2;
- white – 3.
Knitting patterns: LG, knit. We knit rows of faces. p., and purl - purl. n. Strips: LG,* 2 r. thread No. 3, 2 p. - No. 2, No. 3 – 2 rubles. and No. 1 – 2 r.* The pattern with holes is knitted strictly according to the pattern. In all out. R. In addition to the first, yarn overs and stitches are knitted purlwise. First, the pattern is repeated from 1 to 9 p., and then from 2 to 9. Density of the knitted fabric: 10X10 cm = 35 r.X30 p. - we knit LG, with knitting needles number 3.
We begin knitting for newborn babies by creating the right and left pant legs. Take knitting needles No. 2.5 and cast on 72/78 stitches with thread No. 1. Knit 16 rows in stockinette stitch. Then change the needles to the third number, make a pattern with holes between the edges - 24/28 r. After this, knit 6 rows from arrow A/B. striped pattern. Now, using LG thread No. 1, create another 10-12 r. Stripes – 14 rub. In each subsequent 8 r. for the bevel, add on both sides: 6X1 stitches (including those loops that were added to the pattern). Having formed 15/17 cm from the bar, set the loops aside. Knit the left leg in the same pattern as the right one. 
Continuing knitting for children, now let's follow the pattern with the description of the upper part of the overalls for newborn girls. Transfer 168/180 stitches onto circular needles from the legs. Knit with thread No. 1 LG. Having formed 40/44 cm of knitted fabric, distribute the loops: for the left back part - 42/45 sts, for the front part - 84/90, for the right back part - 42/45 sts. Set aside the loops from the back of the baby product and continue working above the front: striped pattern – 16 RUR. Knit the rest in stockinette stitch with thread No. 3. In 1 r. bind off 1X13 stitches. Having completed 48.5/53.5 cm of knitted fabric, bind off 12 stitches in the middle and finish the sides separately. In all subsequent second r. close: 1x4, 1x3, 1x2, 1x1. Having formed another 54/59 cm from the bar, close the loops on the shoulders of the overalls for a newborn girl.
Move the loops from the right half of the back onto the knitting needles and make 16 rows with stripes. Next, knit the LG with thread No. 3. Don't forget to make an armhole on the inside edge! Close the loops at the same height as the front. Using the same pattern, knit the other half of the back of the overalls for a newborn girl.
Any knitting for kids is pure pleasure, because all the details are small, and the result is always breathtakingly beautiful! And even a novice needlewoman can literally make a warm jumpsuit for a newborn girl or boy in just a couple of evenings. 
Having knitted the legs, front and back of the overalls, we can say with confidence that the clothes for newborns are almost ready. All that remains is to knit the sleeves and the children will be finished knitting:
- take the first thread and cast on 60 sts on knitting needles No. 2.5;
- form with stockinette stitch 16 rows;
- change the knitting needles to number 3 and form a pattern with holes between the edges - 24 r.;
- then from arrow B form 6 r. stripes;
- make faces. satin stitch 20/22 r. pink thread;
- stripes – 16 rubles;
- in each subsequent 4 r. add: 12/10X1 p.; in the second row - 0/5X1 p.;
- Having made another 14/15 cm from the bar, form an additional 4.5 cm upward.
All the details of the girl's overalls are ready! Now we need to put them together. Sew seams on the sleeves and shoulders. Sew in the sleeves so that their center is aligned with the shoulder seams. Sew the inside and bottom seams on the legs. Visually dividing the strips in half, turn them inward and sew them. Don't forget to leave 1 hole on each one.
Insert the tape. For the neckline, cast on 79 pink stitches using circular needles. Form with stockinette stitch 14 rows: 3 rows. on knitting needles number 3, 8 r. - No. 2.5, 3 r. - No. 3. Close the items so that they are not too tight. Unscrew the strips and sew them. Sew in a zipper. Make a loop on one side of the plank, and sew a button on the other. Warm knitted product for newborn girls is ready! You were able to see that knitting brings only pleasure to children.
Video: Technique for knitting overalls
Elegant overalls “Umka” for a baby
Warm overalls for newborns can be worn not only at home, but also on special occasions. The model we are about to tell you about is perfect for celebrating the New Year or receiving guests. 
To ensure that knitting for children brings joy and you do not have to be constantly distracted while working, we recommend preparing in advance all the necessary materials, as well as special tools:
- 500 g of white “grass”;
- 100 g "lanoso GATO";
- some black yarn;
- hook number 3;
- a pair of circular knitting needles No. 2, 3;
- 5 buttons (diameter 15 mm).
In this knitting for children we will use the same abbreviations as in the previous work. We start knitting for children by creating pants. Cast on 50 stitches of Lanoso GATO yarn. Distribute the stitches onto 4 knitting needles, 12 and 13 each. Complete 10 rubles. in a circle with an elastic band 1X1. Take the “grass” and switch to needles number 3. Continue knitting overalls for a newborn boy using stockinette stitch. Make increments after 5 sts. After this, on the loops at the end, as well as at the beginning of the row, we make increments 5 times over 6 p. Having completed 30 cm of knitted fabric, we begin to form a “step” seam. To do this, close 4 sts on the right side, and 5 sts on the left, 2 sts on the right and left sides, and another 1 st on the left and right. Using this pattern, knit another 5 r. The second piece is knitted symmetrically.
Once the legs of the knitted item for boys are ready, you can begin to form the front and back parts. Connect the knitted legs of the baby product, and then close 5 stitches on each. Next, make 24 cm of LG in straight and reverse rows. To design an armhole in a product for a baby, divide the items as follows: 22 pcs., 56 pcs., 22 pcs. Form another 5 cm. In each 2 r. close the item for the neck: 5, 4, 3, 2 pcs. Using the same pattern, we knit 2 rows, and then close the stitch. As we said earlier, when we knit for children, we make many details symmetrical. We knitted the second leg symmetrically to the first and we will also make the left half of the front part of the product for boys symmetrical to the right half. The back of the overalls for a newborn boy will consist of straight and reverse rows - 36 cm. 
Having finished creating the front and back parts of the baby's overalls, we can begin to form the sleeves:
- sew the seams on the shoulders;
- dial 45 points along the edge;
- knit 20 cm in circle LG;
- perform decreases: knit each subsequent 4 stitches together with 5 sts;
- change needles and continue working with Lanoso GATO yarn. Use a 1X1 rubber band to form exactly 12 rows;
- close the loops;
- When creating the second sleeve, repeat the knitting pattern.
The final stage of this small master class will be the creation of a hood:
- dial 80 points;
- knit 16 cm LH;
- divide knitting: 28, 24, 28;
- knits 32 stitches, knit 23. p., 24 together with 25, and then turn the knitted fabric;
- further: 23 purl. p., 24 again together with 25;
- we continue working according to this pattern until the number of loops on the knitting needles is 24;
- close the loops;
- sew the hood to the boy's overalls.
The elegant overalls for the boy are ready! Now all that remains is to decorate it and make the strips. Let's start with the planks. Take the “lanoso GATO” yarn and cast on 42 stitches on the left side. Work 22 stitches. garter stitch. Close the loops. Now take the “grass” and cast on 42 sts on the right side. Knit 22 r. garter stitch and bind off the stitches. Sew the straps to the overalls so that the strap made of “grass” is on top. Sew on the buttons. 
Now start making decorations for the jumpsuit. First make the ears. Cast on 10 stitches with Lanoso GATO yarn. Knit the faces. satin stitch 10 rub. Next, knit in rows:
- 2 p. together, knit 8;
- 2 together, purl. – 7 pcs.;
- close 3 stitches, knit 5;
- 3 close and do 3 purls;
- “grass” knit 4 knits, cast on 2 pcs.;
- 6 p. and dial 2;
- 8 persons. plus one increase;
- P9 and increase. We close the loops. We crochet the ears and then sew them to the hood.
Let's make eyes. We crochet 2 sts from “lanoso GATO”. We form 6 sts and close them into a ring. In the next row we increase 6 times. At 3 p.m. We perform the increase again – 6 times. Take black yarn and knit 1 row: cast on 2 stitches, knit 6 and close in a circle. Second row: increase 6 times. Sew the black part to the white part, and then attach the eyes to the hood. We embroider eyebrows with black thread.
Lastly, we make the nose. Taking the hook, cast on 10 stitches with black thread. First row: make 89 single crochets and 3 double crochets in the last stitch. We connect the resulting columns. Rows No. 2-4: on semicircles in each column, knit 2 single crochets, and on a straight section, make 1 column. Sew the finished nose to the overalls for a newborn boy.
If desired, this overalls for a newborn boy can be additionally decorated with a small knitted tail. By changing the shape of the ears and making a muzzle like a cat's, you can turn your baby into a charming Persian kitten!
In conclusion, I would like to note that the main advantage of knitting for children is that you can allow yourself to show your imagination and experiment a little. Kids will be delighted with any thing made by mother’s caring hands, and adults will definitely not be able to remain indifferent when they see a cheerful teddy bear or a smiling kitten! 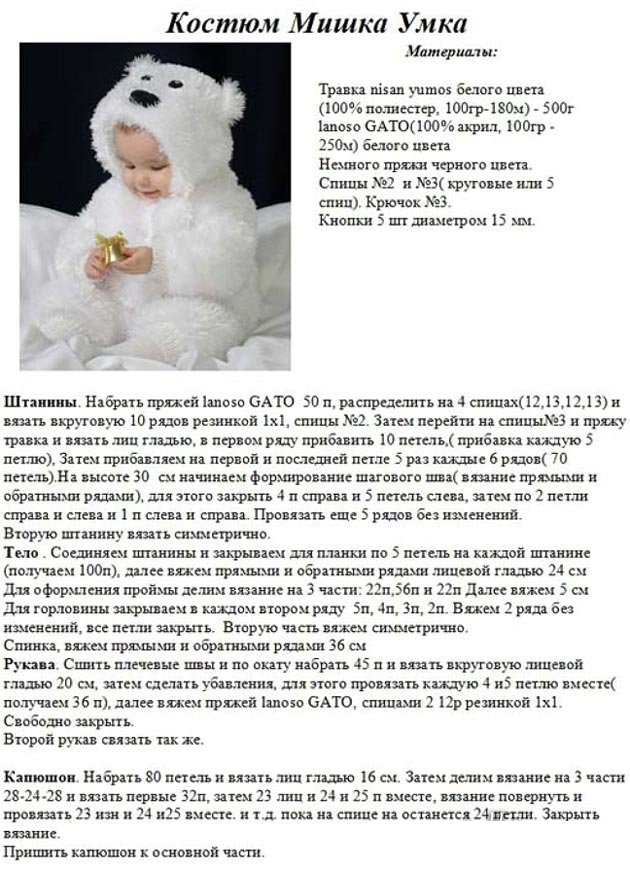

We knit from newspaper clippings photo MK


Video: Knitting an elegant jumpsuit
Knitted overalls for baby.
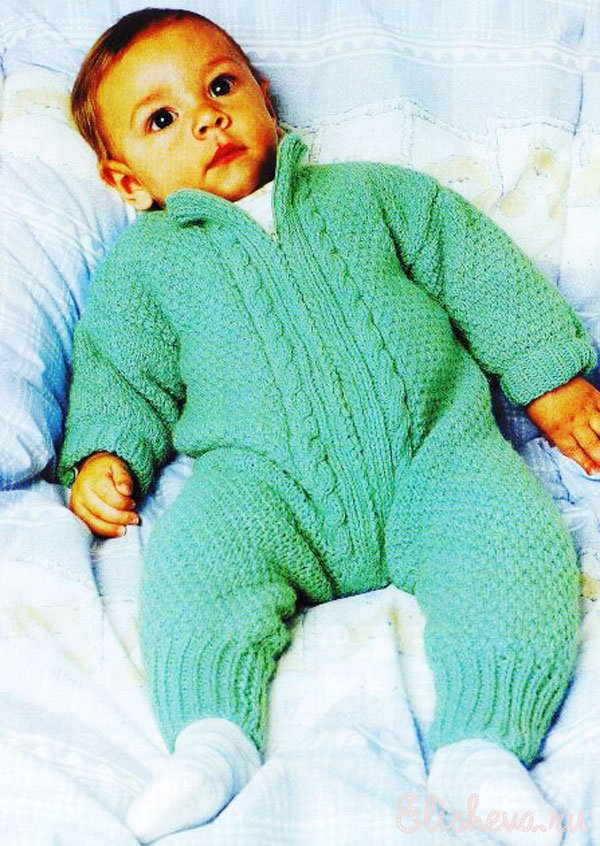
 From materials we will need 200 g of green acrylic yarn, a matching zipper 30 cm long and knitting needles with numbers 2.5 and 3.5.
Patterns that we will need to make: 1x1 rib (1 knit, 1 purl), the purl row is knitted according to the pattern. Fantasy patterns are knitted according to patterns.
The density of our knitting is 10 cm = 22 loops.
The work is knitted with a thread folded in half!
Let's start with the back part. On 2.5 knitting needles you need to cast on 20 loops (for each leg) and knit the next 7 cm with an elastic band. Then you should switch to knitting needles number 3.5 and continue knitting (pattern 1), while adding 8 loops in the first row. In each 8th row you need to add 1 loop along the crotch line a total of 4 times. When 22 cm is knitted, the loops of both legs are combined (to do this, 8 loops are cast on between them), another 20 cm must be knitted straight. When only 42 cm is knitted, 4 loops are closed on both sides for the armholes. Then you need to continue knitting and at a height of 55 cm, bind off 21 loops for both hangers and 22 loops for the neck. That's it, knitting ends.
Now is the time to start knitting the front part, which is done in the same way as the back. When a height of 24 cm is reached from the beginning, the knitting is divided into two parts for the cut, and the loops are distributed as follows: 6 loops on both sides of the cut are knitted with an elastic band, another 6 loops are knitted according to pattern 2, and the remaining loops are performed according to pattern 1 When 42 cm is knitted, 4 loops are closed on both sides for the armholes. Knitting continues, and after 10 cm you need to close 4 loops to form the neckline, while in each 2nd row you decrease 2 times 3 and 1 loop on both sides. When the total knitting height is 55 cm, 21 loops are closed for each shoulder. Knitting ends.
To knit the sleeves, you need to cast on 32 loops on knitting needles number 2.5 and knit 4 cm with an elastic band. Then switch to knitting needles number 3.5 and knit the pattern according to pattern 1, and in the 1st row you need to add 12 loops, and in every 6th row - add 1 loop 6 times on both sides. When only 19 cm is knitted, the loops need to be closed and finished knitting.
Now you can start assembling. The shoulder seams are made, then 32 stitches are picked up along the edge of the neckline using 2.5 knitting needles, and another 3 cm are knitted with an elastic band. Then all the loops are closed according to the pattern. The remaining seams need to be completed, then all that remains is to sew on the sleeves and sew in the zipper. When the product is ready, it must be moistened and left to dry.
The jumpsuit is ready! Now your baby will definitely not freeze!
Whatever the weather, there is nothing more practical for a baby or toddler than a baby knitted overalls. It can be plush or with a hood. For going out, walking in the yard, visiting, playing and relaxing at home, a children's knitted raglan jumpsuit will be useful. This universal idea can easily be adapted to a variety of tasks, temperature conditions, style trends and design ideas. For warm days, children's models are created from light, breathable yarn, for cooler days - from wool yarn or mixed threads.
To knit a seamless jumpsuit on top, including for a newborn, you will need a little free time, suitable threads, knitting needles, a hook or a knitting needle. To knit patterns, it is useful to purchase special additional knitting needles or pins.
In the article we will consider the issue of choosing threads for knitting and description of knitting principles DIY baby overalls.
Model and color
The choice of model depends on the purpose, age, conditions of use and skill level of the knitter.
When planning clothes for the little ones, it is advisable to pay attention to simple in design and maximally functional children's models that can create maximum comfort newborn.
A child’s clothes should be easy to care for and take a minimum of time to restore their properties (washing, ironing, cleaning, steaming).
It is important to create models that are interesting from an aesthetic point of view, even for the youngest children. Therefore, when choosing the color and texture of the thread, you need to focus on high quality yarn (hypoallergenic dyes, non-fading thread) and usefulness of color wave for the baby's vision.
It is better to postpone the purchase of knitting threads dyed in “acid” colors until the child reaches adulthood or adolescence.
Material and texture
 For newborn babies, we choose threads made of cotton, bamboo or thin low-pile that are pleasant to the touch. yarn of the best quality.
The absence of lint should be given special attention so as not to provoke the development of allergic reactions in the child due to the entry of thread particles into the respiratory tract.
The yarn should be soft and not cause discomfort when touching it.
If there are no skin problems, options mixed with acrylic are acceptable.
Design, knitting method, complexity of pattern and finishing
 Using the same pattern you can create a huge number a variety of overalls and overalls for various purposes, differing in design (knitted or crocheted), pattern design, trim, material and color of threads. Therefore, for a beginning knitter, it is better to choose the simplest and most structurally concise models with a minimum number of elements that are difficult to implement. The same applies to the knitting methods and patterns used.
In order for the work to bring joy to the needlewoman and the person for whom the item is intended, it is better to arm yourself with those knitting tools that the craftswoman has already mastered well for the first tests. Even two structurally identical models, knitted with stockinette stitch and garter stitch from the same yarn will look completely different.
By combining elements connected by these basic patterns, a beginning knitter will be able to achieve the uniqueness of each item she creates. On warm days, overalls with openwork inserts made of fine yarn will look good. For the cold season, voluminous knitting in the form of weaves, braids, Aran knitting, jacquard and Tunisian knitting is suitable.
Advice: if the openwork seems too difficult to perform, you can use a little knitting trick. For example, we knit overalls for a newborn to wear during the hot season. Let's take a thin thread, and knitting needles or a hook three or four times thicker than recommended for such yarn. We make the knitting itself looser. To calculate the knitting density per centimeter of finished fabric, we make a sample by casting on ten loops and knitting 10 rows.
Master Class. We knit a cute jumpsuit for a newborn
Model parameters
 Child's age: 6 (9, 12, 18) months
Finished product size: 68/74/80/86 cm.
Knitted fabric parameters
Main pattern: stockinette stitch.
Knitting method: knitting.
Knitting density: knitted with needles No. 3 or No. 3.75, a square pattern with sides 10 centimeters in width should be made of 28 loops, knitted into 36 rows.
Materials
 Yarn:
Yarn:
- composition: 100% wool, 25 g/85 m;
- weight - 175/200/250/300 grams.
Tools:
- knitting needles No. 2.75 or No. 3;
- knitting needles No. 3 or No. 3.75;
- hook No. 2.5 or No. 3;
- accessories: buttons or buttons, colored or transparent.
Description of working with video step by step

- We knit this part in the same way as the back pattern described above to a height of 29/35/40/47 cm. At this point, we have already made one decrease on both sides.
- We knit 23/25/27/29 loops, and slip the remaining 45/49/53/57 onto a knitting pin to then form the left front.
Right shelf:

Left shelf:
- Let's return the 45/49/53/57 loops previously removed to the knitting pin and perform the last decrease in the same way as in the back to get 44/48/52/56 loops.
- Having knitted 38/43/48/54 cm from the first row, let’s begin designing the armhole, decreasing eight as for the back. The knitting needle should measure 36/40/44/48.
- At a height of 47/53/58/65 cm, remove 6/4/3/0 stitches from the neckline onto an additional needle, and then begin to bind off the loops from the neckline in each front row. For size 68/74 cm we will close once six, once four, once three, once two and once one. For size 80/86 cm we will close 13/18 loops once, three times, two two times and one three times.
- At a height of 49/55/61/68 cm, we will form the shoulder line similar to the back, closing 14/16/18/20 loops.
- Close off the 6/4/3/0 loops removed earlier.
Cast on 47/49/51/55 stitches on needles No. 3 (No. 3.75). At the same time, knit in stockinette stitch and add one on each side:
- for size 68 - five times in every eighth row and twice in every sixth row;
- for size 74 - twice in every eighth row and seven times in every sixth row;
- for size 80 - five times in every eighth row and five times in every sixth row;
- for size 86 - five times in every eighth row and six times in every sixth row.
 Continue knitting in stockinette stitch until the length of the fabric is 16/18/21/23 cm and cast off 5/5/6/6 stitches once on each side of each second row.
Let's form a sleeve cap, closing:
- for size 68, once four, once three, once four and once five loops; for size 74 - once five loops, once four and twice five loops;
- for size 80 - once 5 loops, once 4 loops, once 5 loops and once 6 loops;
- for size 86 - once 6 loops, once 5 loops and 2 times 6 loops.
Having knitted to 19/21/24/26 cm, we will close off the remaining 19 loops.
Sew the shoulder line, sew in the sleeves, sew the side seams and sleeves.
Neck:
Using knitting needles No. 2.75 (No. 3), cast on 108/112/120/124 stitches along the edge of the neckline from the front side. Then we knit two rows in garter stitch (knit).
Let's complete the design of the neck - starting from the purl row, knit one and a half centimeters with a 2x2 elastic band with an edge loop at the beginning of each row and close everything.
Leg fastening:
Cast on 7 stitches on knitting needles No. 2.75 (No. 3) and knit 37/43/49/57 cm with a 1×1 rib with an edge loop at the beginning of each row. Let's close everything and make another plank.
There's nothing better than a knitted onesie for a newborn. This unique, very interesting piece of clothing turns out to be very convenient for a newly born person. Thus, the baby is provided with complete protection from drafts and other bad weather - the back is reliably protected. Young mothers, giving preference to such clothes, can be calm about the health of the baby. Surprisingly, the girls are so enterprising that they use the presented products for newborns in order to further increase their size - this is an excellent idea for those who do not have the opportunity to purchase new insulated items every time. Jumpsuits are easy to knit, and some models can even be extended. How to make such beauty yourself? Easily! Even beginners can handle such clothes for newborn babies.
Yarn selection
It is extremely important for a newborn to choose yarn for knitting things with knitting needles in order to prevent the development of allergies and other troubles. Therefore, the range of possible varieties of thread is reduced by 100% of wool, which is not used for independent “production” of clothes for children with allergies. A newborn is a child “not examined”, so young parents cannot take risks.
To independently knit such a thing with knitting needles, it is better for children to choose acrylic, cotton, or bamboo. By the way, the latter type is the best yarn for children's things, since the thread is non-sharp, and the colors are pleasing with their variety of colors. It is also noted that bamboo holds its shape well - if knitting needles are used in the work, this factor is fundamental in the choice.
For those who want to dress their baby warmer, acrylic varieties with a slight addition of wool are suitable. For example, Krokha Troitskaya contains 80% acrylic and only 20% wool - a figure that is insignificant in provoking an allergic reaction. Among the most popular are Baby Wool from Alize - wool, acrylic, bamboo are included here, so the properties of the yarn lie in the elasticity, warmth and shape of the finished product.
Self-calculation

Choosing a size seems to be the most difficult task, especially if you are knitting clothes for a newborn baby - after all, it is impossible to know exactly what height or weight the baby will be born with. On average, newborns weigh from 2.5 to 4 kg - these are sizes from 44 to 62 children's rulers. If a child was born of average height - from 49 to 53 cm, then he should knit clothes of size 56. Provided that clothes for newborns are knitted “blindly”, it is better to use the standard size - 56, since most children are born weighing from 3 to 3.5 kg, with a height of 50 to 52 cm. When calculating the size, the fact of putting the finished item on additional clothing is taken into account - a blouse and panties, so let the size be chosen larger. This way, the clothes will not hinder the child’s movements, and he will feel comfortable while walking.
As for the patterns, when choosing them, they are guided by the convenience of the baby. Imagine lying on raised aranas or other textured patterns. Surely, you will feel discomfort due to the characteristic relief. Even a small hair bothers babies, and a crumb under the back will be an unbearable torment. Therefore, when independently designing overalls for a newborn, they are guided by convenience, as a result of which they give preference to “weakly expressed” patterns.
Stocking or garter stitches are suitable here; you can slightly decorate the product with a pearl pattern or checkerboard pattern; transverse stripes of knit and garter stitch are often used. Braids and openwork are strictly excluded.
Several models of independent implementation
Having chosen the yarn and selected the necessary knitting needles, we begin making the sample. To do this, you need to cast on 20 to 25 loops on the working tool and knit with the pattern used later, 10 cm in height. The sample is then moistened, dried or steamed and allowed to rest. When the sample is ready, carry out the appropriate calculations - you should measure how many loops and rows fit in 1 cm. Based on the results obtained, make a calculation for your size. Get started knitting by choosing one of the patterns below.
Method from below

Overalls for a newborn are knitted in three ways, one of which is recommended for beginners. This method involves knitting the fabric from the bottom, so the sleeves will have to be knitted separately.
So, as an example, we’ll take a simple model with a zipper without the need to make a special placket with buttons. A zipper is not the best fastener for a newborn baby, but young mothers who have never taken on such complex things may deviate from the rules. The following model is given with a detailed description:
- Cast on 50 loops, knit 4-5 cm with a 1x1 or 2x2 elastic band. Continue to the main pattern, going another 13-14 cm. Tear off the thread, leaving a long end.

- Start the second leg in the same sequence as the first. One pair of working tools should produce two canvases of the lower part of the future item. When knitting the second half, the thread is not torn off, but the work continues.
- Proceed with the connection. To do this, determine the front and back of the future product. Start from the edge of the pant leg. Having reached the end of the row, simply move the second part and continue with the main pattern. The second trouser leg is knitted to the end of the row, the work is turned.

- Next, knit with the main pattern to the armhole - this is approximately 23-25 cm. It is better to increase the length of the back and front, since this model does not imply adding a certain gap between the legs, and the presence of a diaper on the baby can significantly “eat” the upper part, as a result of which the clothes will end up small.

- Once you reach the armhole, use the standard shaping method. Here you need to knit 23 loops, bind off the next 4 loops, go through 46 backs, bind off the next 4, finish the row with the last 23 loops. Subsequently, the shelves and back are knitted separately.
- First, you should knit the flange that remains with the thread. To do this, unroll the work and go through 20 stitches, knit the last two together, make the last one an edge stitch - go through it purl-wise. Unfold the work, knit the intermediate row, make another decrease to form the armhole. In conclusion, you should end up with 21 stitches along with two outer edge stitches. Reach the neck, making similar decreases from the side of the future lightning.
- The second shelf and back are formed symmetrically. And in the shoulder seams the threads come off.
- They move on to making sleeves - for this, 50 loops are also cast on, first knit 4-5 cm with 1x1 fabric, then 12-14 cm with the main pattern. There is no need to use the set-in type - just make the same decreases that were used to decrease the armhole, knit another 2-3 rows, finish the sleeves by closing the edge of the product.
- Upon completion, all parts are ironed or soaked and dried. They move on to stitching the parts together, which can be done with a needle or crochet. To form the neckline, place loops on circular knitting needles from the edges of the parts and finish with an elastic band of 3-4 cm.
- After all the steps are completed, sew on the zipper.

The presented model turns out to be a specific template for overalls for newborns, where each woman can show her imagination and add some individual feature. In the same sequence, you can make a jumpsuit with a hood, which it is advisable not to knit separately and sew on (this can lead to chafing of the neck with the resulting seam), but knit in one piece using the same technique as tying the neckline. Simply pick up the stitches and then knit the hood using the model or pattern.
You don’t have to sew the legs, but make the edge with an elastic band, making holes for the buttons in it - thus, you get a model with the ability to change the diaper without removing it.
Method from above

Overalls for a newborn can be knitted at the top using raglan. This method can be mastered by both careful craftswomen and attentive beginners, since the method involves performing a certain calculation. Knitting starts at the top from the neckline and continues further, separating the formation of the sleeves by throwing the loops onto auxiliary knitting needles. Pants are knitted in a similar way - the main fabric is divided into two parts strictly in half, after which the halves are knitted separately.
So that the work does not cause difficulties, start knitting the product with a zipper. An example of such a model is presented in the following sequence (the quantity should be calculated in accordance with the selected yarn and the size required for the child):
At the end of the work, sew the zipper so that it does not interfere with the baby’s groin area and does not rub the ends of the chin.
For growth

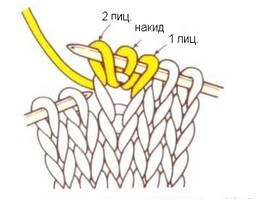
If there is a desire or need to knit overalls for growth, you should give preference to a slightly different model - the product should be knitted only from individual parts and sewn together using a knitted (mattress) seam. You can also use a needle and simple thread - here the stitching technique is suggested in the picture below. As the baby grows, the products are embroidered and tied in any convenient way. Some  craftswomen prefer to make crochet ties along all edges of the part, which are then sewn again with a knitted seam.
An example of the technique for making such clothing is presented in the following sequence:

In the future, if you need to increase the size of the overalls, you will have to not only embroider the product into parts, but also undo the neckband, which will then have to be re-knitted to the updated size. For convenience, the presented model is made with the ability to conveniently change a diaper - buttons are sewn to the running seam on the panties of the overalls. To do this, from the edge of one pant leg to the edge of the other, pull loops from the edge onto a knitting needle and knit with an elastic band with preliminary formation of holes for buttons. If you increase it, you will also need to undo this elastic band and tie a new one to the new size. There is no need to change the zipper after a corresponding increase in size, since an elastic strip can be tied on the shelves as a tie. Sew on buttons and the newborn’s clothes will not only be enlarged, but also updated. 
Knitting overalls is not difficult even for beginners, because if you follow the presented description and patterns, you can create something original in a few evenings, suitable for the individual characteristics of a young mother and newborn baby. For girls, women are recommended to use warmer colors - pink, lilac, white. For boys, you can purchase a soft blue or light green shade of yarn, which will give the product not only originality, but also sunny joy.
A hand-knitted jumpsuit for a baby for his first birthday is a very important mission that any knitter can accomplish, even if she just recently tried her hand at this for the first time. You just have to familiarize yourself with a few important features of working with overalls for newborns, and you can start knitting.
Knitted overalls for newborns
In addition to hats, pants and vests, overalls themselves are universal clothing for tiny children for any time of the year. In addition, they protect from cold and wind, they are easy to put on and take off, and the shapes and various cuts of overalls for newborns amaze with their cute beauty. They are crocheted or knitted, with or without sleeves, with raglan or classically, with buttons or with a zipper, with or without a hood, and the variety of designs and all kinds of knitted patterns is amazing!
It is important not to forget about convenience and practicality before knitting clothes for newborn children. You need to choose a suitable soft yarn that will not irritate the baby’s delicate skin, and knit a jumpsuit, taking into account the fact that the baby quickly grows out of it, so its size should be slightly larger than the initial parameters of a recently born child.
In order to make the jumpsuit easier to knit, and knitting mistakes could be avoided, in this article we will look at how it is created knitted overalls for a newborn with a detailed description. This is useful for both beginners and more experienced craftsmen who are looking for another model for a newborn.
How to knit a simple pattern for a baby?

There is enough time ahead for mistakes and corrections, so you shouldn’t be afraid of it, you need to get down to business as soon as possible. First, you need to choose the simplest model of knitted overalls for a baby up to one year old, to make it easier to get used to the specifics of the work. Let's try knit a jumpsuit for a baby from 0 to 6 months using knitting needles according to the master class.
Popular articles:
Jumpsuit sizes: 50/56 (62/68) 74/80.
Tools: yarn - (100% wool; 220 m/50 g) - 150 (200) 250 g beige; knitting needles No. 3; short circular knitting needles No. 3; 7 buttons.
- Knitting
Front stitch
Front rows - front loops, purl rows - purl loops.
In circular rows, knit all stitches.
Purl stitch
Front rows - purl loops, purl rows - front loops.
In circular rows, purl all stitches.
Rubber
Alternately 1 loop in stockinette stitch, 1 loop in purl stitch.
Knitting density
27 p. x 39 r. = 10 x 10 cm, knitted in stockinette stitch.
Pattern

- Progress
Pants
Cast on 44 (48) 56 stitches on the knitting needles and knit 2 cm between the edges with an elastic band, while adding 1 (3) 1 stitches in the last row.
Then knit between the edges in stockinette stitch, marking the middle stitch (= side seam).
For step bevels, add on both sides every 8th row. 0 (4) 7 x 1 p. and then in every 6th p. 7 (3) 0 x 1 p.
After 13 (15) 17 cm from the elastic band, cast on an additional 1 x 4 stitches on both sides, then leave all the loops.
Repeat for the other leg.
Front and back of trousers
Transfer the loops of the right and left trouser legs onto knitting needles, while at the beginning and end of the row add 1 edge. loop (= middle front) = 136 (148) 160 p.
Then knit between the edges in stockinette stitch.
After 16 (18) 20 cm from the elastic band of the sides, close for the strap on both sides with 1 x 4 sts.
After 21 (23) 25 cm from the elastic band, add at the marks in every 20th r. 2 x 1 p.
After 32 (34) 36 cm from the elastic, divide the work at the marks and the back part = 70 (76) 82 sts and the front parts = 31 (34) 37 sts each. Finish separately.
Left and right front parts
Left: For one-piece sleeves on the right edge, add in every 2 r. 1 x 1 p., 3 x 2 p. and 1 x 3 p.
After 38.5 (42.5) 46.5 cm from the elastic band for the neck, close 1 x 5 sts along the left edge and then in every 2nd p. close off 1 x 3 p., 1 x 2 p. and 2 x 1 p.
After 42.5 (46.5) 50.5 cm from the elastic band, directly bind off the remaining shoulder loops.
Right: Knit the same as the left one, but in a mirror image.
Back
For one-piece sleeves, add on both sides in every 2nd r. 1 x 1 p., 3 x 2 p. and 1 x 3 p.
After 42.5 (46.5) 50.5 cm from the elastic band, close on both sides for the shoulder 1 x 29 (32) 35 sts and leave the middle 32 sts for the neckline.
Assembly
Lightly moisten the product, pin it on the pattern and leave until dry.
Sew shoulder and crotch seams.
Along the edges of the slits for the straps, cast on 81 (87) 93 sts on knitting needles and knit 1 purl row, then knit 2 cm with an elastic band between the edges, while on the left placket, after 1 cm, evenly distributed, make 7 holes for buttons - 1 close and cast on again in the next row. Close all loops.
Sew the bottom short sides of the planks from left to right.
On circular knitting needles, in addition to the remaining 32 back neck loops, cast on along the front edge of the neckline, without touching the short sides of the strips, 17 stitches each and knit 1 purl row, then knit between the edges with a 2 cm elastic band. Close all loops.
Along the edge of the sleeves, cast on 57 (63) 71 sts on knitting needles and knit 1 purl row. Then knit 2 cm with an elastic band between the edges. Close all loops.
Sew the sleeve seams. When finished, lightly steam all seams. Sew buttons.
Knitting model for girls

To make it more interesting to knit overalls for a newborn with knitting needles, you should experiment with the cut, relief or patterns. For example, choose not an ordinary closed suit, but a jumpsuit with straps. This pattern made from fine yarn is perfect for summer and will look perfect on any baby. So, let’s knit a jumpsuit for a girl in soft yellow tones.
Jumpsuit sizes: 0 (3) 6 (12) months.
Tools: yarn - Phildar Detente (93% acrylic, 7% elastane; 144 m/50 g) - 1 (2) 2 (3) skeins of white (BLANC); 1 skein yellow (MIMOSA); knitting needles No. 3 and 3.5; hook No. 3; 5 buttons with a diameter of 9 mm; 2 yellow buttons with a diameter of 15 mm.
- Knitting patterns
Front stitch
Knit (knitting needles No. 3.5): front rows - front loops, purl rows - purl loops.
Sequence of stripes
Knit in stockinette stitch alternately 2p. yellow and 2p. white thread.
Pattern for the strap
Knit (knitting needles No. 3): alternately 1 knit, 1 purl.
Emphasized decreases
Right edge = edge, knit 1, then knit 2 stitches together with a slant to the left (= slip 1 stitch like a knit stitch, knit 1 and pull it through the removed loop);
left edge = when there are 4 stitches left on the left needle, knit 2 stitches together, knit 1, edge.
Knitting density
28p. x 40r. = 10 x 10cm.
Important: the thread is very elastic, you need to let the sample sit for several hours before checking the dimensions.
Pattern

- Progress
Back and front
Start with half of the pant leg. Using white thread on knitting needles No. 3, cast on 29 (31) 33 (37) sts and knit with a pattern for the strap 1 cm = 4 p., starting the row with 1 knit.
Switch to needles No. 3.5 and knit in stockinette stitch, while using 1-gauge stitch. for sizes 1 and 3 add 1 p. = 30 (31) 34 (37) p.
For bevel through 2 (3) 5 (6) cm = 8 (12) 15 (18) r. from the bar, add 1 x 1 stitch from the left working edge, then in each next 2 stitches. 2 x 1p., 1 x 2p. = 35 (36) 39 (42) p. After 3.5 (4.5) 6.5 (7.5) cm = 14 (18) 26 (30) p. . Leave the work temporarily from the bar.
Knit the other half of the trouser leg symmetrically.
Connect the loops of both halves of the legs, adding the appropriate number of loops between them, and continue knitting straight at 70 (72) 78 (84) sts.
In 15 (17) 20 (22) cm = 60 (68) 80 (88) rub. from the bar, it is emphasized to subtract 1 x 1 p. on both sides, then after 4 p. 1 x 1p and after 6p. 1 x 1p. (in each next 6-m. 2 x 1p.) in each next 8-m. 2 x 1 p. (after 8 p. 1 x 1 p. and after 10 p. 1 x 1 p.) = 64 (66) 72 (78) p.
After 19 (22) 26 (29) cm = 76 (88) 104 (116) from the bar, knit in stockinette stitch, alternating stripes in the indicated sequence.
At the same time, for the armholes, close 1 x 4 stitches on both sides, then in each next 2 stitches. 2 x 2p. and 3 x 1p. = 42 (44) 50 (56) p.
Then knit straight and through 26 (30) 35 (39) cm = 104 (120) 140 (156) r. close all loops from the bar.
Before knitting in the same way, but start the pattern for the strap with 1 purl.
Straps
Using white thread on knitting needles No. 3, cast on 13 sts and knit 8.5 cm with a pattern for the strap, with 1 st. start and finish k2, then bind off all stitches.
Knit the second strap in the same way.
Crotch strips
Using white thread on knitting needles No. 3, cast on 41 (49) 63 (71) sts and knit with a 1cm pattern for the strap, with the 1st stitch. and all front rows begin and end with 2 persons.
Then knit 1 knit row and several rows of stockinette stitch with a contrasting color thread.
Iron the rows knitted in stockinette stitch.
Unravel these rows when assembling to the main color.
Assembly
Lightly moisten the pieces, stretch them according to the dimensions indicated on the pattern and let them dry. Sew side seams. Sew the crotch strips using a quilt stitch along the right side of the fabric. Sew 5 buttons along the crotch seam.
Tie the edges of the armholes and the neckline of the back and front with crochet number 3 using white thread 1p. Art. b/n.
Sew one edge of the straps to the back. Make 1 hole for the button, spreading the loops at a distance of 1cm from the second edge of each strap. Sew buttons to the front. At the end of the work, lightly steam all seams.
Overalls for boys with detailed description

Another important task for the expectant mother, sister, aunt or grandmother is to knit a baby boy's overalls. You can use classic patterns, or you can knit a more “playful” and interesting option. Let's considerhow to knit overalls for a newborn with short pants and a chest - a beautiful and very unusual model.
Jumpsuit sizes: 68, 74 and 80.
Tools: yarn - (100% sheep wool; 120 m/50 g) - 100 (150–150) g light gray; knitting needles No. 5; circular knitting needles No. 4, 100 cm long; 6 decorative buttons with a diameter of 19 mm.
- Knitting patterns according to patterns
Rubber
Alternately knit 1, purl 1.
Structural pattern
Knit according to the given pattern in rows in forward and reverse directions.
Read the facial rows from right to left. In purl. For rows not shown in the diagram, purl the loops.
Repeat 4 stitches wide. Repeat in height from rows 1 to 8.

Decorative reductions
From the right edge = chrome, knit 2 stitches together with a tilt to the left.
From the left edge = knit until the last 3 stitches of the row, then knit 2 stitches together, finish with edging.
2 p. with a tilt to the left
Knit 2 sts together with a slant to the left: slip 1 st as a knit stitch, knit the next stitch, then pull the removed loop through the knitted one.
Increases
Add 1 p.: from the broach between the loops, knit 1 knitted crossed loop.
Knitting density
20 p. x 28 r. = 10 x 10 cm, knitted in a structural pattern using knitting needles No. 5.
Pattern

- Progress
Cast on 78 (82–86) stitches on needles No. 4 crossed, purl the 1st row (= purl row) and continue working with an elastic band.
After 3 cm = 10 r. from the beginning of the elastic band, switch to needles No. 5 and knit with a structural pattern, while in the 1st row. evenly add 8 sts = on knitting needles 86 (90–94) sts. After chrome. Perform pattern repeat in a row 21 (22–23) times, finishing with edging.
At 5 p.m. from the elastic band, first add 1 stitch on both sides, then in every 4th row. 7 more times, 1 p. = on knitting needles 102 (106–110) p. Include added loops in the structural pattern.
After 13 (14–15) cm = 36 (40–42) r. from the elastic band, first close 28 sts on both sides, then decrease (see Decorative decreases) in every 2nd r. 2 times for 2 p. and 7 (8–9) times for 1 p., in every 4th r. 1 more time, 1 p. = 22 (24–26) p.
After 9.5 (10–10.5) cm = 26 (28–30) r. from the beginning of the decreases, first add 1 stitch on both sides, then in every 4th row. 5 more times, 1 p. = 34 (36–38) p.
After 10 r. from the last increase, decrease (see Decorative decreases) on both sides, first 1 p., then in every 10th p. 2 times 1 p. and in the next 8 p. 1 more time, 1 p. = 26 (28–30) p.
After 17 cm = 48 r. From the beginning of the decreases, continue knitting faces. satin stitch
After 2 cm from = 6 r. persons In the satin stitch, close off the middle 10 (12–14) stitches for the neckline and finish both sides separately.
To round the neckline, close from the inner edge in every 2nd r. 2 times 1 p. = 6 p. At a height of 16 (17–18) cm = 46 (48–52) r. From the beginning of the neck, make a hole for the button: chrome, knit 1, knit 2 stitches together, 1 yarn over, knit 1, chrome. In the next purl. Purl a row of yarn overs.
After 17 (18–19) cm = 48 (50–54) r. from the beginning of the neck close all 6 sts.
Finish the second side symmetrically.
Assembly
Pin the product onto the pattern, moisten and leave until dry.
On circular knitting needles No. 4, starting from the left edge of the elastic, cast on 455 (473–491) stitches evenly along the contour of the product and knit in rows in forward and reverse directions with an elastic band of 3 rows, then bind off the loops. Fold the middle part with the sides, as in the photo, and sew. Sew 2 buttons accordingly. places to the straps, 4 buttons - to the middle part as decoration. Fasten the ends of the threads.
Video lesson
Diagrams and descriptions are very helpful, but if a jumpsuit is knitted by a needlewoman for the first time, it would be best to start by watching a video with the complete process of knitting a children's warm suit with knitting needles. For this purpose, experienced craftswomen record their video master classes to help young people.
Video: Master class on knitting overalls for a newborn